Knit a Stylish Cowl Neck Hoodie with This Pattern

A cowl neck hoodie is a stylish and cozy addition to any wardrobe. With its oversized cowl neck and hood, this pattern is perfect for keeping warm in colder weather. Whether you’re a beginner knitter or more advanced, this pattern is suitable for all skill levels.
This cowl neck hoodie knitting pattern features a simple yet elegant design. It is knit in a bulky weight yarn, making it a quick project to complete. The pattern includes instructions for sizes ranging from small to extra-large, ensuring a perfect fit for everyone.
Knitting this cowl neck hoodie is a great way to practice various techniques, including ribbing, knitting in the round, and shaping. The oversized cowl neck is created by working a wide band of ribbing, while the hood is formed by picking up stitches along the neckline.
A Cowl Neck Hoodie Knitting Pattern for Cozy Comfort

Knitting your own cowl neck hoodie is a wonderful way to stay warm and stylish during the colder months. This knitting pattern provides easy-to-follow instructions for creating a cozy and comfortable hoodie that features a cowl neck. The cowl neck adds an extra layer of warmth and can be adjusted to suit your personal style. Whether you’re an experienced knitter or just starting out, this pattern is perfect for anyone looking to create their own unique and fashionable hoodie.
The pattern begins with detailed measurements and gauge information to ensure that your finished hoodie will fit perfectly. It then outlines the steps for knitting the body of the hoodie, including the cowl neck. The pattern also includes instructions for knitting the sleeves and attaching them to the body. Additionally, the pattern provides guidance for finishing touches, such as adding ribbing to the cuffs and hem.
Key Features:
- A cowl neck for added warmth and style
- Adjustable cowl neck to suit personal preference
- Detailed measurements and gauge information for a perfect fit
- Step-by-step instructions for knitting the body, sleeves, and finishing
- Opportunity for personalization through color choices and yarn selection
With this cowl neck hoodie knitting pattern, you can create a versatile and cozy garment that will keep you warm and stylish all season long. Whether you’re lounging at home or braving the outdoors, this hoodie will become a favorite in your wardrobe. So grab your knitting needles and get started on this rewarding project today!
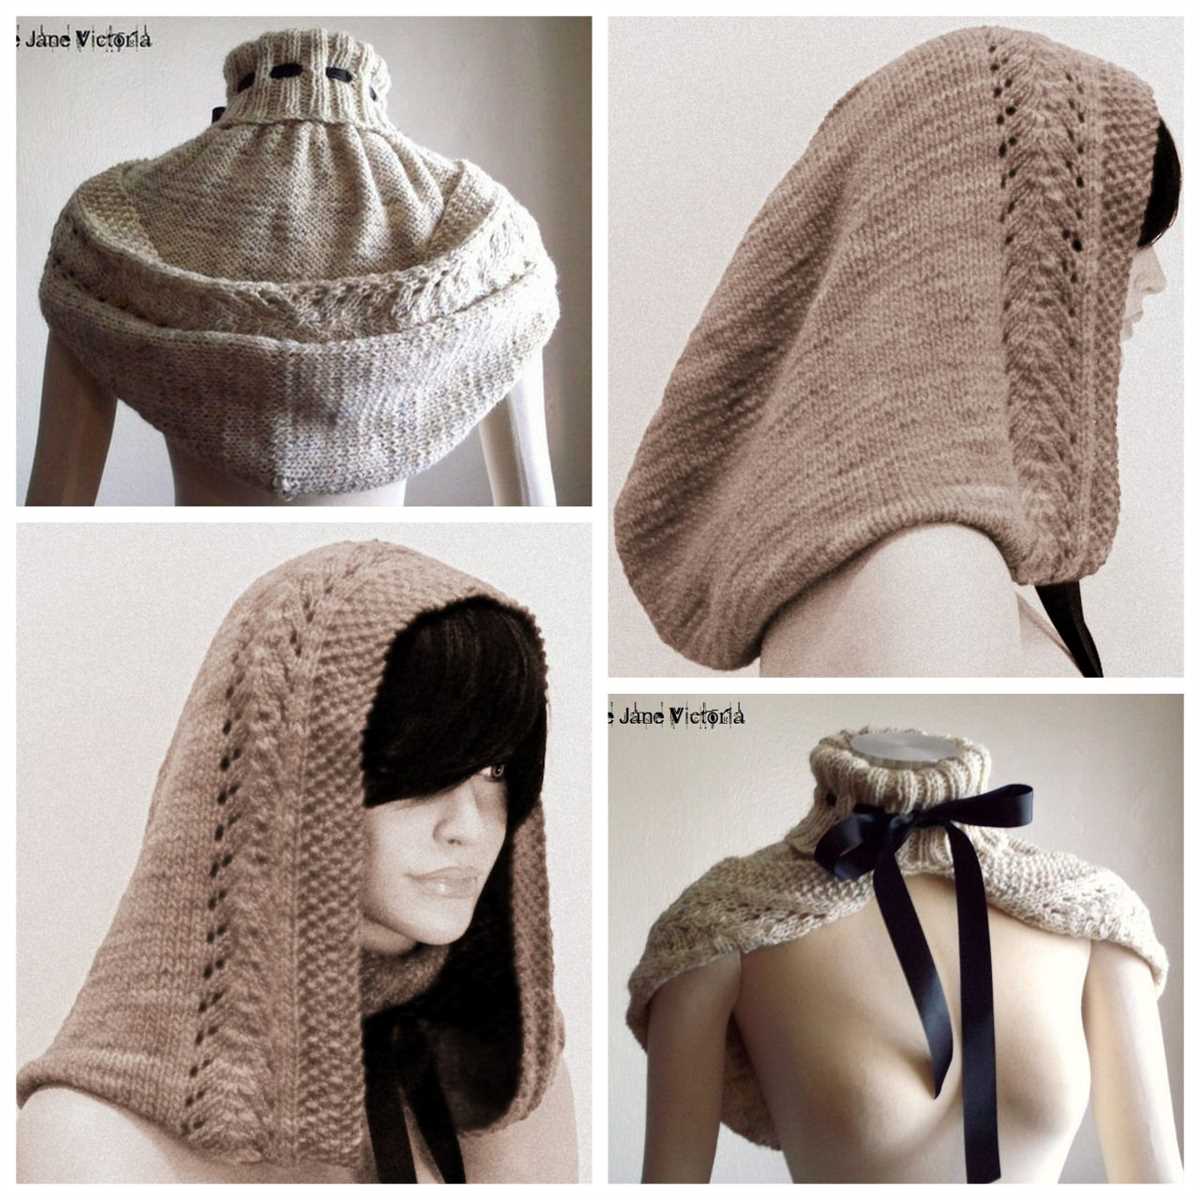
What is a Cowl Neck Hoodie?
A cowl neck hoodie is a type of sweater or sweatshirt that features a draped neckline, which is typically loose and oversized. The cowl neck is designed to drape around the neck and shoulders, creating a cozy and stylish look.
The cowl neck hoodie is popular for its unique and fashionable design. It combines the comfortable and casual style of a hoodie with the added warmth and chic look of a cowl neck. This makes it an ideal choice for those looking to add a touch of sophistication to their casual outfits.
Why Knit a Cowl Neck Hoodie?
A cowl neck hoodie is a versatile and stylish garment that can be worn in various weather conditions. The cowl neck design provides an added level of warmth and comfort, making it perfect for chilly winter days or cool summer nights. It is a practical and fashionable choice for both men and women.
One of the main benefits of knitting a cowl neck hoodie is the ability to customize it to your own preferences. You can choose the colors, yarn type, and stitch pattern to create a unique and personalized garment. By knitting it yourself, you have full control over the design and fit, ensuring that it perfectly suits your style and body shape.
Knitting a cowl neck hoodie can also be a rewarding and enjoyable experience. It allows you to unwind and relax while creating something beautiful and functional. The repetitive and rhythmic motion of knitting can be meditative and calming, reducing stress and promoting mindfulness. Additionally, completing a knitting project gives a sense of accomplishment and pride in one’s craftsmanship.
Another advantage of knitting a cowl neck hoodie is the opportunity to develop and improve your knitting skills. It is a relatively simple and beginner-friendly project, making it suitable for knitters of all levels. However, it also provides room for more advanced techniques, such as cables or colorwork, for those who want to challenge themselves.
In summary, knitting a cowl neck hoodie offers many benefits, including customization, relaxation, a sense of achievement, and skills development. Whether you are a seasoned knitter or a beginner, this versatile and stylish garment is a great project to undertake.
Choosing the Right Yarn for Your Cowl Neck Hoodie
When it comes to knitting a cowl neck hoodie, choosing the right yarn is essential. The yarn you select will not only affect the look and feel of your finished project but also its durability and warmth. Here are a few factors to consider when shopping for yarn for your cowl neck hoodie.
1. Fiber Content:
The first thing to consider is the fiber content of the yarn. Wool is a popular choice due to its warmth and resilience, making it ideal for chilly winters. However, if you’re looking for a lighter option, you might consider cotton or acrylic blends, which are perfect for layering in transitional seasons.
2. Thickness:

The thickness of the yarn, often referred to as the weight or gauge, will determine the overall look and feel of your cowl neck hoodie. Bulky or chunky yarns will create a cozy and thick fabric, perfect for cold weather. On the other hand, lighter weight yarns, such as fingering or sport weight, will result in a more delicate and lightweight garment.
3. Color and Texture:

Consider the color and texture of the yarn, as they will play a significant role in the overall aesthetic of your cowl neck hoodie. Solid colors are classic and versatile, while variegated or self-striping yarns can add visual interest to your project. Additionally, textured yarns, such as those with a boucle or tweed effect, can bring depth and dimension to your finished garment.
By taking these factors into account, you can ensure that you choose the perfect yarn for your cowl neck hoodie. Whether you prioritize warmth, versatility, or visual appeal, there is a yarn out there that will bring your knitting project to life.
Getting Started: Casting On
Before you can begin knitting your cowl neck hoodie, you will need to cast on your stitches. Casting on is the process of creating the foundation row of stitches on your knitting needles. It’s important to cast on the correct number of stitches to ensure your cowl neck hoodie fits properly. Here are a few methods you can use to cast on:
- Long Tail Cast On: This is a versatile cast on method that creates a neat and stretchy edge. To do the long tail cast on, you will need to estimate the amount of yarn you’ll need for your desired number of stitches, as you will be using both the working yarn and a “tail” of yarn to create the stitches.
- Knitted Cast On: The knitted cast on is a simple and quick method that creates a firmer edge than the long tail cast on. It’s a great option if you prefer a more stable and structured edge for your cowl neck hoodie.
- Cable Cast On: The cable cast on is a method that creates a decorative and sturdy edge. It’s similar to the knitted cast on, but involves a small twist in the process that adds extra strength to the edge.
Once you’ve chosen your preferred casting on method, you can start adding stitches to your needles. Follow the instructions for your chosen method, making sure to keep your tension even and consistent. It’s a good idea to practice your cast on technique a few times before starting the actual cowl neck hoodie, to ensure you’re comfortable with the process.
Knitting the Body of the Hoodie

Once you have finished knitting the ribbing for the hem and cuffs, it’s time to move on to the body of the hoodie. Using a circular knitting needle, start by casting on the required number of stitches, as specified in the pattern. Make sure to join in the round, taking care not to twist the stitches.
Follow the pattern instructions for the body, which will typically involve knitting in the round and possibly adding increases or decreases to shape the garment. Pay attention to any stitch patterns or color changes that are indicated in the pattern, and make sure to follow them accurately.
To keep track of your progress, you may find it helpful to use stitch markers to mark different sections of the body. This can be particularly useful when transitioning from the body to the sleeves or when working any shaping or stitch patterns.
If the pattern calls for any shaping, such as waist shaping or a longer back panel, make sure to follow the instructions carefully. This may involve increasing or decreasing stitches at specific intervals to achieve the desired shape.
Continue knitting the body until you reach the desired length, as indicated in the pattern. At this point, you can check the fit of the hoodie by trying it on or measuring it against a similar garment that fits well. Adjust the length if necessary by adding or subtracting rows.
Finally, when you have completed the body of the hoodie, you can bind off the stitches using your preferred method. Make sure to weave in any loose ends and give the hoodie a gentle blocking to help it attain its final shape.
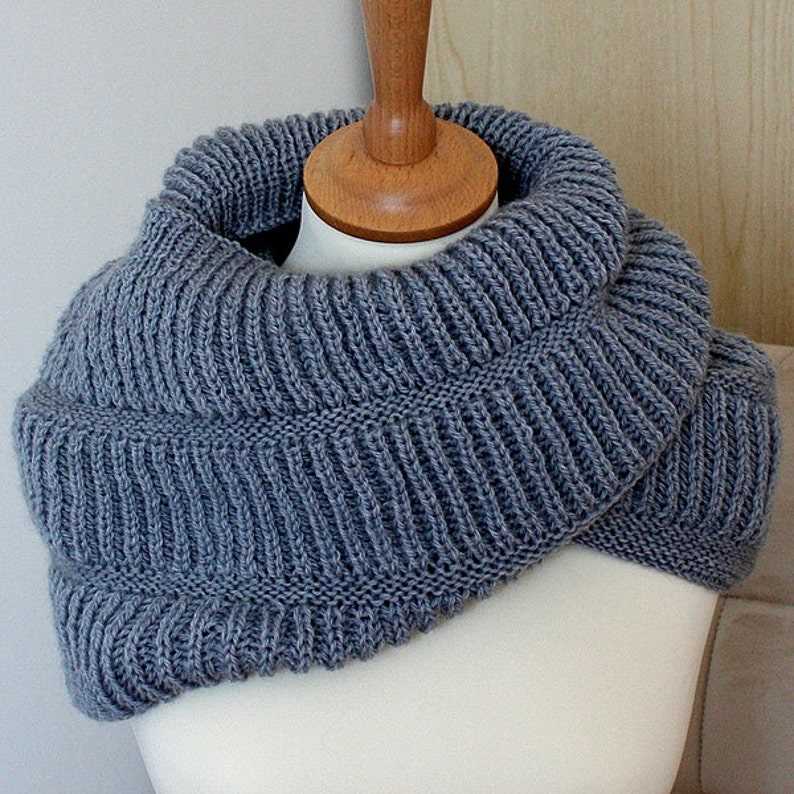
Creating the Cowl Neck
The cowl neck style is a popular choice for knitted hoodies
When knitting a cowl neck hoodie, one of the most important steps is creating the cowl neck itself. The cowl neck adds a stylish and cozy touch to the hoodie, providing extra warmth and comfort. Here are some tips and techniques to help you create the perfect cowl neck for your knitted hoodie.
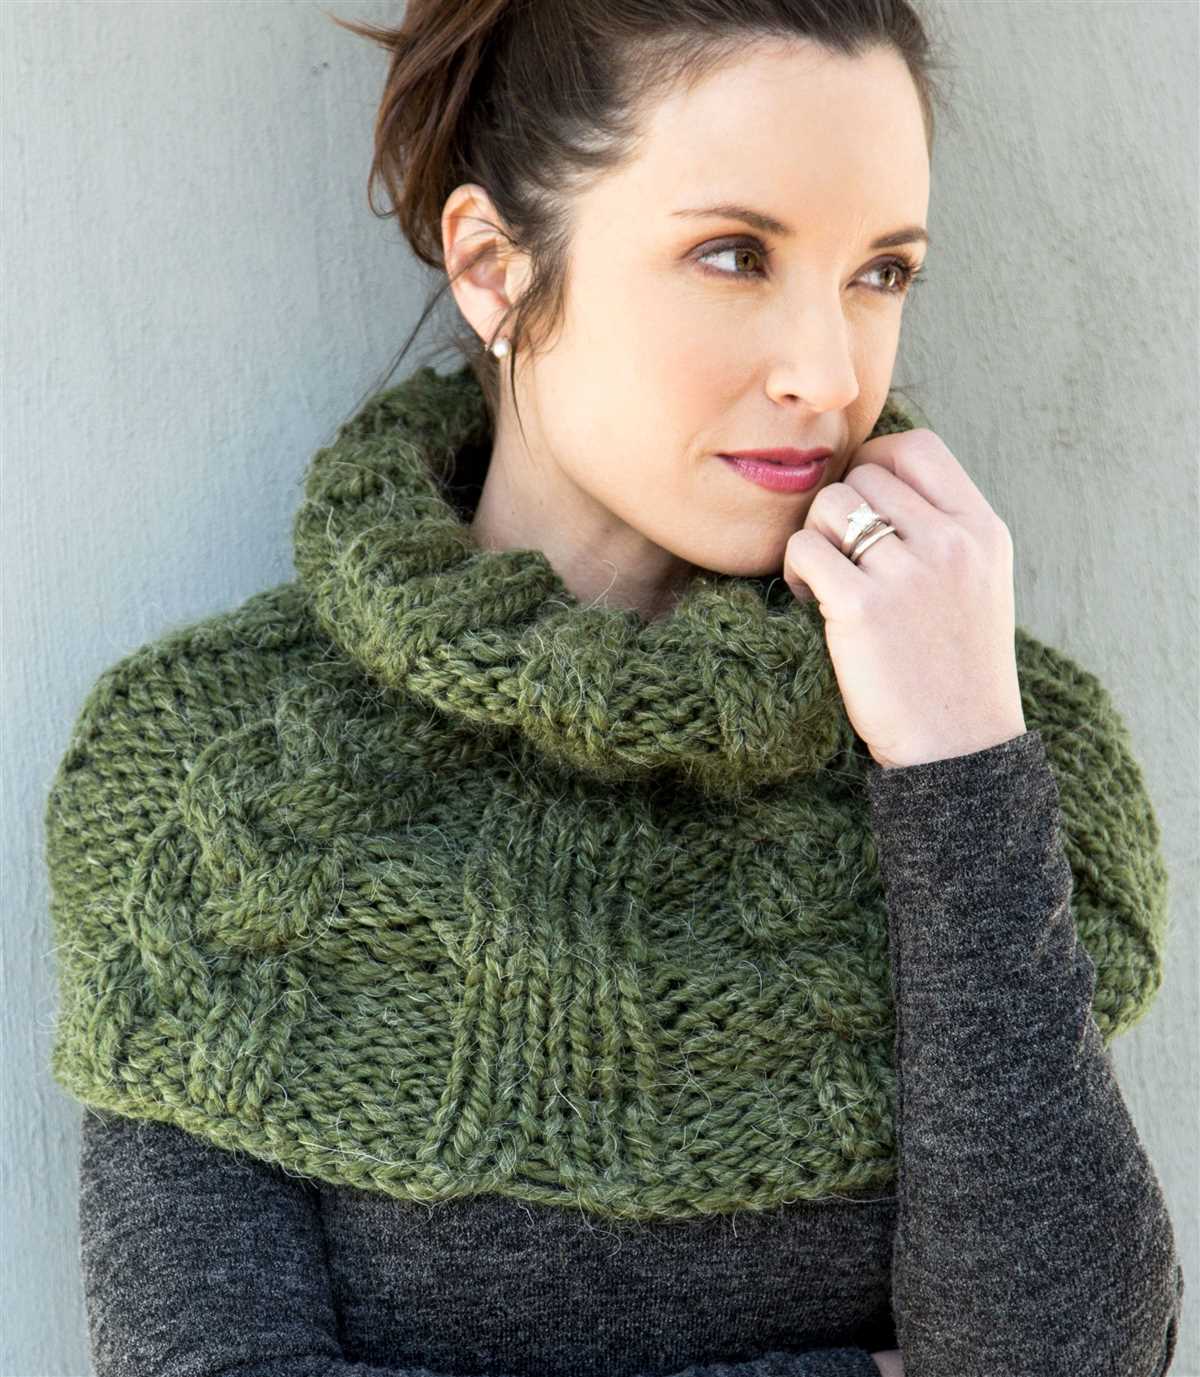
Choosing the right yarn and needle size

Before starting your cowl neck, it’s important to choose the right yarn and needle size. For a cozy and warm cowl neck, opt for a bulky or super bulky weight yarn. This will create a thick and plush fabric that will keep you warm during the colder months. Choose needles that are appropriately sized for your chosen yarn, ensuring that your stitches are not too loose or too tight.
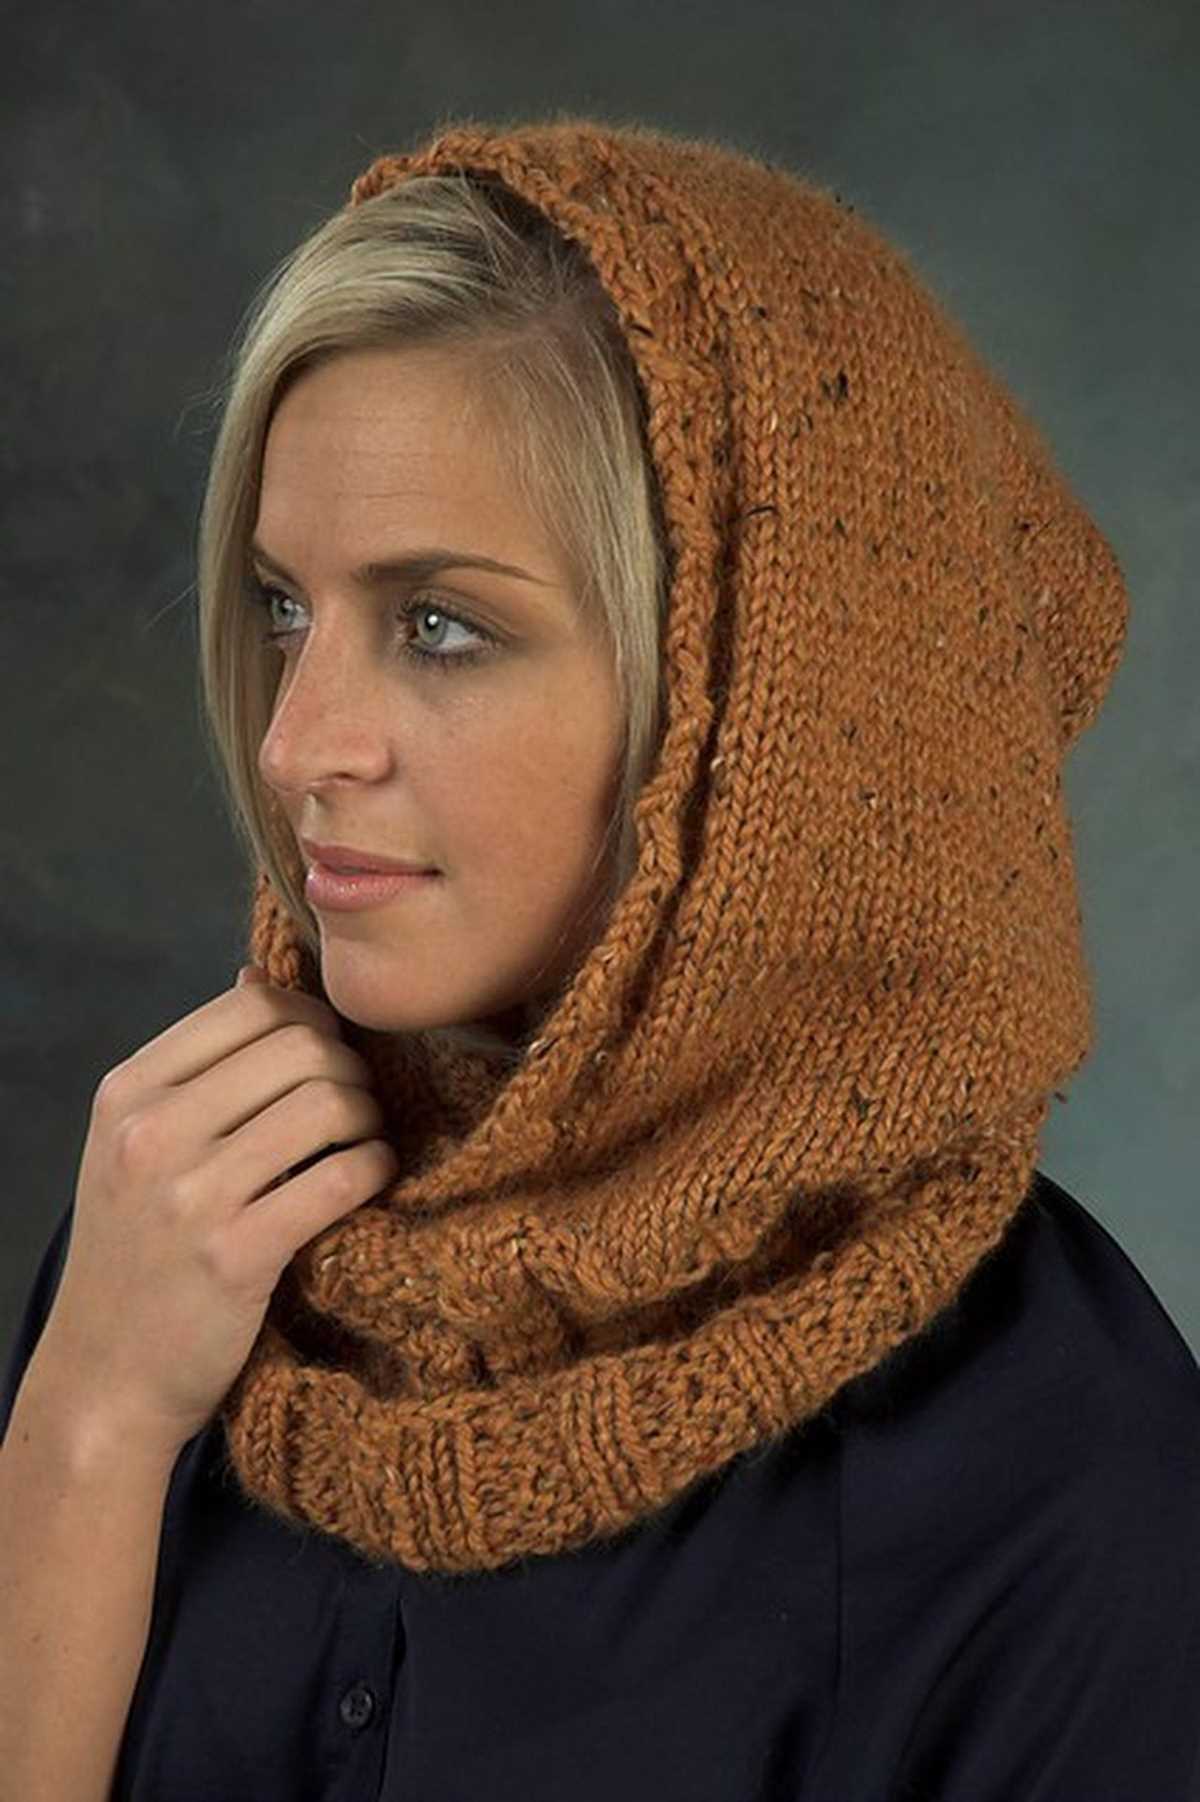
Knitting the cowl neck
To knit the cowl neck, you will typically start by picking up stitches along the neckline of your hoodie. This can be done using a smaller needle size to create a neater edge. Once you have picked up the stitches, you can begin knitting in the round. Depending on the pattern, you may need to use ribbing or a specific stitch pattern to create the desired texture for your cowl neck. Follow the instructions provided in your pattern, making sure to check your gauge to ensure proper sizing.
Addinig finishing touches
Once you have finished knitting the cowl neck, it’s time to add some finishing touches. This can include weaving in any loose ends, blocking the cowl neck to give it a smooth and even appearance, and adding any desired embellishments such as buttons or a drawstring. Take your time to carefully finish off your cowl neck, ensuring that it complements the overall design of your knitted hoodie.
By following these steps and techniques, you can create a beautiful and cozy cowl neck for your knitted hoodie. Enjoy the process of knitting and personalizing your hoodie, and soon you will have a stylish and warm garment to wear during the colder months.
In the process of knitting the cowl neck hoodie, one important component to focus on is knitting the sleeves. The sleeves are an essential part of the hoodie as they provide warmth and comfort to the wearer. They are typically knit separately and then attached to the body of the hoodie.
Knitting the Sleeves
To start knitting the sleeves, you will need the appropriate size of knitting needles and the yarn that you have chosen for your hoodie. It’s important to choose a needle size that will give you the desired gauge and ensure that the sleeves fit correctly.
Begin by casting on the required number of stitches for the sleeve. This number is typically determined by the size you are knitting and the pattern you are following. Be sure to follow the pattern instructions carefully to ensure accuracy.
Once you have cast on the stitches, you will begin the knitting process. This will typically involve using a combination of knit and purl stitches to create the desired pattern or texture for the sleeves. Follow the pattern instructions for the specific stitch pattern and row count.
Continue knitting the sleeves until you reach the desired length. This will again be determined by the pattern you are following and the length you prefer for your sleeves. You may need to knit multiple rows or rounds to achieve the desired length.
Once the desired length is reached, you can then bind off the stitches to finish the sleeves. This will secure the looped stitches and prevent them from unraveling. Follow the pattern instructions for the specific bind off method to use.
After the sleeves are completed, you can then proceed to attach them to the body of the hoodie. This can be done using a seaming technique such as mattress stitch or by picking up stitches along the armhole and knitting the sleeves directly onto the body.
Overall, knitting the sleeves for a cowl neck hoodie is an important step in the knitting process. It requires attention to detail and following the pattern instructions accurately. However, with patience and practice, you can create beautifully knit sleeves that will complete your hoodie and provide warmth and style.
Adding Ribbing to the Hem and Cuffs
When knitting a cowl neck hoodie, one important step is to add ribbing to the hem and cuffs. Ribbing not only adds a nice finished look to the garment, but it also helps to create a snug fit and prevent the edges from rolling up.
To add ribbing, you will need to switch to a smaller needle size and a ribbing stitch pattern. Generally, a size smaller than the main needle used for the body of the hoodie is recommended. For example, if you were using a US size 8 needle for the body, you could switch to a US size 7 needle for the ribbing.
To create the ribbing, you can use a simple rib stitch pattern such as k1, p1 (knit one, purl one) or k2, p2 (knit two, purl two). This creates a stretchy fabric with alternating knit and purl stitches. For the hem, you will usually work the ribbing for a few inches before continuing with the main body of the hoodie. For the cuffs, you may need to measure the circumference of your wrist or the desired width of the cuff and adjust the number of stitches accordingly.
When adding ribbing, it’s important to maintain a consistent tension and not pull too tightly, as this can cause the fabric to pucker. You want the ribbing to be slightly stretchy, but not loose. You can also consider using a smaller needle size for the ribbing to ensure a snug fit.
Overall, adding ribbing to the hem and cuffs of a cowl neck hoodie is an important step in the knitting process. It not only adds a professional finish to the garment but also helps to create a comfortable and secure fit. By following the recommended needle size and stitch pattern, you can create ribbing that complements the overall design and enhances the functionality of the hoodie.
Seaming the Hoodie
After completing the knitting of the cowl neck hoodie, the next step is to seam the different sections together to create the finished garment. Seaming is an important part of the knitting process as it ensures that the pieces fit together properly and gives the hoodie a polished look.
The first step in seaming the hoodie is to sew the shoulder seams. Fold the front and back pieces in half lengthwise and align the shoulders. Using a yarn needle and the same yarn that was used for knitting, sew the shoulder seams together using a mattress stitch. This stitch creates an invisible seam and gives a professional finish.
Next, it’s time to attach the hood to the body of the hoodie. Lay the hoodie flat with the right side facing up and place the hood on top, aligning the center points. Pin the hood in place to keep it secure. Using the same yarn and a whipstitch, sew the hood to the body of the hoodie along the neckline. Make sure to sew through both layers of fabric to ensure a secure attachment.
Once the hood is attached, it’s time to seam the sides of the hoodie. Fold the hoodie in half with the right sides together and align the side edges. Using the same yarn and a mattress stitch, sew the side seams together from the bottom hem up to the armpit. Repeat this step on the other side of the hoodie.
Finally, finish off the sleeves by sewing the underarm seams. Fold the sleeve in half with the right sides together and align the underarm edges. Using the same yarn and a mattress stitch, sew the underarm seams together. Repeat this step for the other sleeve.
Once all the seams are finished, weave in any loose ends and give the hoodie a gentle blocking to help the stitches relax and even out. Your cowl neck hoodie is now ready to wear or gift to a loved one!
Finishing Touches: Adding Buttons or Zippers
Once you have completed knitting your cowl neck hoodie, it’s time to add the finishing touches to make it functional and stylish. One popular option is to add buttons or zippers to the front of the hoodie. These closures not only add a nice aesthetic touch, but they also allow you to easily open and close the hoodie as needed.
Buttons: Adding buttons to your cowl neck hoodie can give it a classic and timeless look. Choose buttons that complement the color and style of your hoodie. You can sew the buttons directly onto the fabric using a thread that matches the yarn or opt for buttonholes if your knitting pattern includes them. Make sure to position the buttons strategically to ensure that the hoodie stays securely closed.
Zippers: Adding a zipper to your cowl neck hoodie offers convenience and versatility. Opt for a zipper that matches the color and length of your hoodie. There are two main types of zippers you can choose from: invisible and separating. Invisible zippers are concealed within the fabric and provide a seamless look, while separating zippers can be completely opened and closed. Sewing in a zipper may require a bit of skill and patience, but the end result can be stunning.
- When adding buttons or zippers to your hoodie, make sure to securely attach them to the fabric to prevent any mishaps.
- Consider the weight and stretch of your fabric when choosing the type of closure. Heavier fabrics may require sturdier closures.
- If you’re unsure about adding buttons or zippers, you can always consult a tutorial or ask for guidance from experienced knitters.
Remember, adding buttons or zippers is the final step in completing your cowl neck hoodie. Take your time and carefully consider your options to ensure that the finished hoodie meets your expectations in terms of both functionality and style.
Customization Options: Pockets, Colorwork, and Embellishments
When it comes to knitting your own cowl neck hoodie, there are plenty of ways to add your personal touch. With just a few customization options, you can take your hoodie from basic to unique and stylish.
Pockets: One popular customization option for a cowl neck hoodie is to add pockets. Whether you prefer a kangaroo-style pocket or smaller pockets on the sides, they can be both functional and decorative. Pockets can be knit separately and sewn onto the front of the hoodie, or you can even knit them directly into the design.
Colorwork: Another way to enhance your cowl neck hoodie is through colorwork. This technique involves knitting with multiple colors to create patterns, stripes, or motifs. You can incorporate a simple two-color stripe pattern or get more intricate with fair isle or intarsia designs. Adding colorwork to your hoodie can make it stand out and showcase your knitting skills.
Embellishments: For those looking for even more customization options, embellishments can take your cowl neck hoodie to the next level. You can add buttons or toggles to the front, create a decorative edging, or even sew on patches or appliques. Embellishments allow you to add personal touches and make your hoodie truly unique.
With these customization options, you can create a cowl neck hoodie that reflects your own style and personality. Whether you choose to add pockets, incorporate colorwork, or embellish with unique details, your hoodie will be a one-of-a-kind creation that you can be proud to wear.
Caring for Your Cowl Neck Hoodie
Proper care is essential for maintaining the quality and longevity of your cowl neck hoodie. By following these simple care instructions, you can ensure that your hoodie stays in great condition for years to come.
1. Washing Instructions: It is recommended to hand wash your cowl neck hoodie in cold water using a gentle detergent. Avoid twisting or wringing the fabric, as this can cause stretching or damage. After washing, gently squeeze out excess water and lay the hoodie flat to air dry.
2. Drying and Ironing: Avoid using a dryer or hanging your cowl neck hoodie in direct sunlight, as this can cause fading or shrinking. Instead, lay it flat on a clean towel to dry. If needed, you can lightly iron the hoodie on a low heat setting, making sure to place a cloth between the hoodie and the iron to protect the fabric.
3. Storage: When not in use, it is best to store your cowl neck hoodie in a cool, dry place to prevent moisture and mold. Folding it neatly and placing it in a drawer or hanging it on a padded hanger helps maintain its shape and prevent wrinkles.
In summary, proper care involves hand washing with cold water, air drying, and storing in a cool, dry place. By following these care instructions, you can keep your cowl neck hoodie looking and feeling great for a long time.