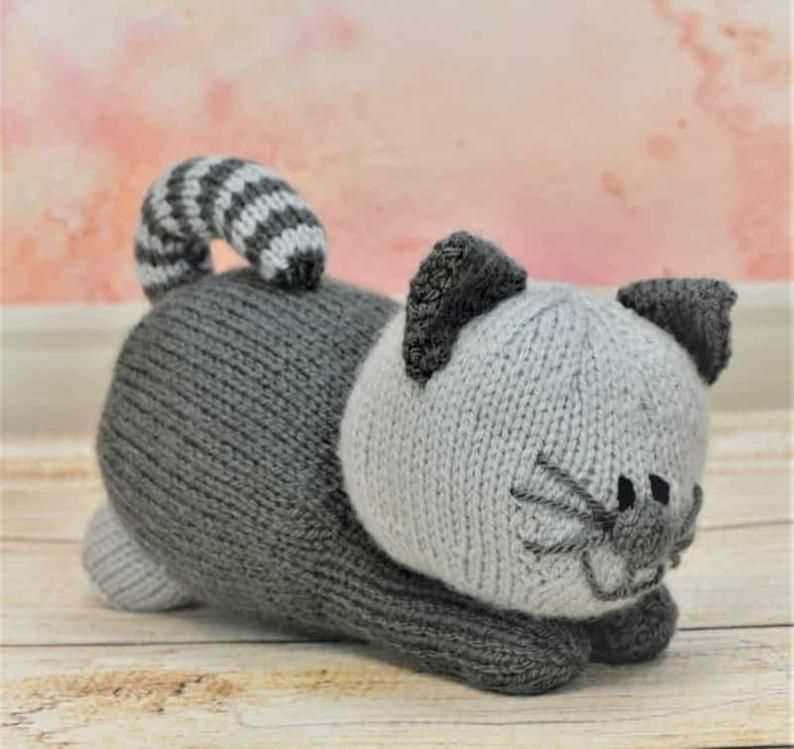
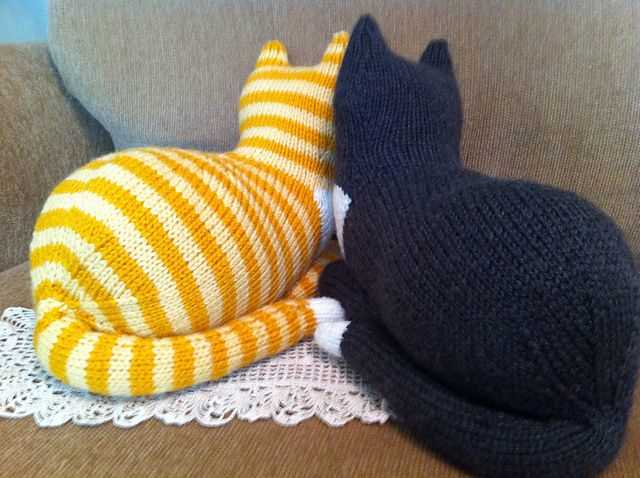
Cozy and Cute: Free Sleeping Cat Knitting Pattern

If you love cats and knitting, we have the perfect project for you! Our sleeping cat knitting pattern is not only adorable, but it’s also completely free! Whether you’re a beginner or an experienced knitter, this pattern is great for anyone looking to create a cute and cozy toy.
The sleeping cat pattern features a sweet kitty curled up in a peaceful slumber. The end result is a soft and cuddly toy that will bring joy to both children and adults alike. You can choose your own colors to personalize your cat or make it as realistic as possible. The possibilities are endless!
This free knitting pattern is easy to follow and includes detailed instructions on how to create every stitch. Whether you prefer circular or straight needles, you can easily adapt the pattern to suit your own knitting style. The finished toy measures approximately 10 inches in length, making it the perfect size for snuggling or displaying on a shelf.
So why not give this sleeping cat knitting pattern a try? It’s a great way to relax and unwind while creating a cute and cozy toy. Plus, it’s completely free, so you have nothing to lose! Grab your knitting needles and get started on this purr-fect project today.
Sleeping Cat Knitting Pattern Free
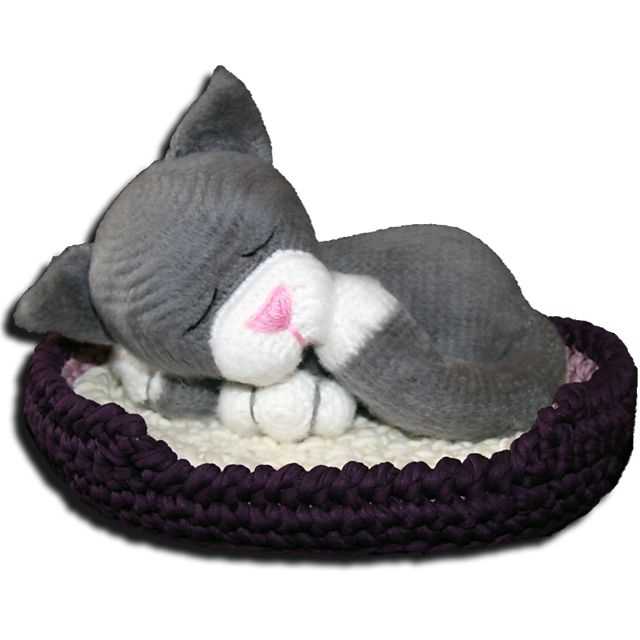
If you are a knitting enthusiast and love cats, then a sleeping cat knitting pattern is the perfect project for you. Knitting patterns allow you to create beautiful and unique pieces of handmade art. With a sleeping cat knitting pattern, you can create an adorable sleeping cat plushie or even a cozy cat-shaped pillow. The best part is, there are plenty of free knitting patterns available online, so you can easily find one that suits your skill level and preferences.
Knitting a sleeping cat can be a fun and relaxing activity, perfect for those cozy evenings at home. Whether you are a beginner or an experienced knitter, there are patterns available for every skill level. The patterns usually include detailed instructions, step-by-step guides, and even helpful tips and tricks to ensure your finished project turns out purr-fectly. Some patterns may also include additional elements like a tiny knitted blanket or a little mouse companion for the sleeping cat.
Here are a few key steps to follow when knitting a sleeping cat:
- Start by gathering the necessary materials, such as knitting needles, yarn, stuffing, and any additional embellishments you may want to add.
- Choose a sleeping cat knitting pattern that you like and download it or print it out for reference.
- Read through the pattern carefully and familiarize yourself with the instructions and techniques needed.
- Begin knitting according to the pattern, making sure to follow the recommended gauge and tension to achieve the desired size and shape.
- As you progress, stuff the cat with the filling of your choice, ensuring it is evenly distributed and firm enough to hold its shape.
- Once you have completed the knitting and stuffing, sew up any openings or seams and add any additional details, such as embroidered eyes or a tiny knitted nose.
- Finally, give your finished sleeping cat a home on your couch, bed, or shelf, and enjoy the cozy and cute atmosphere it brings.
Knitting a sleeping cat can be a rewarding and satisfying project. Not only do you get to indulge in your love for cats, but you also get to showcase your creativity and knitting skills. So why not give it a try? Find a free sleeping cat knitting pattern that catches your eye and start knitting your own adorable feline friend today!
About the Sleeping Cat Knitting Pattern
If you are a knitting enthusiast and love creating cute and cuddly toys, then the Sleeping Cat Knitting Pattern is perfect for you. This free knitting pattern allows you to create an adorable sleeping cat that can be used as a decorative piece or as a toy for young children.
The sleeping cat knitting pattern is a beginner-friendly design that can be completed in just a few hours. It requires basic knitting skills such as casting on, knitting, purling, and decreasing. The pattern includes detailed instructions and a list of materials needed to complete the project.
Key Features of the Sleeping Cat Knitting Pattern:
- The pattern is free to download and use.
- It is suitable for knitters of all skill levels, including beginners.
- The finished cat measures approximately 8 inches in length.
- The pattern includes instructions for knitting the body, head, ears, and tail separately, and then sewing them together.
- It allows for customization with different colored yarns and patterns for the cat’s fur.
- The sleeping cat is a great project for using up leftover yarn or practicing new knitting techniques.
Whether you are looking to add a cute touch to your home decor or wanting to create a special gift for a loved one, the Sleeping Cat Knitting Pattern is a fun and rewarding project that will bring joy to both the knitter and the recipient.
Materials Needed
In order to create the perfect sleeping cat knitting pattern, you will need a few essential materials. These materials will not only help you create a beautiful and intricate design, but they will also ensure that the final product is comfortable and cozy.
Yarn: To create the body of the sleeping cat, you will need a soft and cuddly yarn. Opt for a yarn that is specifically designed for knitting or crocheting stuffed animals. Choose a color that matches your vision for the sleeping cat, whether it’s a natural feline hue or a bright and whimsical shade.
Knitting Needles: You will need a set of knitting needles in the appropriate size for your chosen yarn. The size of the needles will depend on the weight of the yarn and the tension you want for your knitting project. Ensure that your knitting needles are smooth and comfortable to hold as you work on your sleeping cat pattern.
Stuffing: To give your sleeping cat its plump and cuddly shape, you will need stuffing material. Choose a soft and hypoallergenic stuffing that is safe for use in stuffed animals. Polyfill is a popular choice for stuffing, as it provides a lightweight yet voluminous filling.
Embroidery Thread: For adding details and features to your sleeping cat, you will need embroidery thread. Choose thread colors that complement your yarn choice and give depth and dimension to your cat’s face, paws, and any other desired features.
Knitting Stitch Markers: When working on complex knitting patterns, it can be helpful to use stitch markers to keep track of your progress. These small rings or clips can be placed on your knitting needles to mark specific points in the pattern, such as the beginning of a round or a specific stitch repeat.
Choosing the Right Yarn
When it comes to knitting a sleeping cat, choosing the right yarn is crucial. The type of yarn you select will greatly affect the final result of your project. There are several factors to consider when choosing the perfect yarn for your sleeping cat knitting pattern.
Fiber Content: The first consideration is the fiber content of the yarn. The most commonly used fibers for knitting projects are wool, acrylic, and cotton. Wool is a warm and soft natural fiber that provides excellent warmth and insulation. Acrylic is a synthetic fiber that is often chosen for its affordability and easy care. Cotton is a breathable and lightweight fiber that is perfect for warmer climates.
Weight: Another important factor to consider is the weight of the yarn. The weight of the yarn refers to how thick or thin the yarn is. It is typically labeled on the yarn label as a number from 0 to 7, with 0 being the thinnest and 7 being the thickest. For a sleeping cat knitting pattern, you may want to choose a medium-weight yarn (typically labeled as a 4) to achieve a balance between durability and comfort.
Color: The color of the yarn is another important consideration. You might want to choose a yarn color that matches the natural color of a cat or select a fun and vibrant color for a more whimsical look. Consider the overall aesthetic you want to achieve and choose a yarn color that complements the pattern and the environment in which the finished sleeping cat will be displayed.
Texture: The texture of the yarn can greatly affect the appearance and feel of the finished sleeping cat. Some yarn is smooth and sleek, while others have a fluffy or textured appearance. Consider the texture that will best capture the essence of a cat and create the desired look and feel for your knitting project.
Price: Lastly, consider the price of the yarn. Yarn can range in price from very affordable to quite expensive. Set a budget for your project and find a yarn that fits within your budget while still meeting your desired quality and aesthetic requirements.
Overall, choosing the right yarn for your sleeping cat knitting pattern is essential for creating a beautiful and successful finished project. Consider the fiber content, weight, color, texture, and price to find the perfect yarn that will bring your sleeping cat to life.
Choosing the Right Needles
When it comes to knitting, selecting the right needles is crucial for a successful and enjoyable knitting experience. Different types of needles have different characteristics that can affect your knitting technique and the final outcome of your project. Here are some important factors to consider when choosing the right needles for your knitting needs:
1. Needle Size
The size of the needles you choose will determine the gauge or tension of your knitting. If you are working with a thick yarn, you will need larger needles to create a loose and open fabric. On the other hand, if you are working with a thin yarn, you will need smaller needles to create a tight and dense fabric. It’s important to match the needle size to the recommended gauge in your knitting pattern to ensure your finished project turns out as intended.
2. Needle Material
The material of the needles can affect both the feel and the performance of your knitting. Common needle materials include metal, wood, and plastic. Metal needles are known for their smoothness and are great for faster knitters as they allow the yarn to slide easily. Wood needles provide a warm and natural feel, making them a popular choice for many knitters. Plastic needles are lightweight and budget-friendly, but they may not be as durable as other materials.
3. Needle Length
The length of the needles you choose depends on the size and type of your project. For smaller projects like socks and gloves, shorter needles are more convenient to handle. For larger projects like sweaters and blankets, longer needles are recommended to accommodate a larger number of stitches. It’s important to choose a needle length that allows you to comfortably work on your project without straining your hands or wrists.
4. Needle Type

There are various types of needles available, including straight needles, circular needles, and double-pointed needles. Straight needles are the traditional type and are commonly used for flat knitting. Circular needles are versatile and can be used for both flat and circular knitting. Double-pointed needles are used for knitting in the round, particularly for small projects like socks and hats. The type of needles you choose will depend on your knitting project and personal preference.
By considering these factors and experimenting with different types of needles, you can find the perfect needles for your knitting projects. Remember, everyone’s knitting style is unique, so don’t be afraid to try out different needles to find what works best for you.
Step-by-Step Instructions
Knitting a sleeping cat can be a fun and rewarding project. Follow these step-by-step instructions to create your own adorable knitted cat:
Materials Needed:
- Knitting needles (size and type appropriate for your yarn)
- Yarn in the desired color for the cat
- Yarn in a contrasting color for the face and paws
- Yarn needle
- Polyester stuffing or yarn scraps for filling
- Scissors
Step 1: Cast On
Start by casting on the required number of stitches for the cat’s body. You can refer to the knitting pattern for specific instructions on the cast-on method and stitch count.
Step 2: Knit the Body
Continue knitting in the desired stitch pattern mentioned in the pattern for the specified number of rows to create the cat’s body. Make sure to follow the pattern carefully, as it will provide guidance on any additional shaping or color changes.
Step 3: Create the Legs and Tail
Once the body is complete, set aside stitches for the legs and tail according to the pattern. These sections may involve knitting in the round or using a separate set of needles. Follow the pattern instructions to shape the legs and tail and attach them securely to the body.
Step 4: Knit the Face and Ears
Switch to the contrasting yarn color and knit the face and ears separately, following the pattern’s instructions. It may involve simple shaping techniques to create the cat’s face and ears.
Step 5: Assemble the Cat
Using a yarn needle, sew the face, ears, and any other separate pieces onto the body of the cat. Make sure to attach them securely and neatly.
Step 6: Stuff and Finish
Fill the cat’s body with polyester stuffing or yarn scraps to give it a plump, cuddly appearance. Once filled, close the opening neatly using the yarn needle. Trim any excess yarn and weave in any loose ends to finish the project.
Follow these step-by-step instructions, and you’ll have a lovely sleeping cat knitted by yourself in no time!
Working on the Body
Once you have finished knitting the head and ears of the sleeping cat, it is time to move on to the body. The body of the cat is made up of a series of rows and stitches, which will create the shape and size of the cat. It is important to pay attention to the pattern instructions and make sure you are following them correctly.
To start working on the body, you will need to cast on a certain number of stitches, as specified in the pattern. You can use a knitting needle size that is comfortable for you and will give you the desired gauge. It is always a good idea to make a gauge swatch before starting the project to ensure that your measurements will be accurate.
Once you have cast on the stitches, you will begin working in the specified stitch pattern, which may involve knit and purl stitches, as well as increases and decreases. It is important to keep track of your rows and stitches as you go along, especially if you need to make any adjustments or modifications to the pattern.
As you work on the body of the cat, you may also need to shape certain areas, such as the tail or legs. This can be done by increasing or decreasing stitches in specific rows, as instructed in the pattern. It is important to follow the pattern instructions carefully to achieve the desired shape.
Depending on the pattern, you may also need to incorporate any additional design elements, such as color changes or stitch patterns. This can add extra interest and detail to the body of the cat. Be sure to refer to the pattern instructions for any specific details or techniques.
As you progress through the body section, remember to take breaks and rest your hands if needed. Knitting can be a repetitive motion, and it is important to take care of your body to prevent strain or injury. Enjoy the process of knitting the body of the sleeping cat, and soon you will have a cute and cuddly companion to display or gift to a loved one.
Knitting the Legs and Paws
When knitting the legs and paws for your sleeping cat, it’s important to pay attention to the details to achieve a lifelike and adorable finished product. To start, cast on the desired number of stitches for the leg, usually around 14 to 16 stitches. You can use double-pointed needles or a circular needle, depending on your preference.
Once you have the leg stitches cast on, you will begin working in the round to create the tube shape. Knit every round until the leg measures the desired length, usually around 2 to 3 inches. Remember to use the pattern’s recommended yarn and needle size to ensure the correct gauge.
For the paws, you will decrease the number of stitches gradually to create a tapered shape. You can use various decrease methods such as knit two together (k2tog) or slip, slip, knit (ssk). Follow the pattern instructions for the specific decrease method and placement.
To give the paws a more realistic look, you can also add small details such as using a different color yarn for the toes or embroidering tiny claws using a contrasting color. These details will make your sleeping cat knitting project even more special.
Once the legs and paws are completed, you can continue knitting the body and head of the cat. Remember to always read and follow the pattern instructions carefully to ensure a successful outcome. Happy knitting!
Creating the Ears and Tail
Once you have finished knitting the body of your sleeping cat, it’s time to move on to creating the ears and tail. These small details will bring your cat to life and add a touch of personality to your finished project.
Ears:
To create the ears, you will need two double-pointed needles. Start by casting on stitches onto one of the needles. The number of stitches will depend on the size of your cat and your desired ear shape. For smaller ears, you can cast on around 6 stitches, while for larger ears, you may need to cast on 8 or more stitches.
Once you have cast on the desired number of stitches, you can begin working in the round. Knit the first row, then purl the second row. Repeat these two rows until the ear reaches the desired length. For shorter ears, you may only need to repeat the pattern a few times, while for longer ears, you may want to repeat it several more times.
Tail:
The tail of the sleeping cat can be made using the same double-pointed needles and knitting technique as the ears. Start by casting on a small number of stitches, around 4 or 6, depending on the thickness you want for your tail. Once you have cast on, work in the round, knitting each row until the tail reaches the desired length.
If you want to add some texture to the tail, you can experiment with different stitch patterns, such as ribbing or seed stitch. This will give the tail a more realistic look and feel. Once the tail has reached the desired length, bind off the stitches and secure the end of the yarn.
Adding the Facial Features
Once you have completed knitting the body of the sleeping cat, it’s time to add the facial features to give it an adorable look. Follow these steps to achieve the desired result:
Embroidering the Eyes
To create the eyes, thread a needle with black embroidery floss. Using a small stitch, make two diagonal stitches to form each eye. Leave a small gap between the stitches to create a glint in the eyes. Once both eyes are complete, secure the floss at the back of the head and trim any excess.
Adding the Nose

To add the nose, thread a needle with pink embroidery floss. Starting from the center of the face, make a small vertical stitch to form the outline of the nose. Then, create two small diagonal stitches on either side of the vertical stitch to complete the shape. Secure the floss at the back of the head and trim any excess.
Embroidering the Whiskers
To create the whiskers, thread a needle with white embroidery floss. Starting from the sides of the nose, make three or four small horizontal stitches on each side to form the whiskers. Space the stitches evenly apart and trim any excess floss at the back of the head.
Once you have completed these steps, your sleeping cat knitting project will have a charming face that will add extra cuteness to the finished piece. Take your time and make sure to secure the embroidery floss properly to ensure the facial features stay in place.
Finishing Touches
Adding the finishing touches to your sleeping cat knitting project is what truly brings it to life. After completing the main body and legs, you can focus on adding all the little details that make your knitted cat look realistic and adorable.
One important step is embroidering the facial features. Using a contrasting yarn color or embroidery thread, carefully stitch on the eyes, nose, and mouth. This will give your sleeping cat a cute and expressive face. You can experiment with different stitch techniques to achieve different looks.
To give your knitted cat a touch of elegance, consider adding a collar made of ribbon or yarn. You can attach a small bell or charm to the collar for extra charm. This will make your sleeping cat look even more like a beloved pet.
Another fun detail to add is a cozy knitted blanket or pillow for your sleeping cat. Knit a small rectangle or square in a complementary color and place it underneath your cat’s body. This will add a cozy and inviting element to your finished project.
Finally, don’t forget to give your sleeping cat some whiskers. Using thin wire or embroidery thread, carefully attach a few whiskers to each side of the face. This small touch will make your knitted cat look even more realistic and cute.
With these finishing touches, your sleeping cat knitting project will be complete. Take the time to add these details and see your creation come to life. Whether you keep it for yourself or give it as a gift, your knitted cat will surely be cherished by all who see it.
Tips and Tricks for Knitting a Perfect Sleeping Cat

Knitting a sleeping cat can be a fun and rewarding project, but it can also be a bit challenging. To help you create a perfect sleeping cat, we have compiled a list of tips and tricks that you can follow:
1. Choose the Right Yarn

Choosing the right yarn is essential for knitting a realistic-looking sleeping cat. Opt for a yarn that has a soft and fluffy texture, as it will give your cat a cozy and cuddly appearance. You can also choose a yarn in a color that closely matches the color of your own cat to make the finished project more personal.
2. Use the Right Knitting Needles
The size of your knitting needles can greatly affect the outcome of your project. For a sleeping cat, it is best to use smaller needles to create a tighter and more defined stitch. This will help you achieve a more detailed and lifelike look. Additionally, using circular or double-pointed needles can make it easier to knit smaller and more intricate parts of the cat’s body.
3. Follow a Detailed Pattern

Knitting a sleeping cat involves various techniques and specific instructions. Following a detailed knitting pattern can greatly simplify the process and ensure that you create a cat with accurate proportions and features. Look for free knitting patterns online that provide step-by-step instructions and include clear diagrams or images.
4. Pay Attention to Details
When knitting a sleeping cat, it’s important to pay attention to the small details that will make your cat more realistic. Focus on creating defined facial features, such as the eyes, nose, and mouth. Adding whiskers using embroidery thread can also add an extra touch of realism. Additionally, shaping the cat’s body to resemble the natural curves of a sleeping cat can make a significant difference in the overall appearance.
5. Take Your Time and Be Patient
Knitting a detailed project like a sleeping cat can be time-consuming, so it’s important to take your time and be patient throughout the process. Don’t rush through the stitches and make sure to double-check your work before moving on to the next step. Remember, the more time and effort you put into the project, the more rewarding the final result will be.
By following these tips and tricks, you’ll be able to create a perfect sleeping cat that looks cozy and adorable. Enjoy the knitting process and have fun bringing your cat to life!
Conclusion
Knitting can be a relaxing and fulfilling hobby, and what better way to showcase your skills than by creating a cute sleeping cat? With the variety of free knitting patterns available, you can easily find a design that suits your style and preferences. Whether you want to create a realistic-looking cat or a whimsical and colorful one, there is a pattern out there for you.
Knitting a sleeping cat can also be a great way to express your love for these adorable animals. Whether you are a cat lover or know someone who is, a knitted cat can make for a thoughtful and heartfelt gift. You can also use these patterns to create cat toys or decorations for your home.
To get started on your own sleeping cat knitting project, simply choose a pattern that catches your eye, gather the necessary materials, and follow the instructions. With a little time and patience, you will soon have your very own knitted sleeping cat to cuddle and admire.
- Free knitting patterns offer a variety of designs for sleeping cats.
- Knitting a sleeping cat can be a relaxing and fulfilling hobby.
- A knitted cat can be a thoughtful and heartfelt gift for cat lovers.
- These patterns can be used to create cat toys or decorations for the home.
- Choose a pattern, gather materials, and follow instructions to create your own knitted sleeping cat.