Cozy and Stylish: The Perfect Knitting Pattern for Men’s Sweaters

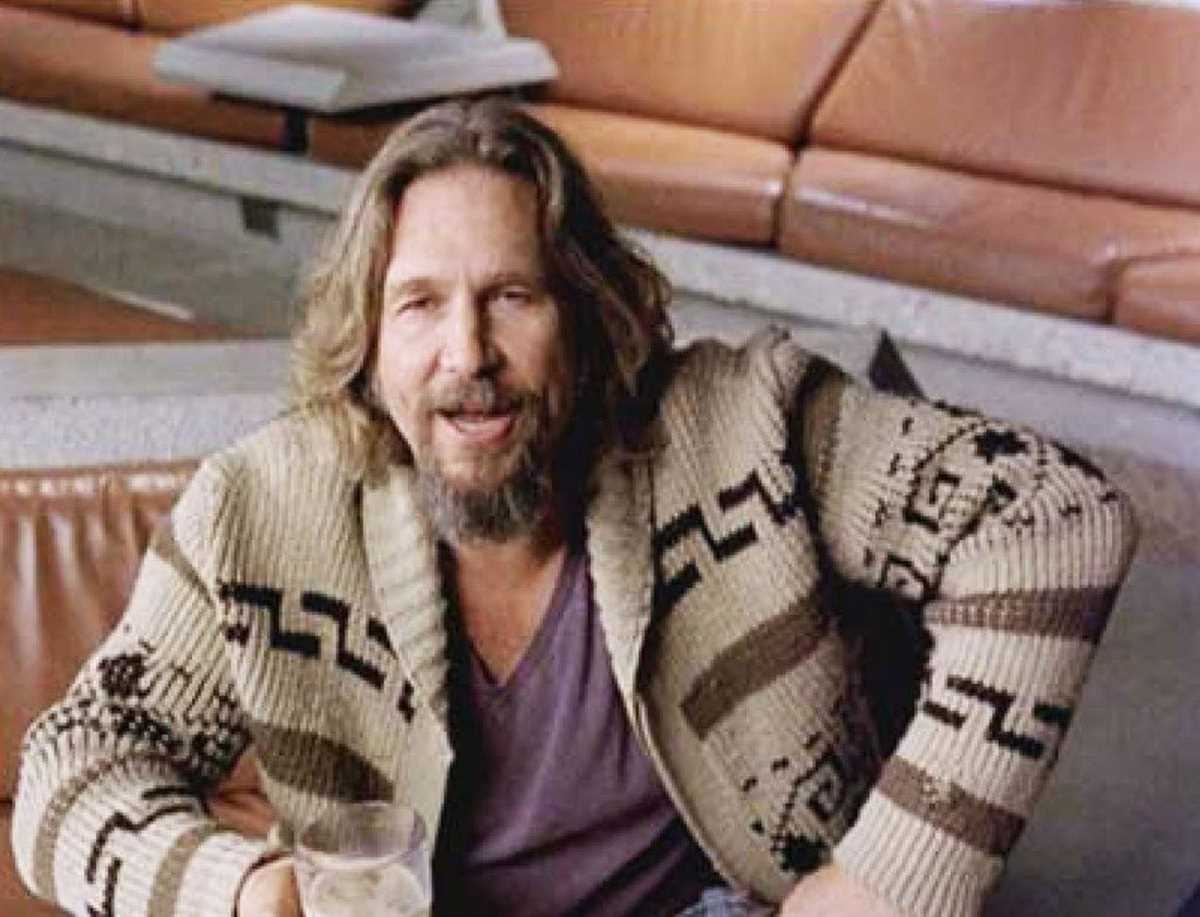
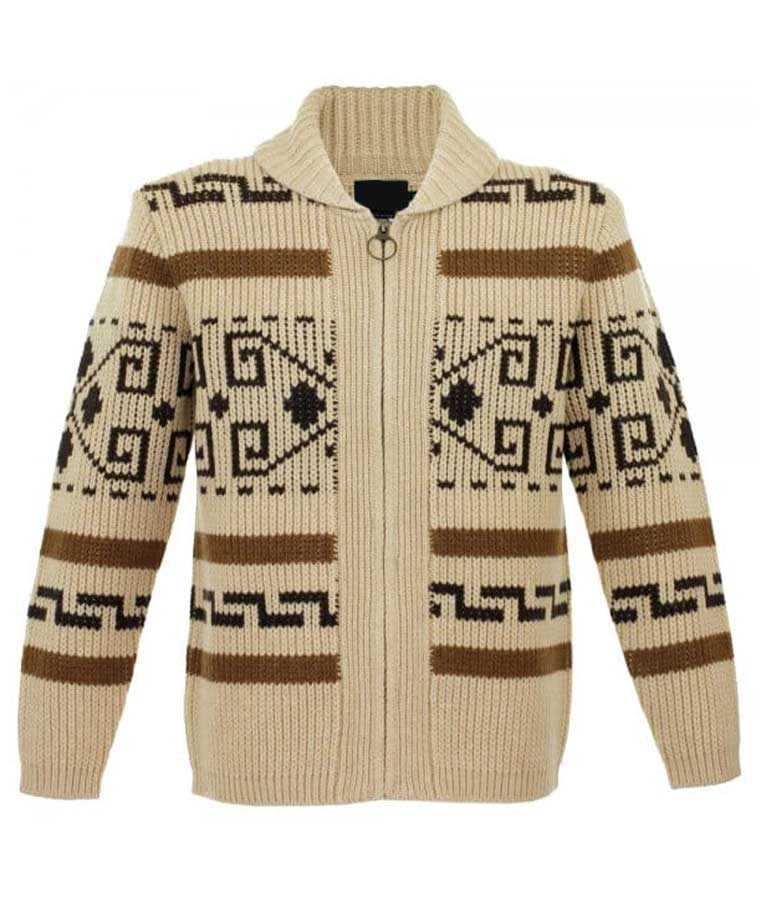
Knitting sweaters is a great way to stay warm and cozy during the colder months. And if you’re a fan of the movie “The Big Lebowski,” then you’ll love the idea of knitting your very own Dude sweater. The iconic sweater worn by Jeff Bridges’ character, The Dude, has become a cult classic, and now you can recreate it with this knitting pattern.
The Dude sweater is known for its relaxed and slightly oversized fit, making it the perfect garment for lounging around the house or taking it easy at your favorite local bowling alley. This pattern will guide you through the steps to create the classic raglan sleeve shape, ribbed collar and cuffs, and the iconic pattern on the front of the sweater.
Whether you’re a beginner knitter or have years of experience, this pattern is suitable for all skill levels. With its simple and repetitive stitches, you’ll find yourself easily getting into the rhythm of knitting this cozy and stylish sweater. So grab your knitting needles, some cozy yarn, and get ready to channel your inner Dude with this knitting pattern.
The Dude Sweater Knitting Pattern
If you’re a fan of The Big Lebowski or just looking for a cozy and stylish sweater, The Dude Sweater knitting pattern is perfect for you. Inspired by the iconic sweater worn by Jeff Bridges’ character “The Dude,” this pattern allows you to recreate his laid-back and effortless style.
The pattern begins with the classic raglan construction, which means the sleeves are knitted directly onto the body. This creates a seamless and comfortable fit. The main body of the sweater is worked in a simple stockinette stitch, allowing you to relax into the soothing rhythm of knitting. The ribbed collar, cuffs, and hem add structure and a touch of sophistication to the design.
Materials:
- Super bulky weight yarn (approximately 800-1000 yards)
- Size 11 (8mm) circular needles (32-inch length)
- Size 11 (8mm) double-pointed needles (set of 4)
- Cable needle
- Stitch markers
- Tapestry needle
Instructions:
- Cast on 64 stitches using the circular needles.
- Work K2, P2 ribbing for 2.5 inches.
- Switch to stockinette stitch and continue knitting until the body measures 16 inches from the cast-on edge.
- Place marker for the underarm on each side.
- Continue knitting in stockinette stitch for each sleeve, increasing 2 stitches at each marker every other round. Repeat this until there are 16 stitches for each sleeve.
- Knit the sleeves separately on double-pointed needles until they measure approximately 18 inches from the underarm markers.
- Join the sleeves and body, and continue knitting in stockinette stitch for another 6 inches.
- Switch back to K2, P2 ribbing and work for 2.5 inches.
- Bind off loosely.
This pattern allows for customization, so feel free to add your own personal touches. You can choose to incorporate a contrasting color for the collar, cuffs, and hem, or experiment with different stitch patterns for the body. Whatever you decide, the end result will be a cozy and stylish sweater that will make you feel like “The Dude” himself.
Choosing the Right Yarn and Needles
When it comes to knitting the perfect sweater, choosing the right yarn and needles is crucial. The type of yarn you select will not only determine the overall look and feel of your finished project, but it will also affect the ease of knitting and the durability of the sweater. Similarly, the size and material of your knitting needles can greatly impact the final outcome.
Yarn: One of the first things to consider when choosing yarn for your sweater is the fiber content. While wool is a popular choice due to its warmth and versatility, there are many other options available. Cotton, acrylic, alpaca, and cashmere are just a few examples of fibers you may want to explore. Consider factors such as breathability, softness, and the level of warmth you desire when making your decision.
Another important consideration is the weight or thickness of the yarn. Sweaters can be knitted using anything from lace weight to bulky yarn, and the weight you choose will affect the drape and heaviness of the garment. Be sure to check the pattern for any specific recommendations, as it may call for a particular weight of yarn in order to achieve the desired fit and texture.
When it comes to needles, the size and material can make a significant difference in your knitting experience. Wooden or bamboo needles tend to be lightweight and have a bit of grip, making them popular choices for many knitters. Metal needles, on the other hand, are often smoother and provide quicker knitting due to the reduced friction. The size of the needles will depend on the gauge of your pattern, so be sure to check the recommended size and adjust accordingly to achieve the desired tension in your knitting.
By taking the time to select the right yarn and needles for your sweater project, you can ensure that your knitting experience is enjoyable and that your finished sweater is everything you envisioned. Don’t be afraid to experiment with different yarns and needle types to find the perfect combination that suits both your personal preferences and the requirements of your pattern.
Getting Started: Casting On

Before you start knitting your dude sweater, you’ll need to cast on your stitches. Casting on is the process of creating the foundation row of stitches that will eventually become your sweater. It’s important to cast on the correct number of stitches to ensure that your sweater fits properly.
To begin, you’ll need a pair of knitting needles and your chosen yarn. Make sure to choose a needle size that is appropriate for your yarn weight. The pattern should specify the recommended needle size.
There are several different methods for casting on, but one of the most common is called the long-tail cast on. This method creates a sturdy and flexible edge that’s perfect for a sweater. To start, leave a long tail of yarn, approximately three times the width of the finished sweater. This will be used to create the first row of stitches.
- 1. Make a slipknot by making a loop with the tail end of the yarn and pulling the working yarn through. Place the slipknot onto your knitting needle.
- 2. Hold the knitting needle with the slipknot in your right hand.
- 3. Use your left hand to hold the tail end of the yarn and the working yarn together.
- 4. Insert the knitting needle under both strands of yarn with your right hand.
- 5. Using your right hand, bring the needle over the working yarn and under the tail end of the yarn.
- 6. Bring the needle back to its original position, creating a loop of yarn on the needle.
Repeat steps 4-6 until you have cast on the desired number of stitches. Remember to keep the stitches loose and even. Once all stitches are cast on, you’re ready to start knitting the body of your dude sweater!
The Ribbing: Creating a Neat Edge

When it comes to knitting the perfect sweater, the ribbing at the edges plays a crucial role in creating a neat and polished look. The ribbing is usually found at the cuffs, collar, and hem of a sweater, and it helps to give the garment structure and elasticity. It also adds a decorative touch to the overall design.
Choosing the Right Ribbing Pattern:
There are various ribbing patterns you can choose from, such as 1×1 ribbing, 2×2 ribbing, or even a combination of different ribbing patterns. When selecting the ribbing pattern, consider the overall design of your sweater and the look you want to achieve. A 1×1 ribbing pattern, for example, creates a tight, stretchy fabric, while a 2×2 ribbing pattern adds more depth and texture to the edges.
Working the Ribbing:
The ribbing is usually worked with a smaller needle size than the main body of the sweater. This helps to create a tighter and more defined edge. Begin by casting on the required number of stitches for the ribbing. Then, work the ribbing pattern in the desired stitch combination, such as knitting one stitch and purling the next for a 1×1 ribbing. Repeat the pattern row until the desired length is achieved.
Finishing the Ribbing:
Once the ribbing is complete, it’s important to bind off the stitches in a way that maintains the elasticity of the ribbing. A loose bind off can cause the edges to flare or lose their shape. To ensure a neat finish, try using a stretchy bind off method, such as the sewn bind off or the tubular bind off. These techniques create a flexible edge that blends seamlessly with the ribbing pattern.
By paying attention to the ribbing and taking the time to create a neat and polished edge, you’ll elevate the overall look of your sweater and ensure a professional finish.
Knitting the Body: Tips and Techniques
Choosing the Right Yarn: When knitting the body of your sweater, it’s important to choose the right type of yarn. Look for a yarn that is soft, durable, and has good stitch definition. A worsted weight yarn is a popular choice for sweaters, as it provides a good balance of warmth and drape. Consider the fiber content of the yarn as well, as this can affect the look and feel of your finished garment.
Casting On: Before you begin knitting the body of your sweater, you’ll need to cast on the required number of stitches. The long-tail cast on method is commonly used for sweaters, as it creates a neat and stretchy edge. Make sure to leave a long enough tail when casting on, as you will need to use it later for seaming the underarm sleeves.
Working the Body: Once you have cast on your stitches, you can begin knitting the body of your sweater. Follow the pattern instructions carefully, making note of any shaping or stitch patterns. It’s important to keep track of your rows or use stitch markers to mark the beginning of each round if you’re knitting in the round. This will help ensure that your sweater is symmetrical and that you don’t make any mistakes.
Shaping the Waist and Hips: Many sweaters feature waist and hip shaping to create a more fitted silhouette. This is typically done by increasing or decreasing stitches at specific intervals. Follow the pattern instructions for these shaping techniques, making sure to distribute your increases or decreases evenly across the row or round. This will help maintain the overall balance and proportions of your sweater.
Binding Off: When you reach the desired length for your sweater, you’ll need to bind off the stitches. The standard bind off method is commonly used, as it creates a firm edge that matches the cast on edge. Make sure to bind off loosely enough to allow for ease of movement in the finished sweater. You can also consider using a stretchy bind off method, such as the suspended bind off, for added flexibility.
- Choose the right yarn
- Cast on using the long-tail method
- Follow the pattern instructions carefully
- Shape the waist and hips
- Bind off the stitches
Creating the Sleeves: Methods and Measurements
When it comes to knitting the sleeves for your dude sweater, there are several methods and measurements you need to consider in order to achieve the perfect fit and style. The sleeves are an essential part of the sweater, so it’s important to take the time to get them just right.
Measurement
Before you start knitting the sleeves, you’ll need to take accurate measurements of the wearer’s arm. Start by measuring the circumference of the upper arm, just below the shoulder. This will determine the width of your sleeve. Next, measure the length from the shoulder to the desired wrist length. This measurement will help you determine the overall length of your sleeve.
Knitting Methods
Top-Down Method
The top-down method is a popular choice for knitting sleeves, as it allows you to try the sweater on as you go to ensure a good fit. With this method, you start knitting at the shoulder and work your way down to the wrist. You can easily adjust the length and width as you go to suit your measurements.
Bottom-Up Method
The bottom-up method involves knitting the sleeve from the wrist up to the shoulder. This method is ideal if you prefer to have more control over the fit of the sleeve, as you can try it on as you go. However, it can be a bit trickier to adjust the length and width once you’ve already started knitting.
Seaming
Once you have completed knitting the sleeves, you’ll need to seam them to the body of the sweater. You can use the mattress stitch or the whipstitch method to join the sleeves and the body seamlessly. Make sure to take your time and match the stitches carefully for a professional-looking finish.
With these methods and measurements in mind, you’ll be able to create sleeves that are the perfect fit for your dude sweater. Whether you choose the top-down or bottom-up method, the key is to take accurate measurements and make any necessary adjustments as you go. Happy knitting!
Joining the Sleeves and Body
Once you have completed both the sleeves and the body of your Dude sweater, it’s time to join them together to create the final garment. This process involves sewing the sleeves to the body at the armholes, creating a seamless connection.
To begin, lay the body of the sweater flat with the right side facing up. Take one of the sleeves and align its top edge with the armhole opening on the body. Make sure that the right sides are facing each other. Pin the sleeve in place along the armhole, starting at the top and working your way down to the underarm. Repeat this process with the second sleeve on the opposite armhole.
Using a yarn needle and the same yarn that you used to knit the sweater, carefully sew the sleeves to the body. You can use a whip stitch or a mattress stitch to join the pieces together, depending on your personal preference. Be sure to sew all the way around the armhole, making sure that the stitches are secure and the seam is neat and tidy.
Once the sleeves are securely attached to the body, try on the sweater to check the fit. Make any necessary adjustments, such as tightening or loosening the seam, before finishing off the edges. You can choose to add ribbing or a decorative border to the armholes and neckline, or leave them as they are for a more relaxed look.
Adding the Neckline: Collar or Crew Neck
When it comes to adding the neckline to your dude sweater, you have two main options: a collar or a crew neck. Both styles can give your sweater a unique look and provide different levels of warmth and comfort.
If you prefer a more classic and formal look, you may want to consider adding a collar to your dude sweater. A collar can add a touch of sophistication and elegance to your garment, making it suitable for more formal occasions. You can choose from different collar styles, such as a ribbed collar or a buttoned collar, depending on your preference and the overall style of your sweater.
On the other hand, if you’re aiming for a more casual and relaxed look, a crew neck might be the better option for your dude sweater. A crew neck is a simple, round neckline that sits at the base of the neck. It is a versatile and timeless style that suits many different body types and can be easily paired with jeans or trousers for a laid-back yet stylish outfit.
When deciding between a collar and a crew neck, it’s important to consider factors such as your personal style, the intended use of the sweater, and the overall design of the garment. Ultimately, the choice between a collar or a crew neck will depend on your preferences and the look you want to achieve with your dude sweater.
Finishing Touches: Weaving in Ends
After finishing the knitting portion of your dude sweater, it’s time to take care of the loose ends. Weaving in ends is an essential step to give your sweater a polished look and ensure that it doesn’t unravel over time. Here are some tips to help you with this finishing touch.
Weaving in Ends Step by Step:
- Use a tapestry needle: Choose a tapestry needle with a large eye that can easily thread your yarn. This needle will help you smoothly weave the ends into the stitches without causing any damage.
- Secure the end: Start by threading your needle with the loose end of the yarn. Then, insert the needle under the stitches on the wrong side of your work to secure the end. This will prevent it from coming undone.
- Weave through the stitches: Carefully weave the needle in and out of the stitches, following the direction of the yarn. You can go up and down the columns of stitches or diagonally, depending on what works best for your pattern.
- Repeat for multiple ends: If you have multiple loose ends, repeat the process for each of them separately. It’s essential to give each end enough length to weave through the stitches without causing any tension or puckering.
- Trim excess yarn: Once you have woven in the ends, trim any excess yarn close to the fabric. Be careful not to cut the fabric or any adjacent stitches.
By weaving in the ends, you not only ensure the longevity of your dude sweater but also create a neater finish. Take your time and be meticulous in this step, and your sweater will be ready to show off!
Blocking and Shaping the Sweater
Blocking is an important step in the knitting process that helps to shape and refine the final appearance of the sweater. After completing all the knitting, it’s time to give the sweater its final shape and size. Blocking involves wetting the sweater and carefully stretching it to the desired dimensions. This allows the yarn to relax and settle into its final form, ensuring that the sweater fits properly and looks its best.
To block the sweater, start by filling a basin or sink with lukewarm water. Gently place the sweater into the water, making sure it is fully submerged. Allow the sweater to soak for at least 15 minutes, or until it is completely saturated. Avoid agitating or wringing the sweater, as this can cause it to lose its shape or stretch unevenly.
Next, carefully remove the sweater from the water and gently squeeze out any excess water. Lay the sweater flat on a clean, dry towel, and use another towel to roll up the sweater and gently press out any remaining moisture. Once most of the water has been removed, lay the sweater flat on a blocking mat or clean towel, and use pins to carefully stretch it to the desired dimensions. Pay attention to the measurements specified in the knitting pattern, as this will ensure the sweater fits correctly.
Leave the sweater to dry completely, preferably in a well-ventilated area. This may take several days, depending on the thickness of the yarn and the humidity in the room. Once dry, carefully remove the pins and admire the beautifully blocked and shaped sweater. It’s now ready to be worn or gifted to someone special!
Choosing the Right Buttons
When it comes to finishing your dude sweater, choosing the right buttons is a crucial step. The buttons you choose can completely transform the overall look and feel of the sweater. Here are some factors to consider when selecting buttons:
- Size: The size of the buttons should be proportionate to the size of the sweater. Larger buttons can make a bold statement, while smaller buttons can create a more delicate and understated look.
- Color: Consider the color of the yarn and the overall color scheme of the sweater. Choose buttons in a color that complements and enhances the overall aesthetic.
- Material: Buttons come in various materials such as wood, metal, plastic, or even fabric-covered. Consider the texture and weight of the material and how it will blend with the fabric of your sweater.
- Style: This is where you can get creative and reflect your personal style. Choose buttons that match the overall theme of your sweater, whether it’s vintage, modern, or quirky.
- Functionality: Lastly, consider the functionality of the buttons. Do you want buttons that are easy to fasten and unfasten? Do you prefer buttons with a shank or a flat back? Think about how the buttons will be used and make a choice accordingly.
Take your time when choosing buttons for your dude sweater. Experiment with different options and see how they look against the fabric. Remember, the right buttons can elevate your sweater from ordinary to extraordinary.