A Fiery Stitch: Unleashing the Flame Knitting Pattern

Flame knitting pattern is a technique that allows you to create stunning and intricate designs that mimic the flickering flames of a fire. This eye-catching pattern adds a fiery touch to your knitted projects, making them truly unique and mesmerizing.
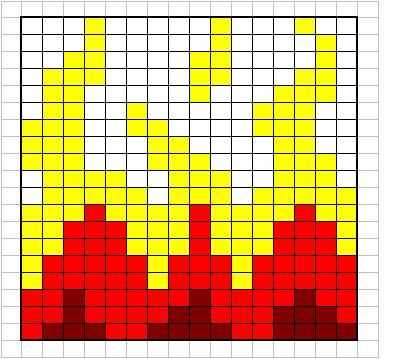
With flame knitting, you can create a range of different patterns, from simple flames to more complex fire-inspired motifs. This technique involves using colorwork to create the illusion of flames, with different shades of red, orange, and yellow blending together to create a realistic flame effect.
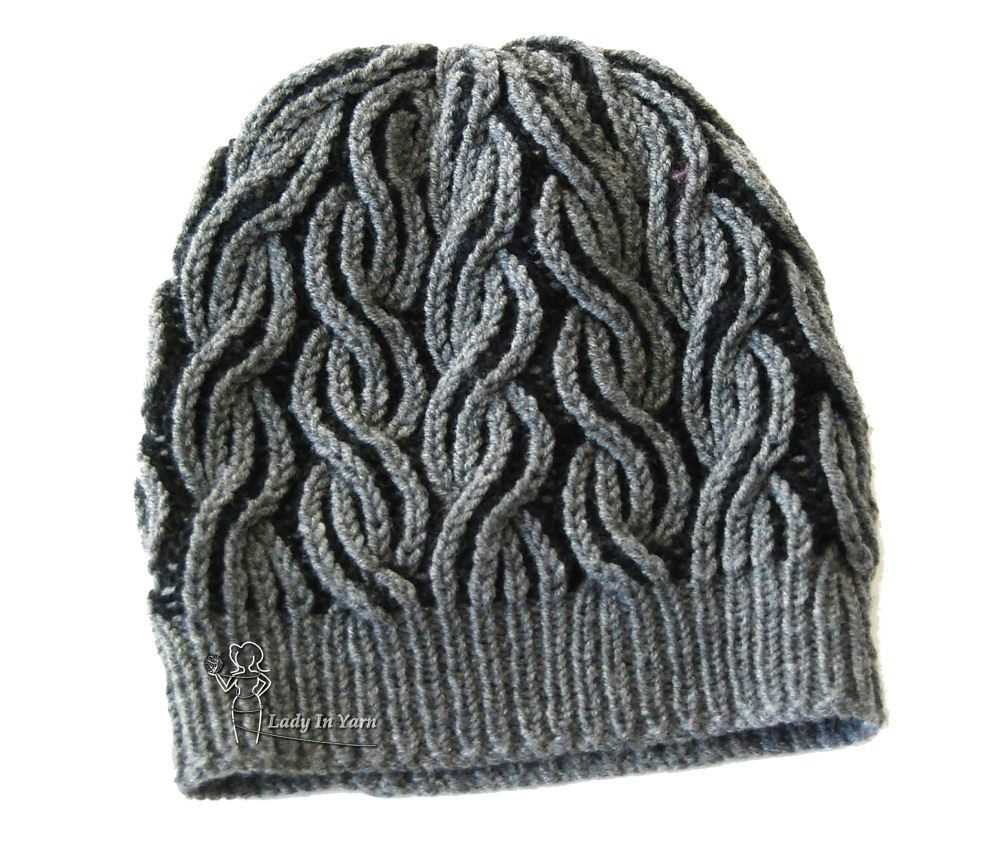
Flame knitting patterns can be used to enhance a variety of knitted items, such as scarves, hats, sweaters, and even home decor items like blankets and pillow covers. They are perfect for adding a bold and striking element to your knitting projects, and they make for great statement pieces that are sure to turn heads.
What is Flame Knitting Pattern?
Flame knitting pattern is a technique that creates a unique and eye-catching design resembling flames or fire. It is a popular choice for projects like scarves, hats, and sweaters, adding a bold and dynamic element to the finished piece.
This knitting pattern involves using a combination of different stitches and yarn colors to create the flame effect. By alternating between knit and purl stitches and strategically changing yarn colors, knitters can achieve a vibrant and textured design that resembles flickering flames.
The flame knitting pattern allows for endless creativity and customization. Knitters can experiment with different color combinations to create different flame effects, such as a warm orange and red flame or a cool blue and purple flame. They can also adjust the size and shape of the flame by altering the number of stitches and rows in the pattern.
If you’re looking to add an element of excitement and visual interest to your knitting projects, the flame knitting pattern is a great choice. Whether you’re a beginner or an experienced knitter, this technique offers a fun challenge and the opportunity to create stunning and unique pieces that are sure to turn heads.
Flame Knitting Pattern: A Step-by-Step Guide

Knitting is a popular craft that allows people to create beautiful and unique items using just a pair of needles and some yarn. One of the most eye-catching and intricate knitting patterns is the flame pattern. This pattern resembles flickering flames and adds a touch of drama to any knitted piece. If you’re interested in trying out the flame knitting pattern, here is a step-by-step guide to get you started.
Materials Needed:

- A pair of knitting needles
- Yarn in multiple colors
- Tapestry needle
- Scissors
Step 1: Cast On
To begin, cast on the desired number of stitches onto your knitting needles. The flame pattern works best with a multiple of six stitches.
Step 2: Knit Base Rows
Knit a few rows using the same color yarn to create a solid base for your flame pattern. This will make the flames stand out more.
Step 3: Choose Flame Colors
Select the colors you want to use for the flames. Traditionally, flame colors include shades of red, orange, and yellow, but feel free to get creative and use any colors you like.
Step 4: Knit Flame Motif
Start knitting the flame motif using the chosen colors. The flame motif typically consists of a series of increases and decreases to create the flame-like shape. Follow a flame knitting pattern or create your own by experimenting with increases and decreases to achieve the desired flame effect.
Step 5: Repeat Flame Motif
Once you have completed the first flame motif, repeat the pattern across the row. This will create a row of flames that will continue to grow as you knit.
Step 6: Knit Additional Rows
Continue knitting additional rows in the flame pattern until you have achieved the desired length for your project. Remember to alternate between the base color and the flame colors to make the flames really pop.
Step 7: Bind Off

When you have reached the desired length, bind off your stitches to secure your knitted piece.
With this step-by-step guide, you can easily create stunning flame patterns in your knitting projects. Whether you choose to incorporate flames into a scarf, hat, or blanket, the flame knitting pattern is sure to impress with its intricate and mesmerizing design.
Choosing the Right Yarn for Flame Knitting Pattern
The choice of yarn plays a crucial role in achieving the perfect flame knitting pattern. When selecting yarn for this technique, there are a few important factors to consider to ensure the desired result.
Fiber Content: The fiber content of the yarn can greatly impact the flame effect. Opt for yarns that include synthetic fibers such as acrylic or polyester, as they tend to create more defined and vibrant flames. These fibers have a smooth texture, which helps in highlighting the flame-like stitches.
Weight and Thickness: The weight and thickness of the yarn determine the overall drape and texture of the finished flame knitting project. For a more prominent flame effect, choose a medium to bulky weight yarn. Thinner yarns may not showcase the flame stitches as effectively.
Color Selection: While flame knitting patterns can be created using any color, it is recommended to select yarns in shades that resemble fire and flames. Opt for vibrant reds, oranges, and yellows for a realistic flame appearance. Experiment with blending or ombre yarns to create a more dynamic and realistic flame effect.
Texture and Twist: Yarn with a smooth texture and tight twist is ideal for flame knitting patterns. This helps the stitches hold their shape and creates a clean and crisp flame design. Avoid yarns with a loose or fluffy texture, as they may result in a less defined flame pattern.
Yarn Substitutions: If a specific yarn recommended for a flame knitting pattern is not available, it is possible to experiment with other yarns. Look for yarns with similar fiber content, weight, and thickness to achieve a similar effect. However, keep in mind that different yarns may yield slightly different results, so it is advised to create a swatch and gauge before starting the project.
Essential Tools for Flame Knitting Pattern

Flame knitting pattern is a popular technique that creates a unique and vibrant design on knitted fabrics. To successfully create flame knitting patterns, you will need a few essential tools. Here are some must-have tools for flame knitting:
1. Yarn:
In flame knitting, the choice of yarn is crucial in achieving the desired effect. Opt for yarns that have a blend of different colors, such as variegated or hand-dyed yarns. These types of yarns will create a flame-like effect when knitted, enhancing the overall appearance of the pattern.
2. Knitting Needles:
Choose knitting needles that suit the thickness of your yarn. The size of the needles will determine the gauge and tension of your knitting. It is advisable to use circular or double-pointed needles, depending on the project size and your knitting preferences.
3. Stitch Markers:
Stitch markers are essential for keeping track of your stitches in flame knitting. They can be used to mark specific points in your pattern, such as stitch changes or increases/decreases. Using stitch markers will help you maintain the structure and integrity of your flame knitting pattern.
4. Row Counter:
A row counter is a handy tool for keeping track of your rows in flame knitting. It helps you stay organized and ensures that you maintain the correct pattern sequence. You can use a physical row counter or opt for a digital one on your mobile device or knitting app.
5. Tapestry Needle:
A tapestry needle is essential for weaving in loose ends and finishing your flame knitting project. It allows for neat and secure finishing, ensuring that your flame knitting pattern looks polished and professional.
In conclusion, flame knitting requires the use of specific tools to achieve the desired effect. With the right yarn, knitting needles, stitch markers, row counter, and tapestry needle, you can create stunning flame knitting patterns that are sure to impress.
Getting Started with Flame Knitting Pattern
If you’re looking to add some unique and eye-catching designs to your knitting projects, flame knitting patterns are a great option. Flame knitting creates intricate flame-like patterns using simple stitches, making it accessible for knitters of all skill levels. Whether you’re a beginner or an experienced knitter, here’s how you can get started with flame knitting patterns.
Choose the Right Yarn
When it comes to flame knitting patterns, choosing the right yarn is crucial. Look for yarn that is smooth and has good stitch definition, as this will help highlight the flame-like patterns. Variegated or self-striping yarns can also add an extra dimension to the design. Experiment with different colors and textures to find the perfect yarn for your flame knitting project.
Pick the Flame Knitting Stitch
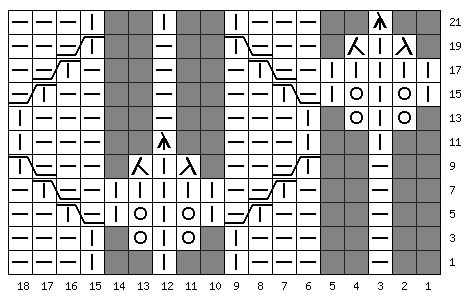
There are several different stitches that can be used in flame knitting patterns, but the most common stitch is the slip stitch. To create the flame effect, this stitch is worked by slipping the needle into the stitch below, rather than into the stitch on the needle. This creates elongated stitches that resemble flames. Practice the slip stitch before starting your flame knitting project to ensure you have a good grasp of the technique.
Follow a Flame Knitting Pattern
Once you’ve familiarized yourself with the slip stitch, you can start following a flame knitting pattern. Many flame knitting patterns are available online, in books, or through knitting magazines. These patterns will guide you through the specific stitch combinations and color changes needed to create the flame effect. Start with a simple pattern to build your confidence, and gradually tackle more complex designs as you become more comfortable with flame knitting.
Block and Finish Your Project
After completing your flame knitting project, it’s important to block and finish your work. Blocking helps even out the stitches and ensures that the flame pattern is fully visible. Follow the instructions for blocking that are specific to your chosen yarn. Once your project is blocked, weave in any loose ends and add any desired finishing touches, such as fringe or tassels. Your flame knitting project is now ready to be showcased and admired!
With these steps, you can get started on your flame knitting journey and create beautiful, flame-like patterns in your knitting projects. Remember to have fun and explore different yarns and patterns to add your own unique touch to the flame knitting technique.
Understanding the Flame Knitting Stitch
The flame knitting stitch is a popular pattern in the world of knitting, known for its unique and eye-catching design. This stitch creates a flame-like effect on the fabric, making it perfect for creating bold and striking garments or accessories.
To achieve the flame knitting stitch, you will need to be familiar with basic knitting techniques, such as casting on, knitting, and purling. The pattern is created by alternating between knit and purl stitches in a specific sequence, which gives the fabric its distinctive flame-like appearance.
Here is the step-by-step process for creating the flame knitting stitch:
- Cast on an even number of stitches. This will ensure that the pattern lines up correctly.
- Row 1: Knit all stitches.
- Row 2: Purl all stitches.
- Row 3: Knit 1 stitch, purl 1 stitch. Repeat this sequence until the end of the row.
- Row 4: Purl 1 stitch, knit 1 stitch. Repeat this sequence until the end of the row.
- Repeat rows 3 and 4 until you reach your desired length.
- Bind off all stitches.
Note: You can play around with the number of knit and purl stitches in each row to create different variations of the flame knitting pattern. For example, you can try knitting 2 stitches and purling 2 stitches instead of 1 to create a more intricate design.
The flame knitting stitch is versatile and can be used in a variety of knitting projects. It works well with different yarn weights and can be used to create anything from scarves and sweaters to hats and blankets. Whether you’re a beginner or an experienced knitter, trying out the flame knitting stitch is a fun way to add some excitement to your knitting projects.
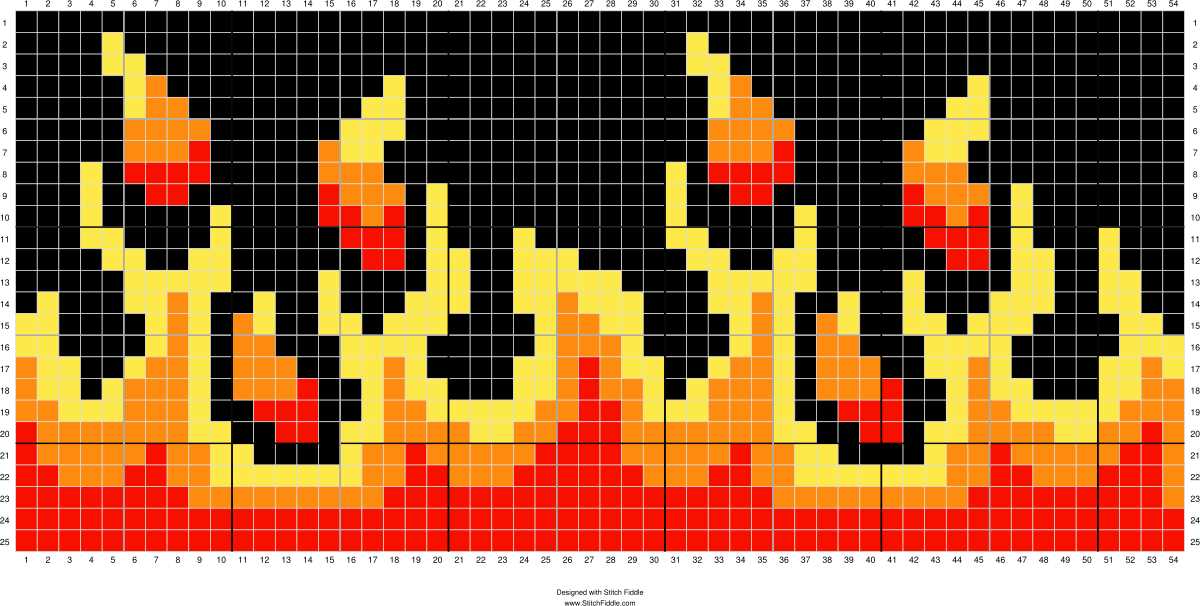
Flame Knitting Pattern Variations and Designs
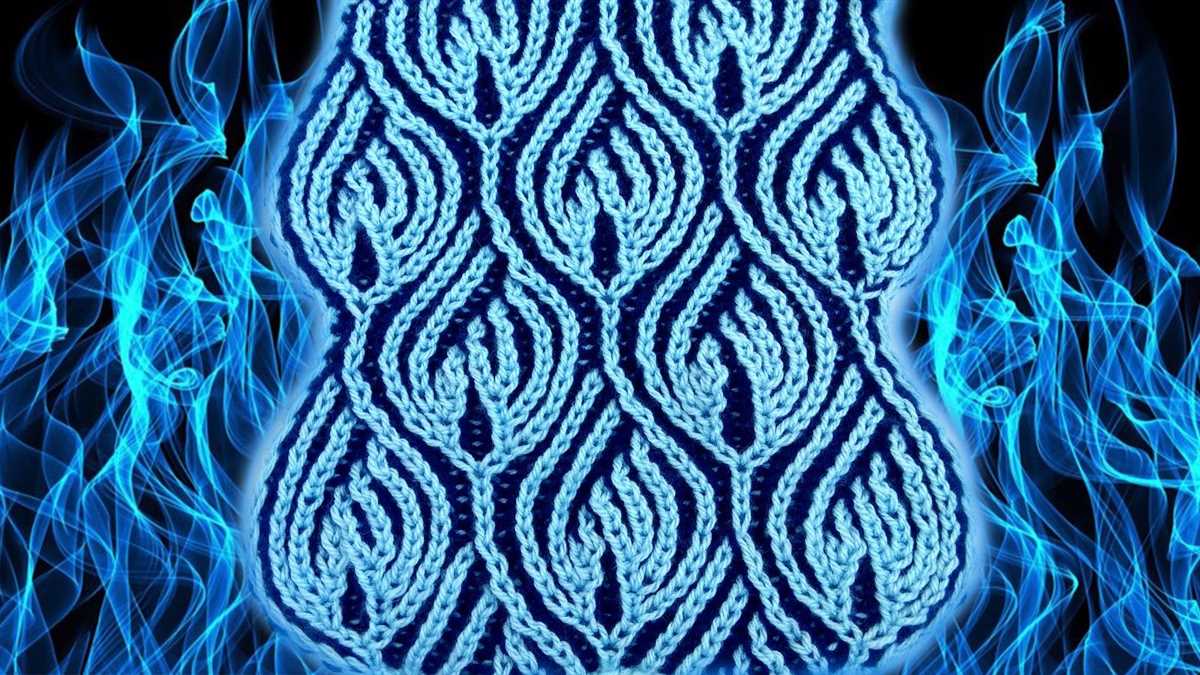
When it comes to flame knitting patterns, there are endless variations and designs to explore. The flame pattern is characterized by its zigzagging lines that resemble dancing flames. It adds a sense of movement and intensity to any knitted project, making it a popular choice for those looking for a fiery and dynamic design.
One variation of the flame knitting pattern is to incorporate different colors to create a more vibrant and eye-catching effect. By using yarns in contrasting hues, it’s possible to achieve a bold and striking design that truly resembles flickering flames. This can be done by alternating colors row by row or by incorporating color changes within each flame motif.
- Vertical Flame Pattern: Another way to play with the flame knitting pattern is to arrange the flames vertically instead of horizontally. This creates a unique and unconventional design that adds an element of surprise to the finished project.
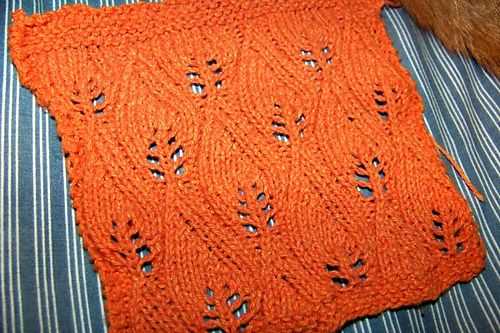
- Flame Lace Pattern: For those who prefer a more delicate and intricate look, incorporating flame motifs into lace knitting patterns can result in stunning designs. The lacy holes created by the pattern add an airy and lightweight feel while still bringing the fiery element of the flames.
- Flame Chevron Pattern: The flame pattern can also be combined with a chevron motif to create an interesting and visually appealing design. By arranging the flame motifs in a chevron shape, the knitted fabric takes on a dynamic and playful look.
Whether you choose to stick with the classic flame knitting pattern or experiment with variations, flame designs offer a unique and captivating aesthetic to any knitted project. From scarves and shawls to sweaters and blankets, there are countless ways to incorporate this fiery motif into your knitting repertoire.
Tips and Tricks for Perfecting the Flame Knitting Pattern
Flame knitting patterns are a popular choice for those looking to add a fiery touch to their knitting projects. Whether you’re a beginner or an experienced knitter, here are some tips and tricks to help you perfect the flame knitting pattern.
1. Choose the Right Yarn
When it comes to flame knitting, the choice of yarn is crucial. Opt for a yarn that has a gradient or variegated color scheme to mimic the vibrant shades of fire. Using a yarn with a high percentage of natural fibers, such as wool or alpaca, will also help to enhance the texture of the flame pattern.
2. Experiment with Stitch Patterns
While the flame knitting pattern traditionally involves simple increases and decreases to create the flame-like shapes, don’t be afraid to experiment with different stitch patterns. Adding cables or lace motifs can add an extra dimension to your flame knitting, making it more unique and eye-catching.
3. Use Stitch Markers
Keeping track of your stitches is essential in flame knitting, especially when working with intricate patterns. By using stitch markers to indicate the beginning and end of each repeat, you can easily keep track of your progress and ensure that your flame shapes are evenly spaced and aligned.
4. Block Your Work
Blocking is a crucial step in achieving a polished and professional look for your flame knitting project. After completing your knitting, wet block your work to even out the stitches and open up the lace or cable patterns. This will enhance the definition of the flame shapes and give your project a finished appearance.
5. Practice, Practice, Practice
Like any knitting technique, perfecting the flame knitting pattern takes practice. Start with small swatches or simple projects before tackling larger and more complex designs. As you become more familiar with the pattern and its intricacies, you’ll be able to create stunning flame knitting projects with ease.
With these tips and tricks in mind, you’ll be well on your way to mastering the flame knitting pattern and creating beautiful projects that are sure to impress.
Troubleshooting Common Issues in Flame Knitting
If you’re new to flame knitting, you may encounter some common issues along the way. Don’t worry, they can easily be fixed with a few adjustments and techniques. Here are some troubleshooting tips to help you overcome these challenges:
Tangled Yarn
One common issue in flame knitting is tangled yarn. This can happen when you’re working with multiple strands of yarn or when the yarn gets twisted. To prevent this, make sure to keep your yarn organized by using yarn bobbins or separate balls of yarn. Additionally, take breaks every now and then to untwist the yarn if needed. With these precautions, you’ll minimize the chances of getting tangled yarn.
Inconsistent Flame Pattern
If your flame pattern is inconsistent, it may be due to variations in tension or stitch size. To fix this issue, make sure you’re maintaining an even tension throughout your work by not knitting too tightly or too loosely. Additionally, check that you’re using the correct needle size for your yarn. Adjusting your tension and needle size can help you achieve a more consistent flame pattern.
Gaps or Holes in the Flame Pattern
If you’re noticing gaps or holes in your flame pattern, it may be because you’re unintentionally dropping stitches. Pay close attention to your knitting and make sure you’re not accidentally skipping stitches or dropping them off the needle. If you do drop a stitch, simply insert your needle into the loop and continue knitting as usual. Regularly checking your work for dropped stitches will help maintain an intact flame pattern.
Uneven Edges
Uneven edges can be a common issue in flame knitting, especially when working with different stitch patterns. To avoid this, consider using stitch markers at the beginning and end of each row to help you keep track of your stitches. Additionally, make sure to knit or purl the first and last stitch of each row to create a more defined edge. Taking these steps will result in neater and more even edges in your flame knitting.
- Organizing your yarn with yarn bobbins or separate balls can prevent tangling.
- Check your tension and needle size to achieve a consistent flame pattern.
- Be mindful of dropped stitches to avoid gaps or holes in the flame pattern.
- Use stitch markers and knit/purl the first and last stitch of each row for more even edges.
Flame Knitting Pattern for Beginners
If you’re new to knitting and want to try something fun and exciting, the flame knitting pattern is a great choice for beginners. This pattern creates a stunning flame-like design that is sure to impress everyone who sees it.
To start, you’ll need a basic understanding of knitting techniques such as casting on, knitting, purling, and binding off. Once you have these skills, you can begin working on the flame knitting pattern.
Materials:
- Yarn in two different colors – one for the flame color and one for the background color
- Knitting needles in the appropriate size for your yarn
Instructions:
1. Begin by casting on an even number of stitches using the background color yarn.
2. Knit the first row using the background color yarn.
3. On the second row, switch to the flame color yarn and knit the entire row.
4. Repeat steps 2 and 3 for as many rows as desired, alternating between the background color and flame color yarns.
5. Finish the pattern by binding off using the background color yarn.
Tips:
- Make sure to knit with a firm tension to create a crisp and defined flame design.
- Experiment with different color combinations to create unique and personalized flame patterns.
- If you make a mistake, don’t panic! Knitting is all about trial and error, so don’t be afraid to unravel and start again.
With this flame knitting pattern, you can create beautiful and eye-catching projects like scarves, blankets, and even sweaters. It’s a great way to challenge yourself and add some excitement to your knitting repertoire. So grab your yarn and needles, and start creating your own fiery masterpieces!
Advanced Techniques in Flame Knitting Pattern
Flame knitting pattern is a unique and versatile technique that allows you to create intricate and eye-catching designs in your knitted projects. While the basic flame knitting pattern is relatively simple, there are several advanced techniques that can take your flame knitting to the next level.
1. Intarsia: Intarsia is a technique used to create colorwork in flame knitting. Instead of carrying different colors of yarn across the entire row, you use separate bobbins or small balls of yarn for each individual color. This allows you to create more complex and detailed flame designs with different shades and shapes.
2. Cabling: Cabling is another advanced technique that can be incorporated into flame knitting pattern. By crossing stitches over one another, you can create intricate cables that add texture and dimension to your flame design. Cabling is commonly used to create flame motifs with the appearance of twisting flames.
3. Lacework: If you want to add a delicate touch to your flame knitting pattern, lacework is the way to go. Lace stitches create an open and airy fabric, perfect for flames that seem to dance on the knitted surface. Lacework can be used to create flame motifs with intricate and delicate details.
4. Double-Knitting: Double-knitting is a technique where you simultaneously knit two layers of fabric, creating a reversible surface. This technique can be applied to flame knitting pattern to create flames that are visible on both sides of the knitted project. Double-knitting allows you to create flame motifs with more intricate and complex designs.
5. Fair Isle: Fair Isle is a traditional knitting technique that involves knitting with multiple colors in a single row. By incorporating Fair Isle into your flame knitting pattern, you can create flame motifs with bold and vibrant colors. Fair Isle allows for more versatility in color choices and can result in stunning flame designs.
Overall, these advanced techniques can elevate your flame knitting pattern, allowing you to create unique and visually striking designs. Whether you choose to incorporate intarsia, cabling, lacework, double-knitting, or Fair Isle, experimenting with these techniques will expand your flame knitting skills and open up a world of possibilities for your knitted projects.
Exploring Creative Applications of Flame Knitting Pattern
The flame knitting pattern offers endless possibilities for creativity and innovation. Its unique design, inspired by flickering flames, can be applied to a variety of knitting projects to create stunning and eye-catching pieces. In this article, we have delved into the different ways in which this pattern can be utilized to elevate your knitting projects to new heights.
From cozy scarves and shawls to stylish sweaters and cardigans, the flame knitting pattern can add a touch of warmth and vibrancy to any garment. The swirling and intertwining stitches mimic the movement and flickering of flames, creating a mesmerizing effect that is sure to make a statement. Whether you choose to incorporate the flame pattern as an accent or make it the focal point of your design, it is guaranteed to capture attention and showcase your knitting skills.
Furthermore, the flame knitting pattern can also be adapted for other creative endeavors beyond traditional garment making. For instance, it can be incorporated into accessories such as hats, gloves, and socks, adding a touch of elegance and sophistication. The pattern can also be used to create unique home décor items like pillows, blankets, and even wall hangings, infusing your space with warmth and personality.
If you are feeling particularly adventurous, you can even experiment with using the flame knitting pattern in unconventional ways. For example, you can incorporate it into jewelry designs by knitting with smaller needles and thinner yarns. The result would be delicate flame-inspired earrings, bracelets, or necklaces that are sure to stand out.
In conclusion, the flame knitting pattern is a versatile and captivating technique that can be explored and applied in various creative ways. Whether you choose to use it in traditional garment making or venture into new territories, this pattern is sure to ignite your imagination and bring your knitting projects to life.