Effortless lace knitting pattern

If you’re looking for a great way to add some elegance and beauty to your knitting projects, look no further than a simple lace pattern. Knitting lace can seem intimidating at first, but with a bit of practice and the right pattern, you’ll be creating stunning pieces in no time. One of the best things about knitting lace is that it looks much more complicated than it actually is. With just a few basic stitches and a bit of attention to detail, you can create intricate and delicate designs that are sure to impress.
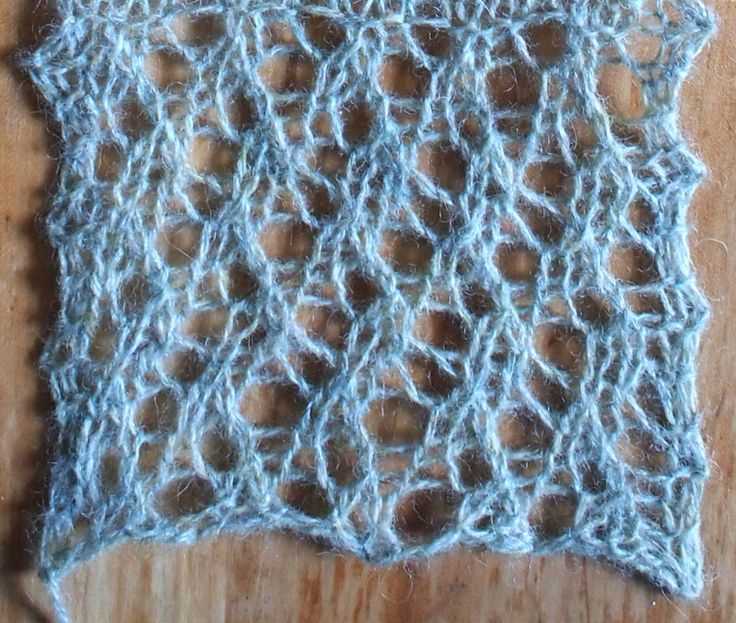
One of the easiest lace patterns for beginners is the “Easy Knit Lace Pattern”. This pattern is perfect for those who are new to lace knitting, as it only requires a basic knowledge of knitting stitches. The pattern consists of a series of yarn overs and simple decreases. Yarn overs create the holes or spaces in the lace, while decreases help to shape the design. By repeating these stitches in a specific order, you can create a beautiful lace fabric.
Not only is the “Easy Knit Lace Pattern” simple to create, but it can also be used in a variety of projects. From scarves and shawls to blankets and baby clothes, this versatile pattern can be adapted to suit any knitting project. Whether you’re looking to create a lightweight cardigan for summer or a cozy blanket for winter, this pattern is a great option. Plus, it’s a great way to practice your lace knitting skills and experiment with different yarns and colors.
Understanding Knit Lace Patterns
Lace knitting patterns are a popular choice among knitters due to their delicate and intricate designs. Despite their complex appearance, understanding knit lace patterns can be made easier by breaking them down into smaller components.
One of the key elements of lace knitting is the use of yarn overs, which create the holes and spaces in the pattern. Yarn overs are simply created by wrapping the yarn around the needle in the direction of the next stitch. This extra loop of yarn then becomes the basis for the next stitch, creating an open and lacy effect.
Charts and Symbols
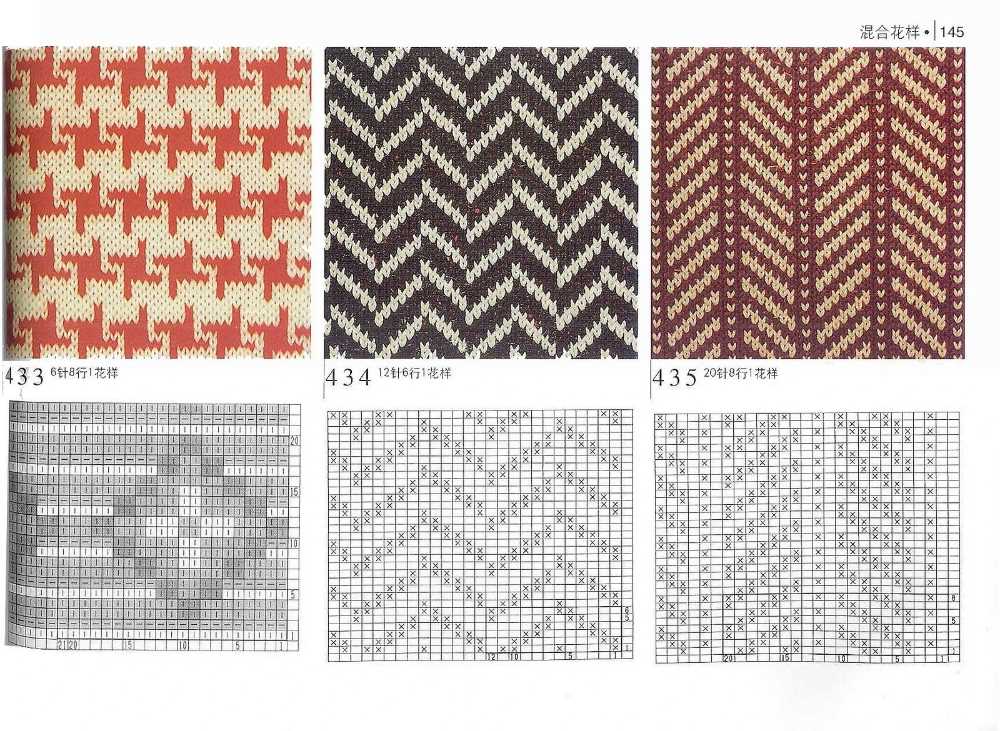
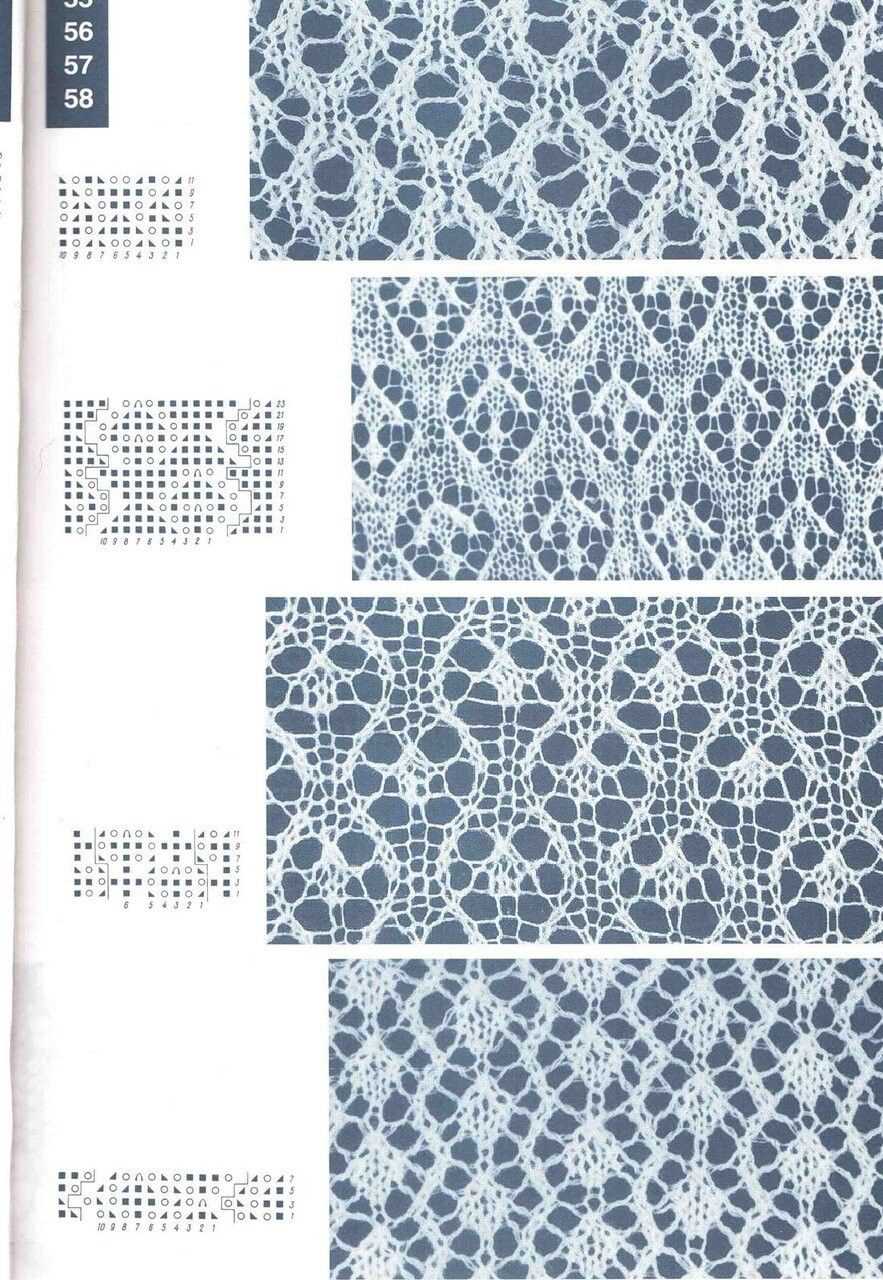
Knit lace patterns are often depicted using charts and symbols. These visual representations provide a clear and concise overview of the pattern, allowing knitters to easily follow along. Each symbol represents a different stitch or action, such as a yarn over, a decrease, or a specific type of stitch. By referring to the chart, knitters can easily see how the pattern evolves and repeats.
Pattern Repeats
Lace knitting patterns typically involve repeating sections of stitches, known as pattern repeats. These repeats create the overall design and allow the knitter to easily memorize and follow the pattern. By understanding the structure of the pattern repeat, knitters can quickly pick up the rhythm and flow of the lace pattern.
Reading Instructions
When working with knit lace patterns, it is important to carefully read and understand the instructions. Patterns may include specific instructions for the stitches used, such as the type of decrease or increase to use, as well as the number of stitches required for each pattern repeat. By paying attention to these details, knitters can ensure that their lace knitting turns out as desired.
- Pay attention to yarn overs
- Use charts and symbols for easier understanding
- Understand pattern repeats for a rhythmic knitting experience
- Read and follow instructions carefully to achieve the desired result
Choosing the Right Yarn for Your Lace Project
When it comes to knitting lace patterns, one of the most important factors to consider is the yarn you choose. The right yarn can make a significant difference in the final outcome of your project, ensuring that your lace stitches will be crisp, defined, and visually stunning. Here are some key points to consider when selecting yarn for your lace project:
Fiber Content
The fiber content of the yarn plays a crucial role in the overall look and feel of your lace project. Natural fibers like wool, alpaca, silk, and cotton are popular choices for lace knitting due to their ability to block well and create beautiful drape. These fibers also enhance the stitch definition of lace patterns, allowing the intricate details to shine. However, synthetic fibers like acrylic and nylon can also be suitable options, especially if you’re looking for a more affordable or machine-washable yarn.
Weight and Gauge
The weight of the yarn and the recommended gauge for your lace pattern should align to ensure the desired outcome. Lace patterns often work best with lightweight yarns, such as lace or fingering weight, as they allow for intricate stitch formations and delicate designs. However, depending on the pattern and your personal preferences, you may also choose a slightly heavier yarn, such as a sport or DK weight, for a denser and warmer result. Regardless of the weight, it’s important to check the gauge and adjust your needle size accordingly to achieve the right tension and structure.
Color and Texture
While lace patterns often shine in solid or tonal colors, you can also experiment with variegated or self-striping yarns to create unique visual effects. The key is to choose a yarn that doesn’t overpower the stitch pattern and complements the overall design. Additionally, consider the texture of the yarn and how it will enhance or interact with the lace pattern. Smooth and silky yarns can highlight the delicate nature of lace stitches, while yarns with a bit of halo or texture can add dimension and interest to the finished piece.
Availability and Budget
Lastly, consider the availability and cost of the yarn. While luxury yarns may be tempting, they may not always be within everyone’s budget. Luckily, there is a wide range of yarn options available in different price ranges, allowing you to find a suitable option for your lace project. Local yarn shops, online retailers, and yarn festivals can be great sources for exploring different yarn brands and discovering new favorites that suit your needs and budget.
- Consider the fiber content and its impact on the final look and feel of your lace project.
- Choose a yarn weight and gauge that align with your lace pattern’s requirements.
- Experiment with different colors and textures to enhance the overall design.
- Take into account the availability and budget for the yarn.
Essential Knitting Tools for Lace Patterns
If you’re interested in knitting lace patterns, it’s important to have the right tools on hand. Lace knitting can be intricate and delicate, so having the proper tools will help make the process easier and more enjoyable. Here are some essential knitting tools for lace patterns:
1. Laceweight Yarn
One of the most important tools for knitting lace patterns is laceweight yarn. This type of yarn is very fine and lightweight, which allows for the delicate and airy stitch patterns that are characteristic of lace knitting. Laceweight yarn is usually made from natural fibers, such as wool, silk, or alpaca, and comes in a variety of colors and textures.
2. Knitting Needles
When knitting lace patterns, it’s essential to use knitting needles that are appropriate for the type of yarn you’re using. Laceweight yarn requires smaller needles, typically ranging from US size 0 to 4 (2-3.5 mm), to create the tight and intricate stitches that are characteristic of lace knitting. Additionally, using circular needles with a long cable can be helpful for accommodating the large number of stitches that are often required for lace patterns.
3. Stitch Markers
Stitch markers are invaluable tools for keeping track of stitches and stitch patterns in lace knitting. They can be used to mark the beginning of a round or row, to indicate stitch repeats or pattern sections, or to mark specific stitches or increases/decreases. Using stitch markers can help prevent mistakes and make it easier to follow complex lace patterns.
4. Blocking Tools

Blocking is an important step in finishing lace projects and helps to shape the stitches and open up the lace pattern. To block lace projects, you’ll need blocking tools such as blocking mats, T-pins, and blocking wires. These tools allow you to stretch and shape the knitted fabric to the desired dimensions and ensure that the lace pattern is displayed to its full potential.
5. Lace Pattern Charts

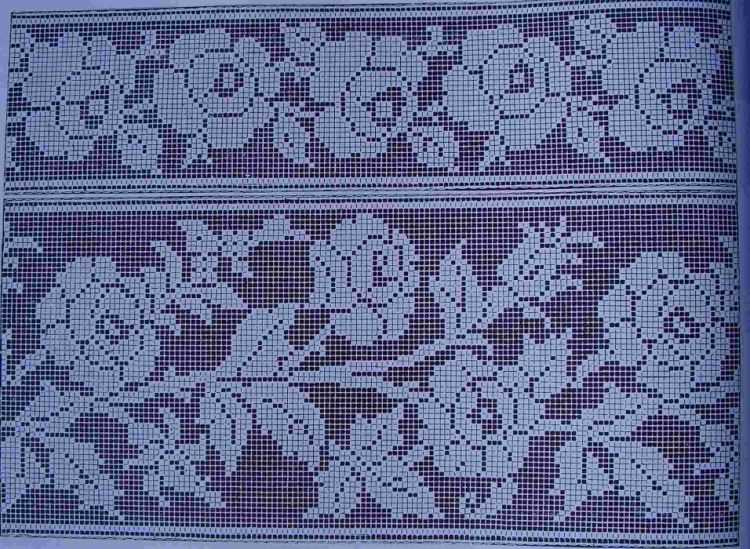
Many lace patterns are charted, meaning that they are represented graphically using symbols or colors. Having access to lace pattern charts is essential for following along with the stitch pattern and understanding how the stitches should be worked. These charts can be found in knitting pattern books, online knitting resources, or can be created using knitting software.
By having these essential knitting tools for lace patterns, you’ll be well-equipped to tackle your next lace knitting project with confidence. Whether you’re a beginner or an experienced knitter, these tools will help you create beautiful lacework that will impress and delight.
Getting Started: Casting On for a Lace Pattern
When starting a lace knitting pattern, it is important to begin with the right cast on method to ensure that your stitches are secure and that you have the correct number of stitches for the pattern. There are several different cast on methods that can be used for lace knitting, but the most commonly used ones are the long tail cast on and the knitted cast on.
Long Tail Cast On: To use the long tail cast on method for a lace pattern, you will need to estimate the amount of yarn that you will need for your cast on. This can be done by multiplying the width of your desired project by the number of stitches required per inch. Once you have estimated the amount of yarn needed, make a slipknot at the end of the yarn, leaving a long tail. Insert the needle into the slipknot and use it to cast on the desired number of stitches. The long tail cast on method creates a stretchy and elastic edge, which is perfect for lace knitting.
Knitted Cast On: The knitted cast on method is another popular choice for lace knitting. To use this method, start by making a slipknot and inserting the needle into the slipknot. Hold the working yarn in your right hand and the needle in your left hand. With the working yarn, wrap it around the needle from back to front, as if you were knitting a regular stitch. Then, insert the needle into the slipknot and use it to knit the stitch, transferring it onto your left needle. Repeat this process for the desired number of stitches. The knitted cast on method creates a firm and even edge, which is great for lace patterns that require a more structured look.
Once you have cast on the desired number of stitches using either the long tail cast on or the knitted cast on, you are ready to begin knitting your lace pattern. It is important to pay close attention to the instructions and stitch counts in your pattern to ensure that you are creating the lace design correctly. With a bit of practice, you will be able to easily cast on and knit beautiful lace patterns.
The Basics of Lace Stitch Patterns
Knitting lace stitch patterns can add a beautiful and delicate touch to any project. Whether you are knitting a shawl, a sweater, or even socks, lace patterns can elevate your knitting to the next level. While they may look intricate and complicated, lace stitch patterns are actually based on a few simple principles.
To start, lace stitch patterns usually involve creating a series of yarn overs and decreases. Yarn overs are made by simply wrapping the yarn around the needle, creating an extra stitch. When combined with decreases, which are made by knitting or purling stitches together, the yarn overs create the characteristic openwork and airy appearance of lace.
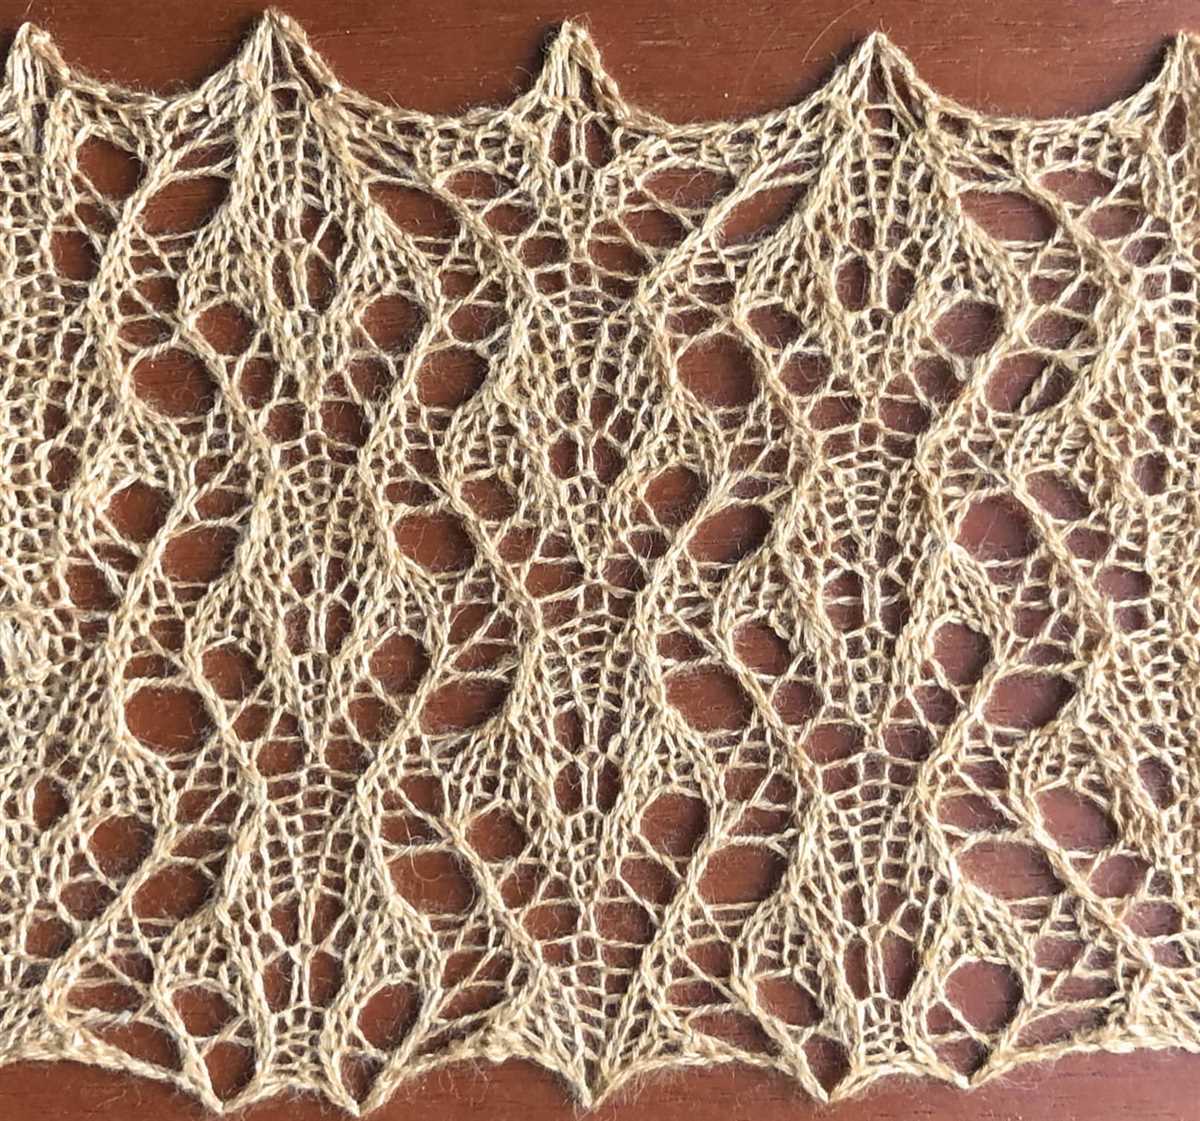
The most common lace stitch patterns include the stockinette lace, the seed stitch lace, and the feather and fan stitch. The stockinette lace alternates rows of yarn overs and decreases on the right side of the work, while the wrong side is usually purled. The seed stitch lace creates a textured, moss-like effect by alternating yarn overs and decreases on both the right and wrong sides. The feather and fan stitch, on the other hand, combines yarn overs and decreases in a repetitive pattern to create a wave-like motif.
When following a lace stitch pattern, it is important to keep track of the number of stitches and rows in each pattern repeat. This will ensure that your lace pattern stays balanced and symmetrical. Additionally, using stitch markers can help you keep track of specific sections or repeats within the pattern.
With practice and patience, knitting lace stitch patterns can become a rewarding and enjoyable experience. It allows you to create intricate and delicate designs that will impress and amaze. So, pick up your knitting needles and give lace stitch patterns a try! You’ll be amazed at the beautiful and elegant projects you can create.
Adding Shaping to Your Lace Knitting
Lace knitting is known for its delicate and intricate patterns, but adding shaping to your lace projects can take them to the next level. By incorporating increases and decreases strategically, you can create garments that flatter your figure and highlight your curves. Whether you’re working on a fitted sweater, a shapely cardigan, or a form-fitting lace shawl, here are some tips to help you add shaping to your lace knitting.
1. Incorporate Increases and Decreases
To add shaping to your lace knitting, you’ll need to incorporate both increases and decreases. Increases, such as yarn overs, can be used to create extra stitches and add fullness to your garment. Decreases, such as knit two together (k2tog) or slip-slip-knit (ssk), can be used to decrease the number of stitches and create a more fitted shape.
2. Follow the Pattern Chart

When adding shaping to lace knitting, it’s important to follow the pattern chart carefully. The chart will indicate where and how to place your increases and decreases to maintain the integrity of the lace pattern. Make sure to read the chart key and understand the symbols used before you begin.
3. Use Stitch Markers
Using stitch markers can be incredibly helpful when adding shaping to your lace knitting. Place a stitch marker before and after each set of increases or decreases so that you can easily keep track of where you need to work these shaping stitches. This will help ensure that your lace pattern remains consistent.
4. Try Short Rows for Bust Shaping
If you’re working on a lace top or sweater and want to add bust shaping, consider using short rows. Short rows involve knitting only part of a row before turning your work and knitting back in the opposite direction. By working short rows across the chest area, you can create a more fitted shape and accommodate for the natural curve of the bust.
5. Block Your Finished Project
After you’ve completed your lace knitting with added shaping, it’s important to block your finished project. Blocking involves wetting or steaming your knitting to even out the stitches and relax the lace pattern. This will help your garment hold its shape and showcase the added shaping you’ve incorporated.
By following these tips, you can confidently add shaping to your lace knitting projects and create garments that not only showcase your lace skills but also flatter your figure. Happy knitting!
Reading Lace Charts: A Step-by-Step Guide
Learning to read lace charts can open up a whole new world of knitting possibilities. Lace knitting patterns can create beautiful, intricate designs that can be used in a variety of projects, from scarves and shawls to sweaters and blankets. While lace charts may appear intimidating at first, they follow a set of standardized symbols and instructions that can easily be deciphered with a little practice.
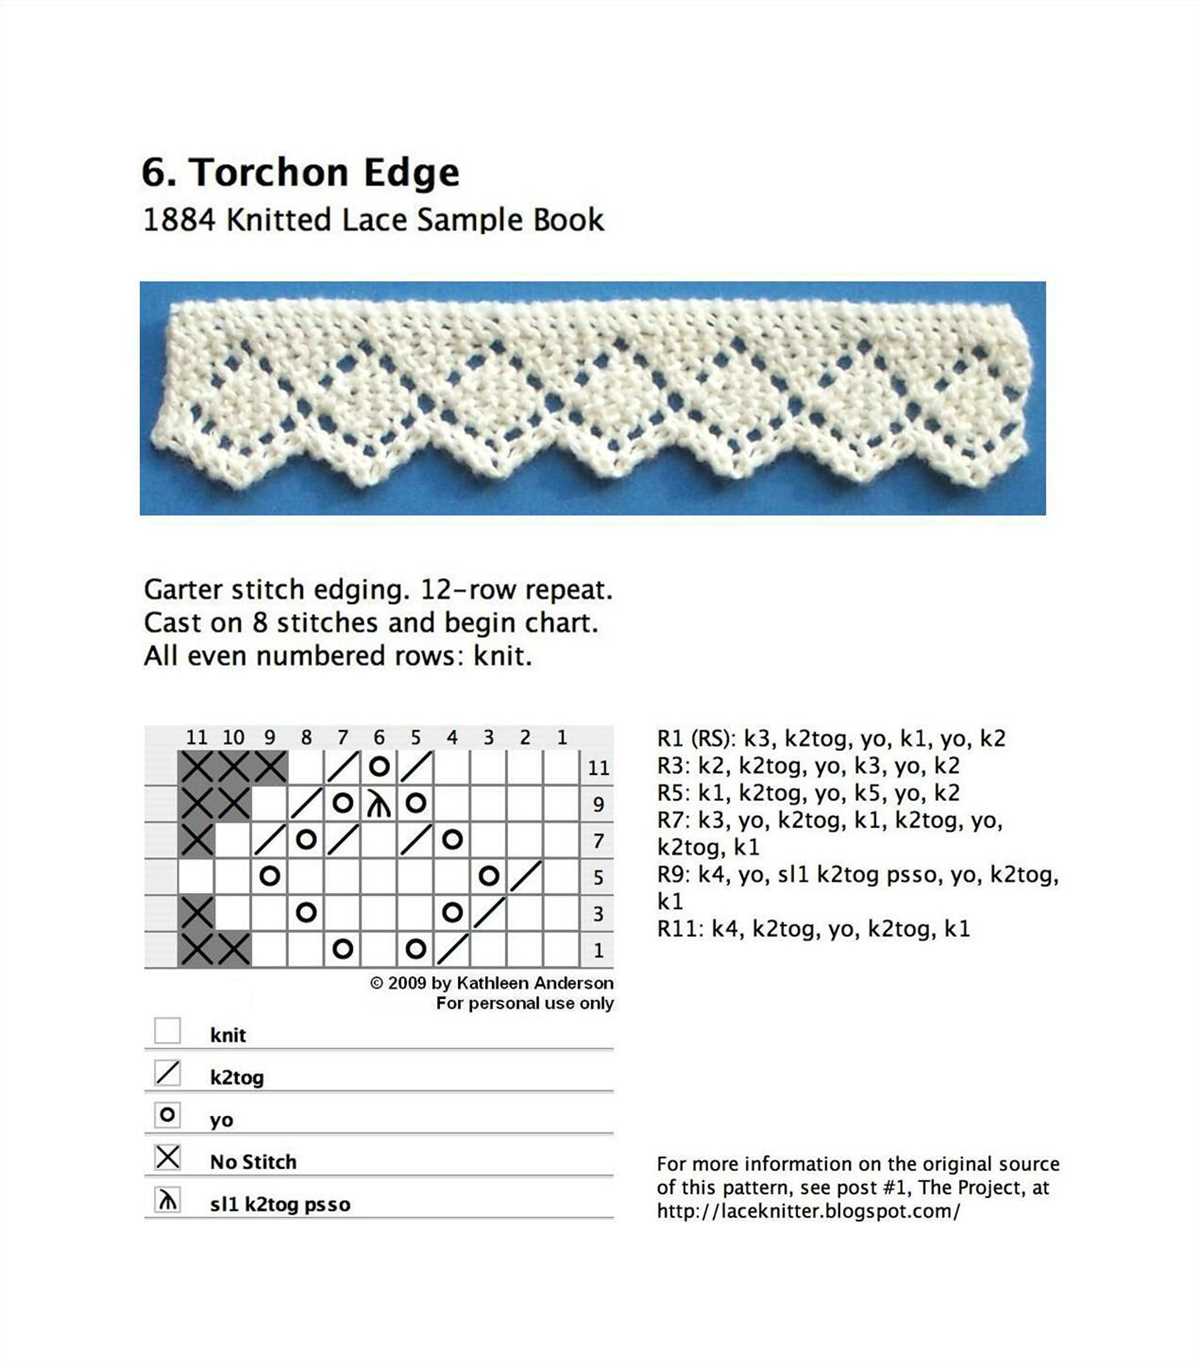
Familiarize yourself with lace chart symbols. Lace charts use a variety of symbols to represent different knitting stitches and techniques. These symbols are typically shown in a chart key, which should be provided with the knitting pattern. Some common symbols include yarn overs (represented by an O), knit stitches (represented by a square or a dot), and decreases (shown by a variety of symbols such as a slash or a backward slash).
Break down the chart into sections. Lace charts are typically divided into multiple sections, with each section representing a certain number of stitches. These sections may be separated by vertical lines or other markers. By breaking down the chart into smaller sections, it becomes easier to focus on knitting one part at a time and keeping track of your progress.
Read the chart from right to left. Lace charts are usually read from right to left, like traditional knitting. This means that you start at the right edge of the chart and work your way across to the left edge. Each row of the chart represents a different row of knitting, so as you move from right to left, you will be following the instructions for each row of the pattern.
Pay attention to the stitch count. Before you begin knitting a lace pattern from a chart, it’s important to check the stitch count. The stitch count represents the number of stitches you should have at the end of each row. Make sure to double-check this count after completing each row to ensure that you are on track and haven’t made any mistakes.
Use a lifeline. When working on a complex lace pattern, it can be helpful to use a lifeline. A lifeline is a piece of scrap yarn that is threaded through a row of stitches, acting as a safety net in case you need to rip out your work. By adding a lifeline every few rows, you can easily pick up your stitches and start again if you make a mistake.
Practice, practice, practice! Reading lace charts may take some time and practice to master, but don’t get discouraged. The more you practice, the more comfortable you will become with reading and following lace charts. Start with simpler patterns and gradually work your way up to more complex designs. Before you know it, you’ll be creating beautiful lace projects with confidence.
By following these step-by-step tips, you’ll be able to read lace charts with ease and tackle any lace knitting pattern that comes your way. So grab your needles and immerse yourself in the world of lace knitting!
Common Mistakes to Avoid in Lace Knitting
Knitting lace can be a beautiful and intricate art form, but it can also be challenging for beginners. To help you avoid common mistakes and create stunning lace projects, here are some key tips to keep in mind.
1. Not Using Lifelines
One of the biggest mistakes in lace knitting is not using lifelines. A lifeline is a strand of scrap yarn that is threaded through the stitches on a row. If you make a mistake, you can easily rip back to the lifeline, rather than having to unravel your entire project. It is best to insert a lifeline every few rows or after completing a complex lace pattern to avoid major setbacks.
2. Poor Yarn Choice

Choosing the right yarn for lace knitting is essential. A yarn with good stitch definition and drape is ideal. Avoid using texture-heavy or fuzzy yarns that will hide the delicate beauty of lace patterns. Instead, opt for a smooth, lightweight yarn that will showcase the intricacies of your stitches.
3. Insufficient Blocking
Blocking is the process of gently shaping and stretching your finished lace project to achieve a polished and even look. Failure to block your lace properly can result in a finished piece that lacks the desired shape and drape. Take the time to carefully block your lace project to ensure that the stitches open up and the pattern is fully showcased.
4. Too Tight Tension
One common mistake in lace knitting is knitting with tight tension. Tight tension can cause your stitches to be too small and result in a stiff and unattractive finished piece. Pay attention to your tension and strive for a relaxed grip on the needles to allow your lace stitches to breathe and create the desired drape.
5. Lack of Concentration
Lace knitting requires concentration and focus. Mistakes can easily be made if you are distracted or not paying close attention to the pattern. It is important to work in a quiet and calm environment where you can fully concentrate on your knitting. If you find yourself becoming distracted, take a break and return to your project when you can give it your full attention.
By avoiding these common mistakes, you’ll be well on your way to creating beautiful and intricate lace knitting projects. Remember to use lifelines, choose the right yarn, block your projects properly, maintain a relaxed tension, and knit with focus and concentration. With practice and attention to detail, you’ll master the art of lace knitting and create stunning pieces that showcase your skills.
Blocking Your Lacework for a Professional Finish
Blocking is a crucial step in the knitting process, especially when it comes to lacework. It helps to open up the stitches, even out any uneven tension, and give your project a polished and professional look. Here are some tips on how to block your lacework for the best results.
1. Prepare Your Lacework

Before blocking, make sure your lacework is clean and free from any excess dirt or debris. Gently handwash your project using a wool wash or a mild detergent, and lay it flat to dry. This will ensure that your lacework is in the best condition before blocking.
2. Pinning and Stretching
To block your lacework, you will need blocking mats or towels and rustproof blocking pins. Lay your project flat on the blocking mats, aligning the edges and corners. Use the pins to gently stretch and shape the lace, following the pattern’s instructions for measurements and dimensions. Pay attention to the points and edges to ensure they are well-defined and crisp.
3. Mist and Steam Blocking
There are two common methods for blocking lacework: mist blocking and steam blocking. Mist blocking involves spraying your project with water and allowing it to dry naturally. This method is ideal for delicate or natural fibers. Steam blocking, on the other hand, involves using a steamer or iron with steam to gently press and reshape the lace. This method is suitable for synthetic or blended fibers. Always test a small, inconspicuous area before applying steam blocking to avoid damaging your project.
4. Let It Dry
Once your lacework is pinned and blocked, let it dry completely before removing the pins. This may take several hours or even overnight, depending on the fiber and the ambient humidity. Avoid touching the project while it is drying to prevent any distortion or interference with the blocking process.
By taking the time to properly block your lacework, you can achieve a professional finish that enhances the stitch pattern and creates a beautiful and elegant garment or accessory. Remember to follow the instructions specific to your project and materials, and enjoy the satisfying results of a well-blocked lacework!
Exploring Advanced Lace Techniques
Lace knitting is a beautiful and intricate technique that adds a delicate touch to any project. While easy knit lace patterns are a great way to start, exploring advanced lace techniques can take your knitting skills to the next level. In this article, we will delve into some advanced lace techniques that you can incorporate into your knitting repertoire.
1. Lace Increases and Decreases: One key aspect of advanced lace knitting is understanding the different types of increases and decreases used to create intricate lace patterns. This includes techniques such as yarn over (YO) increases, centered double decrease (CDD), and slip-slip-knit (SSK) decreases. By mastering these techniques, you can create more complex lace patterns with a variety of shapes and motifs.
2. Working Lace Stitches on Both Sides: While easy knit lace patterns often have a “right side” and a “wrong side,” advanced lace techniques allow you to create patterns with lace stitches on both sides. This can be achieved through lace instructions that include both knit and purl stitches, as well as incorporating lace stitches into every row of your knitting. This adds an extra dimension to your lace projects and allows for more versatility in design.
3. Combining Lace Patterns: Another way to explore advanced lace techniques is by combining different lace patterns within the same project. This can be done by selecting lace patterns with compatible stitch counts and integrating them seamlessly. By experimenting with different combinations, you can create unique and intricate lace designs that are truly one-of-a-kind.
4. Lace Edgings and Borders: Advanced lace techniques also encompass creating lace edgings and borders. These can be added to garments, shawls, or other accessories to give them a finishing touch. Lace edgings and borders often feature complex stitch patterns and can be worked separately and then attached to the main piece or worked directly onto the project. They provide an opportunity to enhance the overall aesthetic of your knitwear.
5. Lace Cables: A fusion of lace and cable knitting, lace cables are another advanced lace technique to explore. This technique involves combining lace stitches with cables to create intricate and textured patterns. Lace cables can be used to embellish a wide range of projects, from scarves and hats to socks and sweaters, adding a unique twist to traditional lace knitting.
Conclusion: By exploring advanced lace techniques, you can take your lace knitting skills to new heights. Whether it’s mastering lace increases and decreases, working lace stitches on both sides, combining lace patterns, creating lace edgings and borders, or incorporating lace cables, there are endless possibilities to explore. So, pick up your knitting needles, grab a lace pattern, and start exploring the world of advanced lace techniques!
Creating Your Own Unique Lace Designs
Now that you have learned the basics of knitting lace patterns, it’s time to unleash your creativity and start creating your own unique designs. Here are a few tips to help you get started:
1. Consider the Yarn: The type of yarn you use can significantly impact the final look of your lace design. Experiment with different yarn weights and fiber types to achieve the desired effect.
2. Sketch your Design: Before you start knitting, sketch out your lace design on paper. This will help you visualize the pattern and make any necessary adjustments before picking up your needles.
3. Experiment with Stitch Patterns: Mix and match different stitch patterns to create unique lace designs. Combine decreases, yarn overs, and other lace motifs to add texture and interest to your pattern.
4. Use Stitch Dictionaries: Invest in a good stitch dictionary or browse online resources for inspiration. These references contain a wide variety of stitch patterns that you can incorporate into your design.
5. Keep a Knitting Journal: As you experiment with different lace designs, make notes in a knitting journal. Document your stitch patterns, yarn choices, and any modifications you make along the way. This will help you recreate your designs in the future.
6. Don’t Be Afraid to Make Mistakes: Lace knitting is all about trial and error. Embrace the process and don’t be afraid to make mistakes. Some of the most beautiful lace designs are the result of happy accidents.
Remember, creating your own lace designs is a journey. It takes time and practice to develop your skills and find your unique style. Have fun exploring different stitch patterns, yarns, and techniques, and don’t be afraid to push the boundaries of traditional lace knitting. Happy knitting!