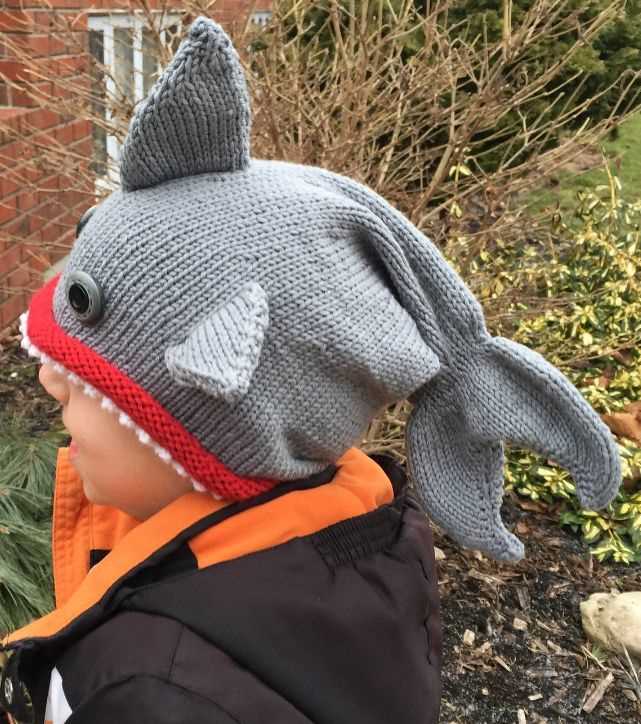
Knit Your Own Fish Hat with This Easy Pattern

Looking for a unique and fun knitting project? Why not try your hand at knitting a fish hat? A fish hat is a whimsical and adorable accessory that is sure to make a splash! Whether you want to create a hat for yourself or make a special gift for a loved one, this fish hat knitting pattern is a great choice.
Knitting a fish hat allows you to experiment with different stitch patterns, colors, and embellishments. You can customize your hat to match your personal style or the style of the person you are making it for. From bright and colorful patterns to more subtle and natural designs, the possibilities are endless.
Not only is knitting a fish hat a fun and creative project, but it also provides a useful and practical item. A fish hat can keep your head warm and cozy during chilly winter months or act as a statement piece in your everyday wardrobe. Kids especially love wearing fish hats, as they add a playful touch to any outfit.
Whether you are a beginner or an experienced knitter, this fish hat knitting pattern has something for everyone. With clear instructions and step-by-step guidance, you can easily create your own unique fish hat. So grab your knitting needles and dive into this fun and rewarding knitting project!
Fish Hat Knitting Pattern

Knitting is a popular hobby that allows people to create beautiful and unique items. One popular knitting project is the fish hat, which features a fun and colorful design resembling a fish. The fish hat knitting pattern is a great way to challenge your knitting skills and create an adorable accessory for both kids and adults.
To start knitting the fish hat, you will need to gather the necessary materials, including yarn in different colors, knitting needles, and a set of double-pointed needles. The pattern usually includes instructions for various sizes, so you can choose the one that best fits your needs.
The fish hat knitting pattern typically involves several steps:
- Start by casting on the appropriate number of stitches for the size you are making.
- Knit the brim of the hat using your desired stitch pattern, such as ribbing or garter stitch.
- Continue knitting the body of the hat in the main color, gradually shaping it to resemble a fish.
- Use different colors of yarn to create the fish’s eyes, fins, and tail.
- Finish off the hat by carefully weaving in any loose ends and blocking it to give it a polished look.
The fish hat knitting pattern can be customized to your preferences, allowing you to get creative with the colors and embellishments. Some patterns even include instructions for adding additional details, such as bubbles or scales, to make the hat even more unique.
Once you have finished knitting the fish hat, it can be a fun and quirky accessory to wear during the colder months or even as a costume accessory. It also makes for a great gift idea for friends and family.
Benefits of Fish Hat Knitting Pattern
Knitting is a popular hobby that not only allows you to create beautiful and unique pieces, but also offers a range of therapeutic benefits. One knitting pattern that has gained popularity in recent years is the fish hat knitting pattern. This pattern allows you to create an adorable and fun hat in the shape of a fish, which can be a great addition to your winter wardrobe or a thoughtful gift for a loved one.
1. Creativity: Knitting the fish hat pattern gives you the opportunity to unleash your creativity and experiment with different colors and designs. You can choose vibrant colors to create a playful fish hat or go for more natural shades for a realistic look. The pattern allows you to add unique details like fins, scales, and even fish eyes, giving you endless possibilities to make each hat one-of-a-kind.
2. Skill development: Knitting the fish hat pattern can help you improve your knitting skills. The pattern involves various techniques such as increases, decreases, and colorwork, which can challenge and enhance your knitting abilities. As you progress through the pattern, you’ll become more proficient in these techniques and develop a greater understanding of knitting as a whole.
3. Stress relief: Knitting has been proven to be a relaxing and stress-relieving activity. The repetitive motions and focus required in knitting can help calm the mind and promote a sense of mindfulness. Knitting the fish hat pattern can be especially soothing as you follow the pattern and see your creation come to life.
4. Practicality: The fish hat knitting pattern results in a practical and functional item that can keep you warm during the winter months. The hat is designed to cover your head and ears, providing extra insulation and protection from the cold. With its whimsical design, the fish hat also adds a touch of fun and personality to your winter outfit.
5. Gift-giving: Knitting the fish hat pattern allows you to create unique and thoughtful gifts for family and friends. Handmade gifts are always appreciated, and a fish hat can be a fun and memorable present for children and adults alike. You can customize the hat with the recipient’s favorite colors or add personalized touches like initials or symbols.
Choosing the Right Yarn for Fish Hat Knitting

When it comes to knitting a fish hat, choosing the right yarn is essential to achieve the desired outcome. The right yarn will not only ensure that your hat looks good, but it will also provide comfort and durability. Here are some important factors to consider when selecting yarn for fish hat knitting.
Fiber Content:
The fiber content of the yarn plays a significant role in the overall feel and appearance of the finished hat. For a fish hat, it is recommended to use yarn that is soft and comfortable to wear. Acrylic yarns, such as Caron Simply Soft or Red Heart Soft, are popular choices as they are both soft and easy to care for. If you prefer a more natural fiber, wool or wool-blend yarns can be a good option, providing warmth and breathability.
Weight and Thickness:
The weight and thickness of the yarn will determine the size and density of the stitches in your fish hat. For a fish hat, a medium-weight yarn, such as worsted weight (category 4), is commonly used. This weight allows for a good balance between warmth and drape. However, if you prefer a chunkier look, you can opt for a bulky weight yarn (category 5) for a more substantial hat. It’s important to consider your knitting gauge and the desired results when choosing the weight and thickness of the yarn.
Color and Pattern:

The choice of color and pattern can greatly enhance the appearance of your fish hat. For a classic fish hat look, using variegated yarn can create a visually interesting effect, mimicking the scales of a fish. Alternatively, you can choose solid-colored yarn and add embellishments or embroidery to create details such as fins or eyes. Consider the overall theme and style you want to achieve with your fish hat and choose yarn colors and patterns accordingly.
Yarn Care Instructions:
Lastly, it is important to consider the care instructions of the yarn you choose. Some yarns may require special care, such as hand washing or laying flat to dry, while others may be machine washable and dryer safe. Consider your lifestyle and preferences when selecting yarn, as you’ll want to ensure that the hat can be easily maintained and cleaned without losing its shape or color.
By carefully considering these factors, you can choose the perfect yarn for your fish hat knitting project and create a hat that is both visually appealing and comfortable to wear.
Tools and Materials Required for Fish Hat Knitting

To start knitting a fish hat, you will need a few essential tools and materials. These items will help you create a unique and adorable hat that resembles a fish.
1. Knitting needles: You will need a set of knitting needles in the appropriate size for the yarn you choose. It is recommended to use circular needles, as they are more comfortable to work with for large projects like hats.
2. Yarn: Choose a soft and colorful yarn that will bring your fish hat to life. Acrylic or wool yarns are commonly used for knitting projects and are available in various colors and thicknesses.
- For a vibrant and eye-catching hat, opt for bright colors like orange, green, or blue.
- For a more natural look, consider using shades of brown, gray, or white.
3. Stitch markers: These small rings or clips are used to mark specific stitches or sections in your knitting. They can be particularly handy when working on patterns with intricate designs, like the fish scales on the hat.
4. Yarn needle: A yarn needle with a large eye is essential for weaving in loose ends and sewing up any seams in your finished hat.
5. Scissors: A pair of sharp scissors will come in handy for cutting the yarn when you finish your knitting and for trimming any excess yarn during the finishing process.
6. Fish Hat Knitting Pattern: You will need the Fish Hat knitting pattern, which provides instructions on how to create the hat from start to finish. It includes details on the stitches, shaping, and finishing techniques required to complete the project successfully.
With these tools and materials at hand, you will be well-equipped to start knitting your very own fish hat. Let your creativity shine as you select your preferred colors and enjoy the process of creating a unique accessory that will surely make a splash!
Step-by-Step Guide to Fish Hat Knitting
Knitting your own fish hat can be a fun and rewarding project. Follow this step-by-step guide to create your very own unique fish hat.
Step 1: Gather your materials
Before you begin knitting, make sure you have all the necessary materials. You will need knitting needles, yarn in various colors, scissors, and a tapestry needle for weaving in ends.
Step 2: Choose your pattern
There are many fish hat knitting patterns available online. Browse through different patterns and choose the one that appeals to you the most. Consider the level of difficulty and the size of the hat to ensure it matches your skill level and desired outcome.
Step 3: Cast on stitches
Once you have chosen your pattern, start by casting on the required number of stitches. Follow the instructions in the pattern to ensure you cast on correctly. This will lay the foundation for your fish hat.
Step 4: Knit the body of the hat
After casting on, begin knitting the body of the hat according to the pattern’s instructions. This may involve different stitch patterns and color changes to create the desired fish-like appearance. Take your time and follow the pattern carefully to ensure accurate results.
Step 5: Shape the hat
Once you have reached the desired length for the body of the hat, it’s time to shape it into a fish. This may involve decreasing stitches gradually to form the fish’s head and tail. Follow the pattern’s instructions to shape the hat correctly. Pay attention to any specific stitch instructions to achieve the desired shape.
Step 6: Finishing touches
After shaping the hat, it’s time to weave in any loose ends and secure them. Trim any excess yarn and tidy up the hat. You can also add extra details, such as embroidered eyes or embellishments, to make your fish hat truly unique.
Now that you have completed all the steps, you can proudly wear your handmade fish hat or gift it to someone special. Enjoy the process and have fun creating your own fish hat masterpiece!
Tips and Tricks for Perfecting Your Fish Hat

When it comes to knitting a fish hat, there are a few tips and tricks that can help you create the perfect finished product. Whether you’re a beginner or an experienced knitter, these techniques will make the process easier and ensure a professional-looking result.
1. Use the right yarn: Choosing the right yarn is essential for achieving the desired texture and look of your fish hat. Consider using a soft, bulky yarn that will create a plush and cozy hat. Experiment with different colors to give your fish hat a unique and playful appearance.
2. Follow a detailed pattern: Knitting a fish hat can be a complex endeavor, so it’s important to find a detailed pattern that provides step-by-step instructions. Look for a pattern that includes detailed diagrams and explanations for each stitch. This will help you stay on track and avoid mistakes along the way.
3. Pay attention to gauge: Gauge is a crucial aspect of knitting, especially when it comes to creating a fish hat. Make sure to knit a gauge swatch before starting your project to ensure that your stitches match the pattern’s requirements. Adjust your needle size if necessary to achieve the correct gauge.
4. Use stitch markers: Stitch markers can be useful tools when knitting a fish hat, especially if the pattern involves intricate stitch patterns or color changes. Place a stitch marker after every repeat or color change to help you keep track of your progress and prevent mistakes.
5. Don’t forget the finishing touches: The finishing touches can make all the difference in achieving a professional-looking fish hat. Don’t rush through the final steps – take the time to carefully weave in the ends, block the hat to shape, and add any embellishments or details as desired. These small details can elevate your fish hat from homemade to handmade.
Conclusion

With the right techniques and attention to detail, you can create a perfect fish hat that is both functional and fun. Remember to choose the right yarn, follow a detailed pattern, pay attention to gauge, use stitch markers, and complete the finishing touches with care. With practice, you’ll be able to knit fish hats that are a true work of art.
Customizing Your Fish Hat with Different Colors

When it comes to knitting a fish hat, one fun and creative way to customize it is by using different colors. Changing the colors of your fish hat can add personality and style to your finished project. Whether you prefer bold and vibrant colors or subtle and muted tones, the possibilities are endless.
Choosing the right color combinations:
When selecting colors for your fish hat, it’s essential to consider how they will work together. You can choose colors that complement each other or create a contrasting effect. For example, using contrasting colors for the fish body and fins will make them stand out, while using analogous colors can create a more harmonious and cohesive look.
Creative color placements:
Another way to customize your fish hat is by playing around with color placements. You can use different colors for the body, tail, and lips of the fish, or even create a striped effect by alternating colors in different sections. Adding accents or patterns in contrasting colors can also make your fish hat more visually interesting.
Experimenting with texture:
In addition to using different colors, you can further customize your fish hat by experimenting with different textures. Incorporating different knitting techniques, such as ribbing or cabling, can create visual interest and add depth to your design. You can also consider using variegated or self-striping yarn to add an extra touch of uniqueness.
Personal touch:
Lastly, don’t be afraid to put your own personal touch on your fish hat. Adding small details like buttons for eyes or embroidery for facial features can make your hat even more special. Get creative and have fun with your colors and design choices – after all, your fish hat should reflect your own unique style and personality!
Adding Embellishments to Your Fish Hat

Once you’ve finished knitting your fish hat, you may want to add some extra embellishments to make it even more unique and fun. There are several different ways you can do this, so let’s explore some options.
Pom-poms: One popular embellishment for fish hats is pom-poms. These cute little balls of yarn can be attached to the top of the hat or used to create eyes for the fish. You can make pom-poms in different colors and sizes to add variety and texture to your hat.
Embroidery: Another way to add embellishments to your fish hat is through embroidery. You can use embroidery floss or yarn to stitch on details like scales, fins, or even a smiling mouth. This allows you to customize the design and make your hat truly one-of-a-kind.
Sequins: For an extra touch of sparkle, you can also sew on sequins to your fish hat. These small, shiny discs can be attached in different patterns to create a sparkling effect. Whether you want to add a few sequins as accents or cover the entire hat, they will add a fun and eye-catching element to your design.
Ribbons and Buttons: If you’re looking to add a touch of whimsy to your fish hat, consider attaching ribbons or buttons. You can sew on ribbons as fins or tails or use them to create decorative bows. Buttons can also be used as eyes or as additional accents on the body of the fish.
Felt Appliqués: Lastly, you can use felt to create appliqués for your fish hat. Cut out shapes like hearts, stars, or other sea creatures and attach them to the hat using fabric glue or by sewing them on. This will give your hat a playful and colorful look.
In conclusion, adding embellishments to your fish hat is a fun way to personalize your creation. Whether you choose to use pom-poms, embroidery, sequins, ribbons, buttons, or felt appliqués, these extra details will make your hat stand out and reflect your own unique style.
Alternate Fish Hat Knitting Patterns

When it comes to knitting fish hats, there are numerous alternate patterns available that can add variety and uniqueness to your creations. These patterns allow you to explore different techniques and styles, ensuring that each fish hat you make is truly one-of-a-kind.
1. Colorwork Fish Hat Pattern: Try incorporating different colors into your fish hat to create stunning colorwork designs. You can use Fair Isle or intarsia knitting techniques to add intricate fish or wave patterns to your hat. Experiment with different color combinations to achieve the desired effect.
2. Lace Fish Hat Pattern: For a delicate and feminine touch, consider knitting a lace fish hat. Use lace weight yarn and intricate lace patterns to create a lightweight and airy hat. The lace fish hat can be an elegant addition to your wardrobe, perfect for special occasions or everyday wear.
3. Textured Fish Hat Pattern: If you prefer a more tactile texture, try knitting a fish hat with different textured stitches. Cable, bobbles, or seed stitch patterns can add depth and interest to your hat. Experiment with different stitch patterns to create a unique and textured fish hat.
4. Striped Fish Hat Pattern: To create a playful and colorful fish hat, consider using stripes. Knit alternating sections of different colors to create a bold and vibrant hat. Stripes can be achieved by simply changing yarn colors or by using self-striping yarn for an effortless striped effect.
5. Embellished Fish Hat Pattern: Add a touch of whimsy to your fish hat by embellishing it with various materials. Consider adding buttons, beads, or sequins to create eyes or scales on the fish. You can also use embroidery or applique techniques to add additional details and personalize your fish hat.
Remember, these alternate fish hat knitting patterns are just a starting point. Feel free to mix and match different techniques, stitches, and embellishments to create your own unique fish hat designs. The possibilities are endless, and you can let your creativity shine through with each hat you knit.
Common Mistakes to Avoid in Fish Hat Knitting
Knitting a fish hat can be a fun and unique project, but it’s important to pay attention to details to ensure a successful outcome. Here are some common mistakes to avoid when knitting a fish hat:
1. Skipping Gauge Swatch:
Skipping the gauge swatch is a common mistake that many knitters make, but it can lead to a poorly fitting fish hat. The gauge swatch helps determine the appropriate needle size and stitch tension to achieve the desired size and fit. Take the time to knit a gauge swatch and make any necessary adjustments before starting the project.
2. Ignoring Pattern Instructions:
When knitting a fish hat from a pattern, it’s important to carefully read and follow the instructions. Ignoring or misinterpreting the pattern instructions can result in mistakes and a hat that doesn’t resemble a fish. Take your time to understand the pattern and follow each step accordingly.
3. Using Incorrect Yarn Weight:
Choosing the wrong yarn weight for your fish hat can affect the overall look and fit. Make sure to use the recommended yarn weight mentioned in the pattern instructions. Using a different yarn weight can lead to a hat that is too loose or too tight, compromising the final result.
4. Not Checking Tension:
Tension plays a crucial role in knitting, especially when creating a fish hat with intricate patterns or colorwork. Failing to check your tension throughout the project can result in uneven stitches and an ill-fitting hat. Regularly measure your tension and adjust your knitting technique if necessary.
5. Neglecting Finishing Details:

A fish hat’s charm lies not only in its shape but also in the finishing details. Neglecting to pay attention to details such as attaching the eyes, embroidery, or adding embellishments can make the hat look incomplete or less like a fish. Take the time to carefully finish these details to achieve the desired look.
Avoiding these common mistakes can help you create a beautifully knitted fish hat that will be a hit for yourself or as a gift. Happy knitting!
Fish Hat Knitting for Beginners

If you’re a beginner to knitting and want to try something fun and unique, why not give the fish hat knitting pattern a try? This pattern is perfect for beginners as it only requires basic knitting skills and can be completed in just a few hours. The end result is an adorable and whimsical fish-shaped hat that will surely turn heads.
To start knitting your fish hat, you will need a few supplies. Make sure you have the appropriate weight yarn for your desired hat size, as well as knitting needles in the recommended size. You may also need some stitch markers, a yarn needle for weaving in ends, and a pair of scissors. Once you have everything you need, you’re ready to begin!
Step 1: Start by casting on the required number of stitches for your hat size. This will typically be around 80-100 stitches, depending on the yarn weight and size of hat you want. Use a long-tail cast on method for a clean and stretchy edge.
Step 2: Start knitting in the round, using a circular needle or double-pointed needles, depending on your preference. Knit every round until the hat measures around 5-6 inches from the cast-on edge.
Step 3: Begin shaping the fish tail by decreasing stitches. Follow the pattern instructions for the specific decreases needed to create the fish tail shape. This may involve knitting two stitches together, or slip slip knitting two stitches together. Continue decreasing until you reach the desired width for the tail.
Step 4: Once you’ve reached the desired width for the tail, you can begin shaping the fish head. This may involve increasing stitches to create a rounded shape, or knitting short rows to create a curved profile. Follow the pattern instructions for the specific shaping techniques.
Step 5: Once you’ve completed shaping the tail and head, it’s time to finish off the hat. Cut the yarn, leaving a long tail for weaving in. Thread the yarn onto a yarn needle and carefully weave the tail through the remaining stitches to close the hat. Secure the end and weave in any remaining loose ends.
With these simple steps, you can create a fish hat that is both fun to knit and enjoyable to wear. Whether you’re knitting for yourself or making a gift for a loved one, the fish hat knitting pattern is sure to bring a smile to anyone’s face. Happy knitting!
Caring for Your Fish Hat

Now that you have successfully knitted your fish hat, it’s important to take proper care of it to ensure its longevity and to keep it looking its best. Follow these simple tips to care for your fish hat:
Cleaning:
When it comes to cleaning your fish hat, it’s best to avoid machine washing or drying. Instead, follow these steps:
- Fill a basin with lukewarm water and add a gentle wool wash or mild detergent.
- Gently hand wash the hat, making sure to avoid excessive rubbing or twisting.
- Rinse the hat thoroughly with clean water to remove any soap residue.
- Press out excess water by placing the hat between clean towels and gently squeezing.
- Reshape the hat while damp and lay it flat to dry on a clean, dry towel.
Storage:

Proper storage is crucial for maintaining the shape and condition of your fish hat. Follow these tips:
- Clean the hat before storing it to prevent any dirt or oils from causing damage.
- Avoid hanging the hat, as it can stretch out of shape. Instead, store it in a clean, dry place such as a drawer or a box.
- If you want to maintain the hat’s shape, you can stuff it with tissue paper or a clean, soft fabric.
- Avoid placing heavy objects on top of the hat, as it can distort the shape.
Additional Care Tips:
Here are some additional care tips to keep in mind:
- Avoid exposing your fish hat to direct sunlight for extended periods as it can cause the colors to fade.
- Keep your hat away from sharp objects or rough surfaces to prevent snags or tears.
- If you notice any loose threads or stitches, secure them with a needle and thread to prevent further unraveling.
- If your fish hat gets wet in the rain, gently shake off any excess water and allow it to air dry.
By following these care instructions, you can ensure that your fish hat remains in great condition and continues to bring joy to your days. Happy knitting!