Creating Visual Knitting Guides: A Step-by-Step Tutorial

Knitting is a beloved craft that allows people to create beautiful and functional pieces using just a pair of needles and some yarn. While many knitters rely on written instructions or follow patterns line by line, charting knitting patterns can be a helpful alternative. Knitting charts provide a visual representation of the pattern, making it easier to understand and follow along.
Whether you’re a seasoned knitter looking to challenge yourself with a more complex project or a beginner hoping to improve your skills, learning how to chart knitting patterns can greatly enhance your knitting experience. By translating written instructions into a visual chart, you gain a better understanding of the stitch patterns, repeats, and overall structure of the project.
Knitting charts are particularly useful for knitting lace patterns, colorwork, or any intricate designs that require careful attention to detail. With a knitting chart, you can easily see how each stitch is constructed and how it fits into the overall pattern. This makes it easier to spot mistakes and correct them, resulting in a more professional-looking finished piece.
Understanding knitting charts

A knitting chart is a visual representation of a knitting pattern that allows you to see the stitches and rows in a clear and concise way. It is a useful tool for knitters to follow a pattern and create their desired project. Understanding how to read and interpret knitting charts is essential for any knitter who wants to tackle more complex patterns.
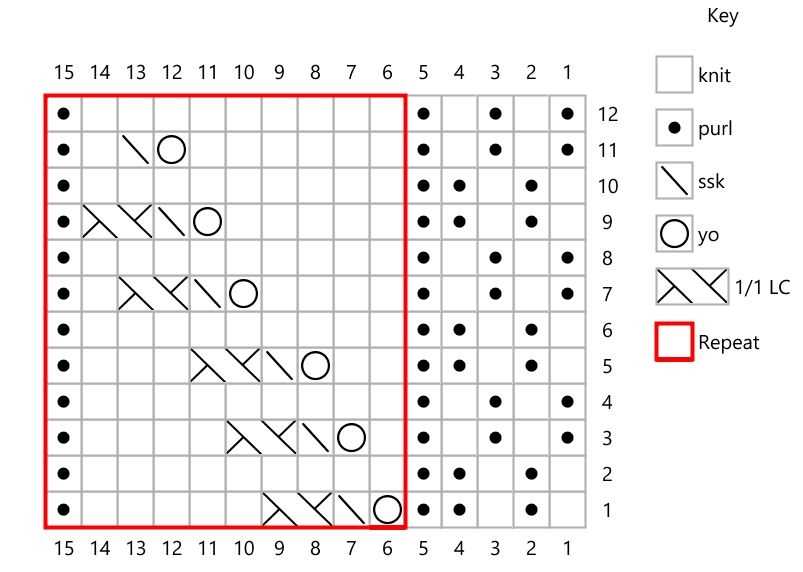
In a knitting chart, each square represents one stitch, and each row is represented by a horizontal line. The chart is read from right to left for right-side rows and from left to right for wrong-side rows. The symbols used in the chart indicate the type of stitch to be worked, such as knit, purl, yarn over, or decreases. Each symbol is accompanied by a legend or key that explains its meaning.
Charts can be particularly helpful for knitters who are visual learners or who struggle with written instructions. By looking at a chart, you can easily see the pattern’s structure and how the stitches interact with each other. It is important to pay attention to the chart’s symbols and their placement. Sometimes, a small dot or symbol above or below a stitch symbol may indicate a specific technique or stitch pattern that needs to be followed.
When reading a knitting chart, it is important to remember to always reference the written instructions that accompany it. The chart is a visual guide, but the written instructions provide the necessary details and explanations for each stitch or technique. By combining both the chart and the written instructions, you can ensure accuracy and better understand the pattern’s overall construction.
Knitting charts are a valuable tool for knitters of all skill levels. They can help you visualize the pattern, keep track of your progress, and make it easier to follow complex stitch patterns. By understanding how to read and interpret knitting charts, you can expand your knitting skills and take on more challenging projects with confidence.
What are knitting charts?
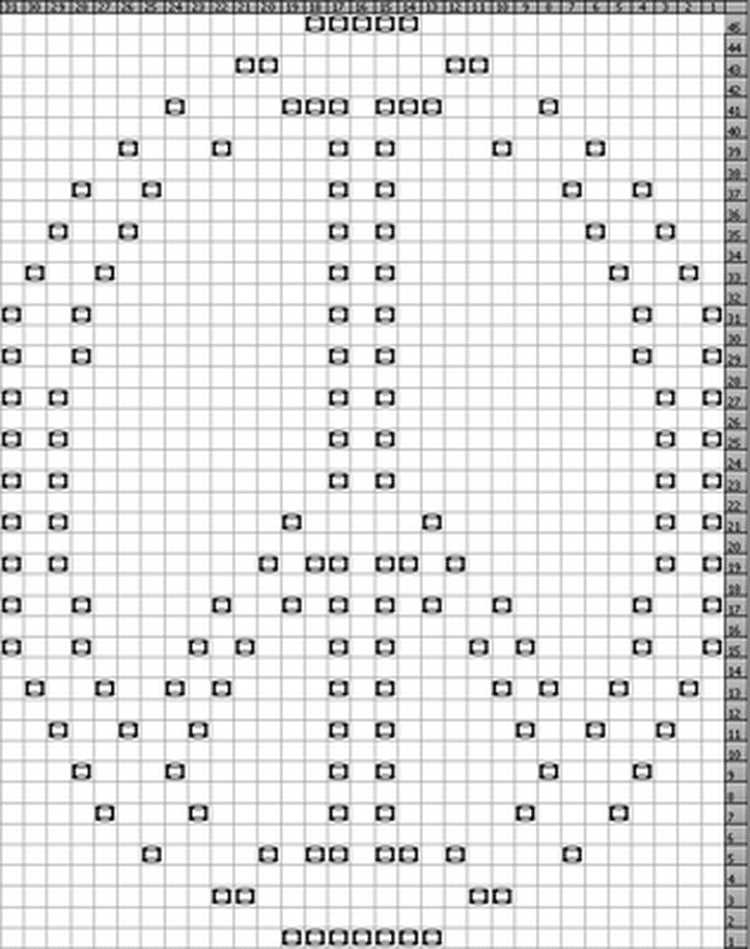
Knitting charts are visual representations of knitting patterns. They consist of a grid of squares, each square representing a stitch or a group of stitches. The symbols or colors used in the chart indicate the specific type of stitch or pattern to be worked. Knitting charts provide a clear and concise way to understand and follow a knitting pattern, making it easier for knitters to visualize the final product and track their progress.
Knitting charts are commonly used in knitting patterns for a variety of projects, including sweaters, scarves, hats, and blankets. They can be created using specialized software or drawn by hand on graph paper. The chart itself is typically accompanied by written instructions that explain how to interpret the symbols or colors used in the chart. Some knitters may prefer working solely from written instructions, while others find knitting charts more intuitive and easier to follow.
Benefits of using knitting charts:
- Visual representation: Knitting charts provide a visual representation of the finished pattern, allowing knitters to see the pattern at a glance.
- Accuracy: Knitting charts help ensure accuracy in following the pattern, as each stitch or pattern is clearly defined in the chart.
- Easy pattern tracking: By using knitting charts, knitters can easily track their progress and keep track of where they are in the pattern.
- Customization: Knitting charts can be easily modified or adjusted to fit individual preferences or design variations.
Overall, knitting charts are valuable tools for knitters of all skill levels. They provide a visual representation of knitting patterns that helps ensure accuracy, track progress, and customize designs. Whether you prefer working from written instructions or knitting charts, incorporating charts into your knitting projects can enhance your overall knitting experience.
Why use knitting charts?
Knitting charts are an essential tool for knitters to visualize their patterns and create accurate and detailed designs. They provide a clear and concise representation of the stitches and help knitters understand how the pattern will look when finished.
One of the main benefits of using knitting charts is that they offer a visual representation of the pattern, making it easier to follow along and avoid mistakes. By following the symbols and colors in the chart, knitters can easily keep track of their progress and ensure that they are creating the correct stitches.
Using knitting charts also allows knitters to easily modify and customize patterns. By visually analyzing the chart, knitters can see how different stitches and pattern elements can be combined or altered to create unique designs. This flexibility gives knitters the freedom to experiment and unleash their creativity.
Additionally, knitting charts are language-independent, making them accessible to knitters from all over the world. Unlike written instructions, which can be confusing or difficult to understand, knitting charts use universal symbols and visual cues that can be easily interpreted by any knitter, regardless of their language or knitting experience.
In conclusion, knitting charts are an invaluable tool for knitters, allowing them to visualize patterns, follow instructions accurately, customize designs, and communicate across language barriers. They enhance the knitting experience and empower knitters to create beautiful and intricate projects with confidence.
Reading knitting charts

Reading knitting charts is an essential skill for any knitter who wants to take their knitting to the next level. Knitting charts are graphical representations of knitting patterns, and they provide a visual guide for knitters to follow. They consist of symbols and colors that represent different knitting stitches and techniques.
To read a knitting chart, start by familiarizing yourself with the key provided by the chart. This key will explain the symbols used in the chart and what each symbol represents. Common symbols include squares for knit stitches, circles for purl stitches, and arrows for yarn overs. By understanding the key, you will be able to decipher the chart and understand what each symbol means.
As you read a knitting chart, it’s important to remember that each square or symbol represents one stitch on your knitting needles. You read the chart from right to left on the right side rows and from left to right on the wrong side rows. The chart will also indicate which rows are right side rows and which are wrong side rows. Following the chart row by row will guide you through the knitting pattern and help you create the desired design.
When using a knitting chart, it can be helpful to use a row counter or highlighter to keep track of your progress. This will allow you to easily see which row you are on and keep track of any stitch or pattern repeats. Additionally, it’s important to read any accompanying written instructions or notes that may be provided along with the chart. These instructions can provide further clarification or additional details that will help you successfully complete the knitting pattern.
In conclusion, reading knitting charts is an important skill for knitters who want to explore more complex patterns and designs. By understanding the symbols, following the key, and reading the chart from right to left and left to right, you can successfully navigate knitting charts and create beautiful knitted projects.
Choosing the right chart for your project
When it comes to knitting, charts are essential for visualizing patterns and designs. Choosing the right chart for your project depends on several factors, including the complexity of the pattern, the stitch techniques used, and your own personal preferences. Here are some tips to help you select the perfect chart for your next knitting project.
Consider the complexity of the pattern

If you’re new to charted knitting or prefer simpler designs, it’s best to start with charts that have fewer symbols and straightforward repeats. Look for charts that have clear instructions and minimal stitch variations. As your skills and confidence grow, you can gradually venture into more complex charts with intricate stitch patterns and shading.
Take into account the stitch techniques used
Some charts are specifically designed for certain stitch techniques, such as cables, lace, or colorwork. Take into account the techniques you’ll be using in your project and choose a chart that supports those stitches. This will ensure that the chart accurately represents your knitting and makes it easier to follow along.
Consider your personal preferences

Everyone has different preferences when it comes to chart styles. Some knitters prefer charts that use symbols to represent each stitch, while others prefer charts that show the actual knitted fabric. Some charts are presented horizontally, while others are presented vertically. Consider what style of chart you find easiest to read and follow, and choose accordingly.
Ultimately, the right chart for your project should be one that aligns with your skill level, supports the stitch techniques you’ll be using, and suits your personal preferences. Take the time to carefully select a chart that meets these criteria, and you’ll have a much more enjoyable knitting experience.
Tools and materials for charting knitting patterns
Creating a chart for a knitting pattern requires a few essential tools and materials to ensure accuracy and ease of use. Whether you prefer using traditional pen and paper or digital software, having the following items on hand will help streamline the charting process.
Paper and pencil or knitting chart software:

When charting a knitting pattern, you have the option to use either traditional pen and paper or digital software. If you prefer the old-fashioned method, make sure to have a grid-style paper like graph paper, which will help you create symmetrical and precise charts. A pencil is also handy for making adjustments or erasing mistakes. Alternatively, if you’re comfortable using technology, there are various software programs available specifically designed for charting knitting patterns. These programs offer features like custom symbols, the ability to easily manipulate and resize charts, and the ability to save your work for future reference.
Symbols and color-coding materials:

Using symbols to represent different stitches and techniques is common in knitting charts. To create clear and easy-to-follow charts, it’s important to have a set of standard knitting symbols on hand. These symbols can be found in knitting pattern books or online resources and usually include symbols for knit, purl, increase, decrease, yarn over, and cables, among others. Additionally, color-coding materials such as colored pencils or highlighters can be useful for visually distinguishing different elements in the chart, making it easier to read and understand.
Rulers and measuring tools:
Accurate measurements are crucial when charting knitting patterns, especially when it comes to gauge and sizing. Having a ruler or a measuring tape on hand will help ensure that your chart accurately represents the desired dimensions of the finished garment. Additionally, stitch markers or removable sticky notes can be helpful for marking specific measurements or important points in your chart.
Knitting reference books or online resources:
While charting knitting patterns, it’s common to encounter stitch patterns or techniques that require additional instruction. Having knitting reference books or access to reliable online resources can be incredibly helpful in understanding and incorporating these elements into your chart. These resources provide step-by-step instructions, illustrations, and tips that can enhance the accuracy and clarity of your knitting chart.
By having the right tools and materials on hand, charting knitting patterns becomes a more efficient and enjoyable process. Whether you prefer the traditional approach or the convenience of digital software, these items will help you create accurate and visually appealing charts that will guide you through your knitting projects with ease.
Creating your own knitting charts
Creating your own knitting charts can be a fun way to personalize your projects and add your own unique touch. Whether you want to design custom patterns, modify existing patterns, or simply keep track of your stitches, creating your own knitting charts allows you to bring your ideas to life.
Before you start creating your knitting chart, it’s important to have a clear idea of what you want to create. Whether it’s a simple cable pattern or a complex fair-isle design, having a plan in mind will help you stay organized and focused. You may also want to gather some inspiration from existing knitting charts or even nature and art.
Here are some steps to help you create your own knitting charts:
- Start with a grid: Use a grid paper or create a digital grid to represent your stitches and rows. Each square in the grid represents one stitch or row, depending on your preference.
- Assign symbols: Assign symbols to each stitch or color in your chart. This will make it easier to read and follow your chart. You can use symbols such as X, O, /, , or even create your own unique symbols.
- Chart the stitches: Use the assigned symbols to chart your stitches on the grid. Start from the bottom right corner and work your way up to the top left corner, just like reading a book.
- Add additional information: Include a key or legend that explains the symbols used in your chart. This will help others understand and follow your knitting chart.
- Test your chart: Once you have finished creating your knitting chart, test it by knitting a swatch using the chart. This will help you identify any errors or inconsistencies in your chart.
Remember, creating your own knitting charts is a creative process, so don’t be afraid to experiment and make changes as you go. With practice, you’ll become more skilled at creating charts that accurately represent your knitting patterns.
Using graph paper

When it comes to charting knitting patterns, using graph paper can be a helpful tool. Graph paper provides a visual representation of your knitting design, allowing you to plan and map out your stitches. It consists of small squares that are numbered and labeled, creating a grid system that makes it easy to translate your design onto paper.
To start using graph paper for charting knitting patterns, you will need to decide on the size of your squares. The size of the squares will depend on the scale of your design and the level of detail you want to include. A smaller square size will result in a more detailed design, while a larger square size may be easier to work with. Once you have determined the size of your squares, you can start filling in the grid to create your knitting chart.
Using graph paper allows you to accurately represent each stitch in your knitting design. You can use different symbols and shading techniques to indicate different types of stitches, such as knit, purl, and decreases. Additionally, you can use different colors on the graph paper to represent different colors of yarn in your design, making it easier to plan out colorwork patterns.
When working with graph paper, it is important to keep in mind your gauge and yarn weight. Make sure that the size of your squares on the graph paper corresponds to the size of your stitches in real life. This will help ensure that your finished knitting project matches your intended design.
Overall, using graph paper can be a valuable tool when charting knitting patterns. It allows you to clearly visualize your design and make adjustments before starting your project. With the help of graph paper, you can bring your knitting ideas to life and create beautiful and intricate patterns.
Digital charting tools
When it comes to charting knitting patterns, digital tools offer a convenient and efficient way to create and edit charts. These tools not only simplify the charting process, but also allow for easy sharing and collaboration with other knitters.
One popular digital charting tool is Knit Visualizer. It allows users to create charts on a visual grid, with the option to include different stitch symbols and colors. Knitters can easily add and remove stitches, as well as adjust the size and layout of the chart. The software also offers features such as row-by-row stitch count, row highlighter, and the ability to export charts as image files or PDFs.
Another digital charting tool worth exploring is Stitch Fiddle. It provides a variety of charting options, including knitting, crochet, and cross-stitch. The interface is user-friendly and allows for easy customization of stitch symbols, colors, and stitch repeats. Stitch Fiddle also offers the ability to share charts with others and collaborate in real time. Users can export charts as image files, PDFs, or even generate written instructions.
- Knit Visualizer: A popular digital charting tool that offers a visual grid, stitch symbols, and the ability to export charts.
- Stitch Fiddle: A user-friendly tool that supports various crafts and allows for customization and collaboration.
In conclusion, digital charting tools provide a convenient and efficient way to create and edit knitting charts. With features like customizable stitch symbols, easy resizing, and the ability to export charts in different formats, these tools are a valuable resource for knitters of all skill levels.
Tips for charting complex knitting patterns
Charting complex knitting patterns can be a challenging task, but with the right techniques and attention to detail, it can become a rewarding and enjoyable process. Here are some tips to help you chart complex knitting patterns effectively:
1. Start with a clear plan
Before you begin charting a complex knitting pattern, it’s important to have a clear plan in mind. Visualize the final design and determine the stitch repeats, shaping elements, and any other unique features that need to be included in the chart. Having a clear plan will help you stay organized and focused throughout the charting process.
2. Use symbols consistently

Consistency is key when it comes to using symbols in a knitting chart. Each stitch should have its own unique symbol, and those symbols should be consistently used throughout the chart. This will help prevent confusion and make it easier for knitters to interpret the chart accurately. Consider using an established set of knitting symbols or creating your own, but make sure to include a legend that explains each symbol used in the chart.
3. Break down the pattern into manageable sections

Complex knitting patterns can be overwhelming, especially when they involve multiple stitch patterns or intricate shaping. To make the charting process more manageable, break down the pattern into smaller, more digestible sections. Focus on one stitch pattern or shaping element at a time, and gradually build the chart by adding more sections. This approach will help you maintain clarity and reduce the chance of making errors.
4. Check for errors and inconsistencies
When charting complex knitting patterns, it’s important to regularly check for errors and inconsistencies. Pay close attention to stitch counts, symbol placement, and the overall flow of the chart. Mistakes can easily occur, especially when dealing with intricate designs, so take the time to review and proofread your chart before finalizing it. It may also be helpful to have someone else review your chart for a fresh perspective.
5. Provide clear instructions

In addition to the chart, it’s important to provide clear instructions for the knitter. Include information on any special techniques or stitches used, as well as details on how the chart should be read. Use concise and straightforward language to ensure that the knitter can easily understand and follow the pattern.
Charting complex knitting patterns requires attention to detail, patience, and organization. With these tips in mind, you’ll be able to create clear and accurate charts that will help knitters bring your intricate designs to life.
Troubleshooting common charting mistakes
Charting knitting patterns can be a rewarding and creative process, but it can also be prone to mistakes. Here are some common charting mistakes and how to troubleshoot them.
1. Miscounting stitches

One of the most common charting mistakes is miscounting stitches. This can result in a pattern that doesn’t align properly or has unexpected gaps. To troubleshoot this mistake, double-check your stitch count at the beginning and end of each row. Make sure that you are following the chart accurately and counting each stitch correctly.
2. Misplacing symbols or colors
Another common mistake is misplacing symbols or colors on the chart. This can lead to confusion and errors in the final knitted piece. To troubleshoot this mistake, review your chart carefully before you start knitting. Check that each symbol or color corresponds to the correct stitch or color in your pattern. If you notice any discrepancies, make the necessary adjustments before continuing.
3. Failing to indicate repeats

Omitting or incorrectly indicating repeats in a chart is another common charting mistake. This can result in a pattern that doesn’t repeat correctly or creates an uneven design. To troubleshoot this mistake, carefully review your chart and make sure that all repeats are clearly indicated. Use brackets or other symbols to show where the repeat begins and ends. This will help you maintain consistency throughout your knitting.
4. Forgetting to include key information

It’s important to include all necessary information in your knitting chart, such as stitch counts, row numbers, and any special instructions. Forgetting to include key information can make it difficult to follow the chart and achieve the desired result. To troubleshoot this mistake, review your chart and make sure that it includes all the necessary details. If you realize that you’ve forgotten something, go back and edit the chart before you start knitting.
Avoiding these common charting mistakes will help you create accurate and clear knitting patterns. Remember to double-check your stitch count, review your symbols and colors, indicate repeats correctly, and include all necessary information. With practice and attention to detail, you can chart knitting patterns with confidence and create beautiful projects.
Translating written knitting patterns into charts
Translating written knitting patterns into charts can be a helpful way to visualize the design and easily follow along as you work. Knitting charts provide a visual representation of each stitch and allow you to see the pattern repeat clearly.
When converting a written knitting pattern into a chart, it is important to have a clear understanding of the stitches and symbols used in knitting charts. Each stitch in the pattern should be represented by a symbol in the chart, making it easier to follow along and keep track of where you are in the pattern.
One common method for translating written patterns into charts is to create a grid system where each square represents a stitch or group of stitches. This grid can be created on graph paper or using a knitting chart software. Each symbol that represents a stitch is then added to the corresponding square in the chart.
It is important to accurately represent the stitches and any increases or decreases in the chart. This includes indicating the direction of the stitches, such as whether they are worked from left to right or right to left.
- Key Tips:
- Take your time to carefully study the written pattern and understand the stitches before creating a chart.
- Use clear and consistent symbols in your chart to represent each stitch or stitch pattern.
- Label or add a legend to your chart to explain the symbols you are using.
- Double-check your chart against the written pattern to ensure accuracy before starting your project.
- Charts can be a valuable tool for visualizing and following knitting patterns, especially for complex designs.
Incorporating symbols and color into knitting charts

Knitting charts are a visual representation of the stitch patterns and colors used in a knitting project. By using symbols and colors, charts make it easier to understand and follow complex patterns. Here are some tips for incorporating symbols and colors into knitting charts:
1. Symbols: In knitting charts, symbols are used to represent different types of stitches or actions. Each symbol represents a specific stitch or a combination of stitches. It is important to have a key or legend that explains the meaning of each symbol. Using clear and easy-to-understand symbols is essential for a successful knitting chart.
2. Color: Color can be used in knitting charts to represent different yarn colors or to differentiate between stitch patterns. To indicate a specific yarn color, use colored squares or circles in the chart. When using color to differentiate stitch patterns, choose colors that are easy to distinguish from each other.
3. Using a combination of symbols and color: Combining symbols and color in knitting charts can provide even more information and make the chart easier to read. For example, you can use symbols to represent different stitch patterns and colors to represent different yarn colors. This can be particularly helpful when working on multi-color or stranded knitting projects.
In conclusion, incorporating symbols and color into knitting charts is essential for creating clear and understandable patterns. By using easy-to-understand symbols, clear color differentiations, and a combination of both, you can create knitting charts that are easy to follow and enjoyable to knit from. Happy charting!