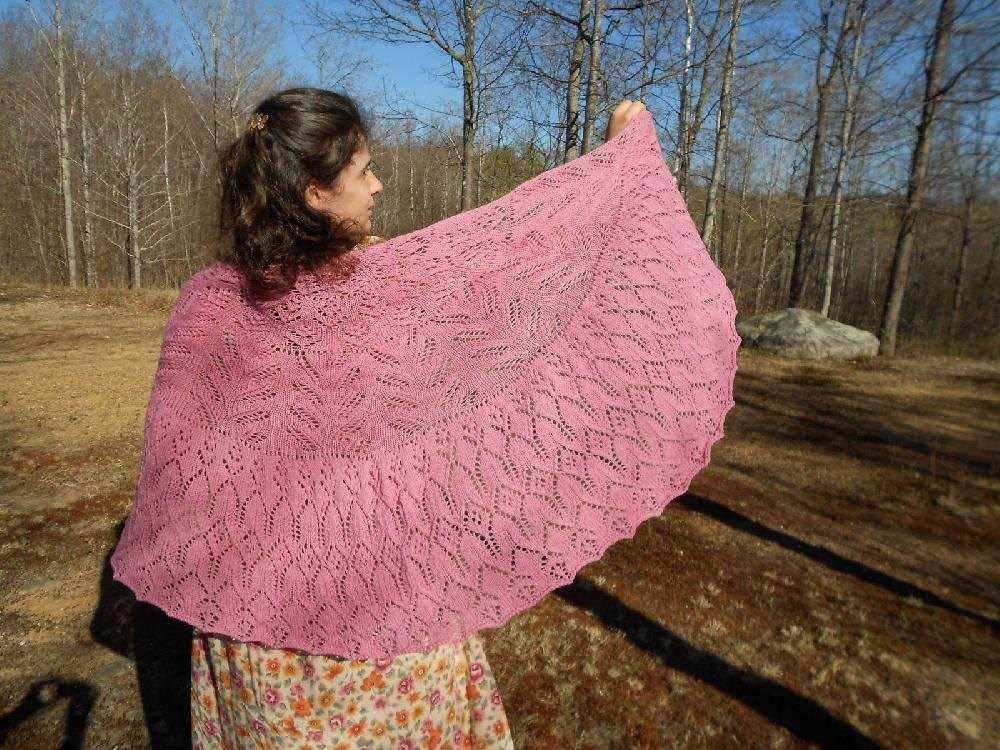
Cozy Connections: A DIY Knitting Pattern for a Friendship Shawl

Knitting is not just a hobby, it’s an art that brings people together. The friendship shawl is a project that embodies the spirit of friendship and creativity. It is a special gift that shows someone you care, and a reminder of the bond you share.
Knitting a friendship shawl is not just about the end result, but about the process of creating something meaningful and lasting. With each stitch, you can feel the love and warmth that goes into making this beautiful garment. Whether you are an experienced knitter or just starting out, this pattern is perfect for you.
The friendship shawl knitting pattern is versatile and customizable. You can choose your favorite colors and yarns to create a unique shawl that reflects your personality and style. The pattern is easy to follow, with step-by-step instructions and helpful tips along the way.
Once you have finished knitting the shawl, it’s time to share your creation with a special friend. Give it as a birthday present, a thank you gift, or simply as a gesture of love and friendship. The shawl will not only keep them warm, but also remind them of the cherished bond you share.
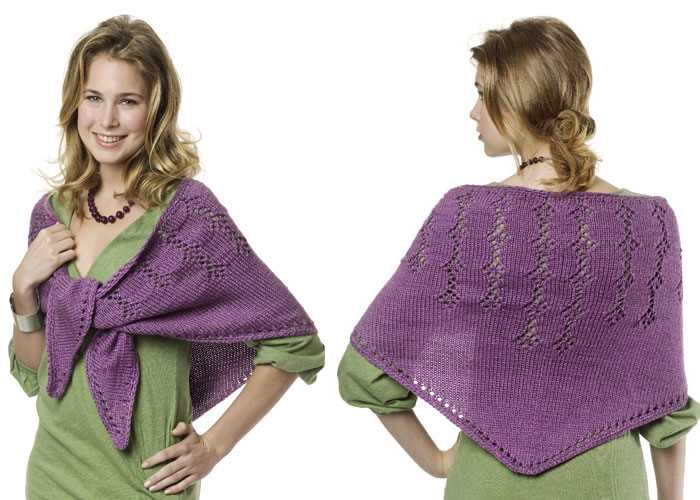
Friendship Shawl Knitting Pattern
Knitting is a wonderful way to express creativity and create beautiful, handmade items. One popular knitting project is the Friendship Shawl, which not only produces a cozy and stylish accessory, but also holds a symbolic meaning of friendship and connection. With its intricate stitches and unique design, the Friendship Shawl has become a favorite among knitters around the world.
The Friendship Shawl knitting pattern is a versatile and customizable project that allows knitters to showcase their skills and personalize the shawl to suit their preferences. Whether you prefer a chunky, cozy shawl or a lightweight, delicate one, the Friendship Shawl can be adapted to meet your needs.
Materials Needed:
- Yarn: Choose a yarn of your choice, keeping in mind the desired weight and texture of the shawl.
- Knitting Needles: Use knitting needles that are suitable for the chosen yarn.
- Stitch markers
- Tapestry needle for weaving in ends
Instructions:

- Cast on the desired number of stitches, typically between 100-200, depending on the desired size of the shawl.
- Follow the chosen stitch pattern, such as garter stitch, lace stitch, or a combination of different stitches, for the desired length of the shawl.
- Add stitch markers to help keep track of pattern repeats, if necessary.
- Continue knitting until the shawl reaches the desired size.
- Bind off the stitches and weave in any loose ends.
- Block the shawl to give it a polished and finished look.
The Friendship Shawl knitting pattern can be enhanced with various modifications, such as adding fringe, incorporating different colors, or experimenting with different stitch patterns. This allows each knitter to put their own personal touch on the shawl and make it a truly unique and meaningful piece.
Whether you choose to keep the Friendship Shawl for yourself or gift it to a dear friend, this knitting pattern is a beautiful way to celebrate the bond of friendship and create something special with your own hands.
Choose the Right Yarn

When knitting a friendship shawl, it is important to choose the right yarn for your project. The yarn you select can greatly impact the final look and feel of your shawl, so it is worth taking the time to make an informed decision. Here are some factors to consider when choosing yarn for your friendship shawl:
Fiber Content
One of the first things to consider is the fiber content of the yarn. Different fibers have different properties and can affect the drape, warmth, and durability of the shawl. Common fiber options include wool, cotton, acrylic, and blends of various fibers. Wool is known for its warmth and ability to retain heat, while cotton is cool and breathable. Acrylic yarns are often affordable and easy to care for. Think about the climate and the recipient’s preferences when selecting the fiber content.
Weight and Thickness
The weight and thickness of the yarn will also impact your finished shawl. Yarn weight is categorized into different categories, such as lace, fingering, sport, DK, worsted, and bulky. Thinner yarns, such as lace or fingering weight, will create a lighter and airier shawl, while thicker yarns, like bulky weight, will result in a warmer and chunkier shawl. Consider the desired look and drape of your shawl when choosing the yarn weight.
Color and Texture
Another important consideration is the color and texture of the yarn. Both of these elements play a significant role in the overall aesthetic of the shawl. Think about the recipient’s preferences and wardrobe when selecting the color. Additionally, consider the texture of the yarn, whether it is smooth, fuzzy, or has a unique texture like boucle or mohair. The texture can add visual interest and dimension to the finished shawl.
Availability and Price
Lastly, consider the availability and price of the yarn. Some yarns may be difficult to find or may be out of your budget. It is important to choose a yarn that is easily accessible to you and fits within your budget. Don’t be afraid to shop around, compare prices, and explore different yarn options to find the perfect fit for your friendship shawl.
By considering the fiber content, weight and thickness, color and texture, as well as availability and price, you can choose the right yarn for your friendship shawl project. Taking the time to select the perfect yarn will ensure that your shawl not only looks beautiful but also meets the practical needs and preferences of the recipient.
Gather Necessary Materials
In order to start knitting your friendship shawl, you will need to gather the necessary materials. Make sure you have the following items on hand before you begin:
- Knitting Needles: Choose a pair of knitting needles in the appropriate size for your chosen yarn. You may need to refer to the yarn label for needle size recommendations.
- Yarn: Select a soft, medium-weight yarn in the color or colors of your choice. Consider using a yarn that is machine washable for easy care.
- Tape Measure: Have a tape measure or ruler nearby to help you measure your work and ensure the correct sizing.
- Scissors: Keep a pair of scissors handy for cutting yarn and any necessary weaving or finishing.
- Yarn Needle: You will need a large-eye yarn needle for weaving in ends and any sewing required for finishing the shawl.
- Stitch Markers: Stitch markers can be helpful for keeping track of specific stitches or sections of your knitting.
Once you have gathered all of these materials, you will be ready to begin knitting your friendship shawl. Make sure you have a comfortable and well-lit workspace, as knitting may require time and concentration. Now, let’s move on to the next step: choosing your pattern and casting on!
Gauge Swatch
Before starting your friendship shawl project, it’s important to knit a gauge swatch. This will help ensure that your finished shawl has the correct size and fit. While it may seem like an extra step, taking the time to knit a gauge swatch can save you from potential disappointment later on.
A gauge swatch is essentially a small test square that you knit using the same yarn and needles you plan to use for your project. It allows you to measure the number of stitches and rows per inch, which will help you determine if your tension is correct.
To knit a gauge swatch, follow these steps:
- Choose the yarn you plan to use for your friendship shawl project, and the needles recommended on the yarn label. It’s important to use the same yarn and needles for your gauge swatch as you will for your shawl.
- Cast on a few more stitches than the recommended gauge (for example, if the recommended gauge is 20 stitches per 4 inches, cast on 24 stitches).
- Knit a few rows in a simple stitch pattern, like stockinette stitch.
- Measure the width of your swatch using a ruler or gauge tool. Count the number of stitches in 4 inches and divide by 4 to determine your stitches per inch.
- Measure the height of your swatch by counting the number of rows in 4 inches and dividing by 4 to determine your rows per inch.
- If your gauge matches the recommended gauge for the pattern, you’re good to go! If not, you may need to adjust your needle size to achieve the correct tension.
Remember, gauge swatches are meant to be washed and blocked just like your finished shawl, as some yarns may change after washing. By taking the time to knit a gauge swatch, you can ensure that your friendship shawl turns out perfectly.
Cast On
The cast on is the first step in starting your friendship shawl knitting pattern. It is the process of creating the initial row of stitches on the knitting needle. There are several different cast on methods you can use, and the one you choose will depend on your preference and the desired outcome of your shawl.
Long-Tail Cast On
The long-tail cast on method is a popular choice for many knitters. It creates a neat and elastic edge that is ideal for shawls. To do the long-tail cast on, you will need to estimate the length of yarn needed for your desired number of stitches. This method involves casting on using both the working yarn and a “tail” of yarn that is approximately three times the length of the desired cast on edge.
1. Make a slipknot, leaving a long tail of yarn.
2. Hold the slipknot in your right hand and insert the knitting needle under the yarn tail, from front to back.
3. Bring the working yarn over your thumb and the yarn tail over your index finger.
4. Insert the needle through the loop on your thumb from front to back and under the yarn tail on your index finger.
5. Drop the loop from your thumb and tighten the stitch by pulling on the working yarn.
6. Repeat steps 2-5 until you have cast on the desired number of stitches.
Once you have cast on your stitches, you are ready to start knitting your friendship shawl pattern. The cast on edge will be the foundation of your shawl, so it’s important to take your time and ensure that your stitches are even and not too tight. Practice the long-tail cast on method until you feel comfortable with it, and then move on to the next step in your knitting journey.
Knit the Body
After completing the cast-on and the border of the Friendship shawl, it’s time to start knitting the body. This is the main part of the shawl where the stitch pattern is created and the shawl grows in size. You will continue using the same stitch pattern that you established in the border, but with a few modifications.
For the body of the shawl, you will work rows of the stitch pattern to create the desired length and width. You will need to follow the instructions and pay attention to any changes in the stitch pattern as indicated. This will ensure that the shawl maintains its overall design and symmetry.
In this section, it is important to keep track of your stitches and rows to ensure an even and consistent fabric. One way to do this is to use stitch markers to mark important points in the pattern or to count your stitches at the end of each row. This will help you stay on track and avoid any mistakes or inconsistencies in your knitting.
As you knit the body of the shawl, you will notice it growing larger and taking shape. The pattern may become more repetitive and predictable, allowing you to get into a rhythm and enjoy the process of creating the shawl. It is important to stay focused and keep track of your progress to ensure that the shawl turns out as intended.
The body of the Friendship shawl is where you can truly make the pattern your own. You can experiment with different colors, yarns, and stitch patterns to create a unique and personalized shawl. Whether you choose to stick with the original pattern or make modifications, knitting the body of the shawl allows you to bring your own creativity and style to the project.
Once you have completed knitting the body of the shawl, you can move on to the next section, which will guide you through the finishing touches and shaping of the shawl. But before that, take a moment to admire your progress and how far you have come in creating this beautiful Friendship shawl.
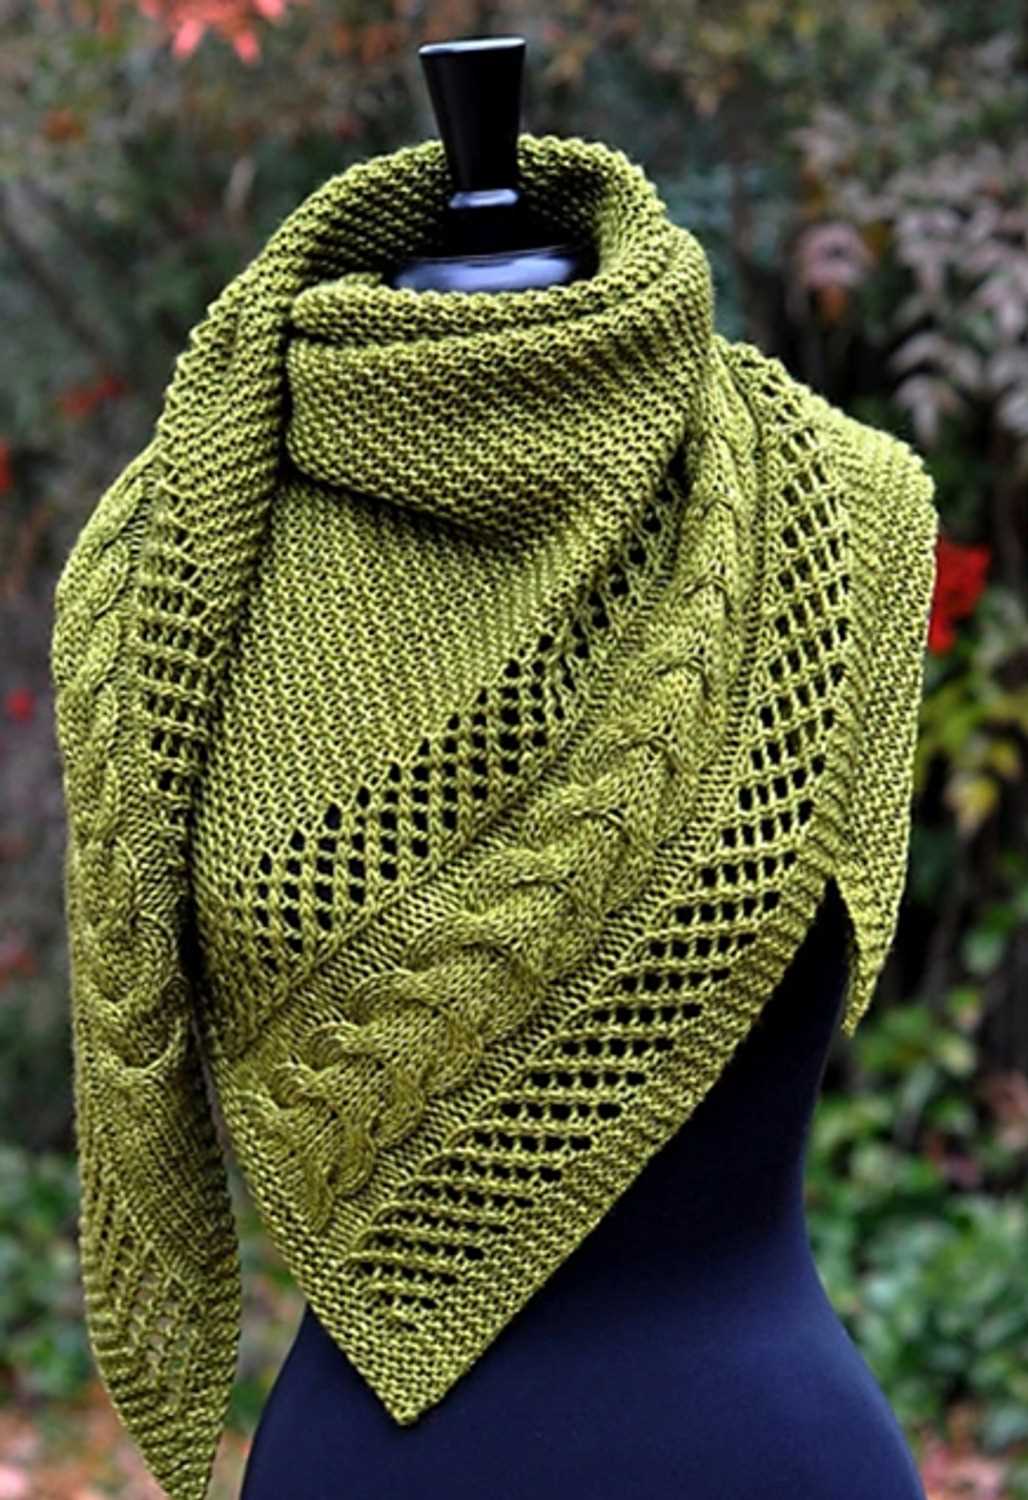
Add a Lace Border
A lace border can add a beautiful and delicate touch to your friendship shawl knitting pattern. It can elevate the overall design and make it even more special. Here are some tips and instructions on how to add a lace border to your shawl.
Choose the Lace Pattern: Start by selecting a lace pattern that complements the overall design of your shawl. There are various lace patterns to choose from, such as floral designs, geometric shapes, or intricate motifs. Consider the complexity of the pattern and how it will blend with the rest of the shawl.
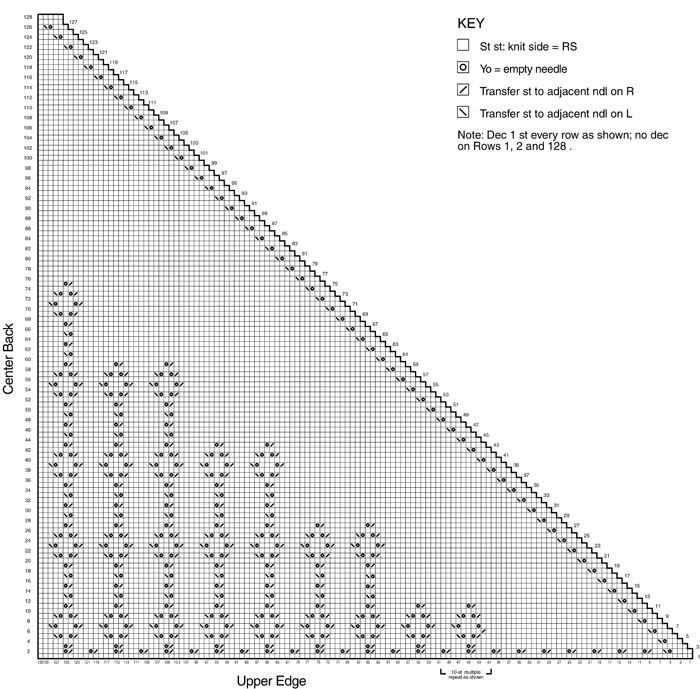
Calculate the Stitch Count: Once you have chosen your lace pattern, calculate the number of stitches needed for the border. This will depend on the desired width of the border and the gauge of your knitting. Make sure to take into account any stitch pattern repeats and edges to ensure an even and balanced border.
Transition from Body to Border: To seamlessly transition from the body of the shawl to the lace border, you can use a transition row. This row can consist of simple knitting or purling stitches, creating a clean and neat edge. The transition row should be compatible with the lace pattern and blend in smoothly with the rest of the shawl.
Knit the Lace Border: Once the transition row is complete, you can start knitting the lace border. Follow the lace pattern instructions row by row, paying attention to any yarn overs, decreases, or pattern repeats. Take your time and ensure that each stitch is executed accurately, as mistakes in lace knitting can be challenging to fix.
Block the Finished Shawl: After completing the lace border, it is essential to block the shawl to enhance the lace pattern and give it a finished look. Wet blocking is recommended for lace knitting, as it helps to open up the stitches and define the intricate pattern. Follow the blocking instructions specific to your chosen yarn to achieve the desired result.
By adding a lace border to your friendship shawl knitting pattern, you can elevate its beauty and create a truly unique piece. Enjoy the process and embrace the intricate details that lace knitting has to offer.
Knit the Final Rows
As you approach the final rows of your friendship shawl, it’s time to pay close attention to the pattern and make sure you’re following it accurately. These last rows are crucial in creating a beautiful finished product, so take your time and double-check your work.
First, make sure you have the correct number of stitches on your needle. You don’t want to end up with too few or too many stitches, as it will affect the overall shape and size of the shawl. Count your stitches carefully before proceeding.
Next, follow the pattern instructions for the final rows. This may involve repeating certain stitch patterns or decreasing stitches to create a tapered edge. Pay attention to any special instructions or stitch combinations that may be required. Use stitch markers if needed to help you keep track of where you are in the pattern.
Remember to maintain your knitting tension as you work the final rows. Avoid pulling the yarn too tight or leaving it too loose, as it will affect the overall appearance of the shawl. Keep your hands relaxed and try to maintain a steady rhythm as you work. Take breaks if needed to prevent fatigue and ensure that your stitches are even and consistent.
Once you have completed the final rows of your friendship shawl, it’s time to bind off. The method of binding off will depend on the pattern and your personal preference. Follow the instructions provided and try to create a firm but not too tight edge.
Finally, give your shawl a gentle blocking to help shape and open up the stitches. You can use blocking pins and a blocking board or simply lay it flat on a clean towel and pat it into shape. Allow it to dry completely before removing the pins or towel. Now your friendship shawl is ready to be admired and cherished, a beautiful symbol of your friendship and the time and effort you put into creating it.
Bind Off
Once you have completed knitting your friendship shawl, it is time to bind off your stitches. Binding off, also known as casting off, is the process of creating a finished edge on your project. It involves removing the stitches from the needles and securing them, creating a neat and secure edge.
To bind off, you will need to have a pair of knitting needles or a crochet hook, as well as your working yarn. Start by knitting the first two stitches as you normally would. Then, using your left needle, lift the first stitch over the second stitch and let it drop off the needle. This completes one bind off stitch.
Continue in this manner, knitting one stitch and then lifting the previous stitch over the newly knitted stitch, until you have bound off all of the stitches on your needles. Once you reach the end of your row, cut the yarn, leaving a long tail. Thread the tail through the last stitch and pull tight to secure.
Binding off creates a finished edge that prevents your stitches from unraveling and gives your project a polished look. Whether you are binding off a friendship shawl or any other knitting project, mastering this technique is essential for achieving professional-looking results.
If you are new to binding off, it may take some practice to get the tension and technique just right. Don’t get discouraged if it doesn’t look perfect right away, as with any skill, it takes time and practice to improve. Keep at it, and soon you’ll be binding off your projects with confidence and ease.
As with any knitting technique, there are different variations of binding off that can be used depending on the desired effect. Some common variations include different stitch patterns or using a larger needle size for a looser bind off. Experimenting with different methods can help you find the perfect bind off technique for your friendship shawl.
Block the Shawl
Blocking your shawl is an essential step in the knitting process. It helps to bring out the lace pattern and give your shawl a polished and finished look. The blocking process involves stretching and shaping the shawl to achieve the desired dimensions and enhance the stitch definition.
The first step in blocking your shawl is to soak it in a basin of lukewarm water. Add a few drops of mild detergent or wool wash to the water and gently agitate the shawl to ensure that it is fully submerged. Allow the shawl to soak for about 15-20 minutes, then carefully remove it from the water and gently squeeze out the excess moisture. Do not wring or twist the shawl, as this may damage the delicate fibers.
Once the shawl is damp, it can be pinned out to shape. Lay a clean, flat surface, such as a blocking board or towel, and carefully arrange the shawl on top. Using rust-proof T-pins or blocking wires, start at the center of the shawl and pin out the edges, stretching them gently to achieve the desired shape and dimensions. Pay special attention to the lace pattern and ensure that it is fully stretched out to highlight the intricate details.
Leave the shawl to dry completely before removing the pins or wires. This may take anywhere from a few hours to a day, depending on the humidity and temperature of your environment. Once dry, carefully lift off the pins or wires, taking care not to snag or pull the shawl. Admire your beautifully blocked shawl, and it is now ready to be worn or gifted with pride.
Add Tassels or Fringe
Adding tassels or fringe to your friendship shawl is a great way to add a stylish and decorative touch. It can give your shawl a finished look and make it more unique. There are several different ways you can add tassels or fringe, depending on your personal preference and the overall style of your shawl.
If you choose to add tassels, you can use yarn in coordinating or contrasting colors to create a fun and playful look. Simply cut several strands of yarn to your desired length, then fold them in half. Insert the folded end through a stitch at the edge of your shawl, then pull the loose ends through the loop and tighten. Repeat this process along the edge of your shawl, spacing the tassels evenly.
For a more subtle and delicate look, you can add fringe to your shawl instead. To do this, cut several strands of yarn to your desired length, then fold them in half. Insert the folded end through a stitch at the edge of your shawl, then pull the loose ends through the loop and tighten. Repeat this process along the edge of your shawl, spacing the fringe evenly.
Care Instructions
Fiber content: The Friendship shawl is knitted with a soft and delicate blend of acrylic and wool. To ensure its longevity, it is important to follow the care instructions carefully.
Washing: Hand wash the shawl in cold water using a gentle detergent. Do not bleach or use harsh chemicals that can damage the fibers.
Drying:
- After washing, gently squeeze out the excess water. Do not wring or twist the shawl as it can cause it to lose its shape.
- Lay the shawl flat on a clean towel and reshape it to its original size. Avoid stretching or pulling the fabric.
- Leave the shawl to air dry in a well-ventilated area. Do not hang it as it can stretch the fibers.
Ironing and Steaming:
- If necessary, you can iron the shawl using a low heat setting. Place a clean cloth between the iron and the shawl to protect the delicate fibers.
- Alternatively, you can steam the shawl by holding a steamer a few inches away from the fabric and gently moving it across the surface. Avoid direct contact with the steamer to prevent any damage.
Storage:
- When not in use, store the Friendship shawl in a clean and dry place. Avoid exposing it to sunlight for extended periods of time as it can cause fading.
- You can fold the shawl neatly or roll it up to save space. Make sure it is stored away from any sharp objects that can snag the delicate fabric.
By following these care instructions, you can ensure that your Friendship shawl remains soft, beautiful, and ready to keep you warm and stylish for years to come.
Share Your Finished Shawl
After spending hours knitting and perfecting your friendship shawl, it’s time to show off your hard work and creativity. Sharing your finished shawl with others can inspire fellow knitters and create a sense of community. Here are a few ways you can share your masterpiece:
- Social Media: Take a beautiful photo of your shawl and post it on your favorite social media platforms. Use hashtags such as #friendshipshawlknittingpattern or #knittersofinstagram to connect with like-minded individuals.
- Knitting Forums and Communities: Join online knitting forums and communities to share your finished shawl. These platforms often have dedicated sections for showcasing completed projects, providing an opportunity to receive feedback and admiration from fellow knitters.
- Gift it: Consider giving your finished shawl as a gift to a friend or loved one. They will appreciate the time and effort you put into creating something special just for them.
- Local Knitting Groups: If you’re part of a local knitting group, bring your shawl to a meeting and share it with fellow members. This can spark conversations and inspire new knitting projects among the group.
- Donate it: Alternatively, you can donate your finished shawl to a charity or organization that accepts handmade items. This way, your shawl can bring comfort and warmth to someone in need.
Remember, sharing your finished shawl is not only a way to showcase your talent but also to connect with other knitting enthusiasts. Despite the distance, the world of knitting can bring people together, and your friendship shawl can be the thread that binds us all.