Understanding the Mysterious “M1” in Knitting Patterns

When you start learning how to knit or follow knitting patterns, you might come across various abbreviations and terms that may seem confusing at first. One such abbreviation is M1. If you are wondering about its meaning and how to incorporate it into your knitting projects, you have come to the right place.
M1 stands for “make one” and it is a commonly used technique in knitting to create a new stitch. It is used when you need to increase the number of stitches in your pattern. By making one stitch, you can add an extra stitch without the need for a yarn over or any other decorative increase method.
There are different ways to make one stitch depending on the knitting pattern you are following. It can be done by lifting the strand between stitches and knitting it, or by picking up the horizontal strand from the row below and knitting it. The specific instructions for M1 will be mentioned in your knitting pattern, so make sure to read them carefully to ensure you are using the correct technique.
In conclusion, M1 is an abbreviation for “make one” and it is used in knitting to increase the number of stitches in your pattern. Understanding this technique and how to correctly execute it will allow you to successfully follow knitting patterns and create beautiful projects.
What does M1 stand for in knitting?

M1 stands for “Make One” in knitting. It is a commonly used abbreviation in knitting patterns and refers to a technique used to increase the number of stitches in a row. When you see “M1” in a pattern, it means that you need to create a new stitch without using an existing stitch.
To make a stitch using the M1 method, you will need to pick up the horizontal strand of yarn between the stitches on your left and right needles, and then knit or purl into it, depending on the pattern. This creates a new stitch and increases the stitch count by one. M1 can be used to create a decorative effect, shape a garment, or add extra width to a project.
M1 is a versatile increase method and there are different variations of it depending on the desired result. Some common variations include M1L (Make One Left) and M1R (Make One Right), which denote whether to pick up the strand from the front or back of the needle.
How to do M1 in knitting:
- Insert the left needle from front to back into the horizontal strand of yarn between the stitches.
- Lift the strand onto the left needle, creating a new stitch.
- Knit or purl into the new stitch, as instructed in the pattern.
By understanding what M1 stands for in knitting and how to perform the M1 increase, you can confidently tackle patterns that include this abbreviation and successfully create beautiful knitted projects.
Understanding the M1 increase in knitting
When following a knitting pattern, you may come across the term “M1” for increases. This refers to a specific type of increase called a “Make One” increase, which is used to add stitches to your knitting. Understanding how to perform a M1 increase correctly is essential for achieving the desired shape and fit in your project.
There are different methods to execute a M1 increase, but the most common one involves picking up the yarn between two existing stitches and creating a new stitch. To do this, you insert the left needle from front to back into the strand of yarn between the stitches on the right needle, and then knit it as you would any other stitch. This method creates a new stitch that leans to the left, making it appear seamless with the surrounding stitches.
It’s important to pay attention to the instructions given in your knitting pattern for the M1 increase, as there may be variations or alternative methods specified. Some patterns may call for a different type of increase, such as a M1L (Make One Left) or M1R (Make One Right), which create stitches that lean in different directions. The specific increase method used can impact the appearance and shaping of your project.
Mastering the M1 increase will expand your knitting skills and allow you to tackle a wider range of patterns. Whether you’re working on a sweater, hat, or any other project that requires increases, understanding how to execute the M1 increase correctly will ensure a smooth and professional-looking finished result. Practice the technique, follow the pattern instructions, and soon you’ll be confident in your ability to work with M1 increases.
Different methods of making an M1 increase

M1, or “make one”, is a common increase used in knitting patterns to add stitches to your work. There are several different methods you can use to make an M1 increase, each with its own unique look and technique.
One method of making an M1 increase is the “lifted increase”. To do this, insert your right needle from front to back into the horizontal strand of yarn that runs between the stitch just worked and the next stitch on the left needle. Lift this strand onto the left needle, and then knit into the back of it. This method creates a tight and invisible increase.
Another method is the “knitting into the stitch below” increase. This involves inserting your right needle into the stitch below the next stitch on the left needle, from the back to the front. Then, knit into this stitch as you would normally. This method creates a slightly raised increase that is visible in the fabric.
The “bar increase” method is another option for making an M1 increase. With this method, you simply knit into the horizontal bar that runs between two stitches. This bar is located right below the stitch on the left needle. This method creates a visible and raised increase.
These are just a few examples of the different methods you can use to make an M1 increase in your knitting. Each method will create a slightly different look, so it’s important to choose the one that best suits your project and the desired outcome.
M1L vs M1R: What’s the difference?
When following a knitting pattern, you may come across the instructions to make a M1L or a M1R. These abbreviations stand for “make one left” and “make one right” respectively. They are both types of increases used to add stitches to your knitting.
M1L: To execute a M1L, insert the left needle into the bar between the stitch just worked and the next stitch, from front to back. Knit into the back of this stitch to create a left-leaning increase. The resulting stitch will be twisted, giving it a different appearance from the surrounding stitches.
M1R: The M1R is worked similarly to the M1L but creates a right-leaning increase. Insert the left needle into the bar between the stitch just worked and the next stitch, but this time from back to front. Knit into the front of this stitch to create the increase. The resulting stitch will also be twisted, but in the opposite direction as the M1L.
In summary, the main difference between M1L and M1R is the direction in which the increase leans. M1L creates a left-leaning increase, while M1R creates a right-leaning increase. The twisted appearance of the resulting stitches adds a decorative element to your knitting and can be used strategically to create various patterns and designs.
Tips for working M1 increases neatly

When knitting a pattern that includes M1 (make one) increases, it’s important to ensure that they are worked neatly and are indistinguishable from the surrounding stitches. Here are some tips to help you achieve a professional finish:
1. Choose the right method
There are several methods for working M1 increases, including the knitwise, purlwise, and lifted increases. Experiment with different methods to find one that produces the cleanest and most invisible result for your specific project.
2. Pay attention to tension
Keep an eye on your tension when working M1 increases, as pulling the yarn too tight can create a visible hole or distortion in the fabric. Maintain an even tension throughout your work to ensure a neat and uniform appearance.
3. Work the increase on the correct row

Make sure you are working the M1 increases on the appropriate row as specified in the pattern. Working the increase on the wrong row can throw off the stitch count and result in an incorrect shape or fit.
4. Use markers
If the pattern requires multiple M1 increases in a row, it can be helpful to place markers between each increase. This will help you keep track of the increases and ensure they are evenly spaced and correctly placed.
5. Practice and swatch
Before starting your project, practice working M1 increases on a small swatch. This will allow you to fine-tune your technique and make any necessary adjustments before beginning your actual project.
- Experiment with different M1 methods
- Pay attention to tension
- Work the increase on the correct row
- Use markers to keep track of increases
- Practice and swatch before starting your project
Common Mistakes to Avoid When Using M1 in Knitting Patterns
When following knitting patterns, it is important to pay attention to the specific instructions provided. One common technique used in patterns is “M1,” which stands for “make one.” M1 is a way to increase stitches in your knitting. However, there are a few common mistakes that beginners sometimes make when utilizing this technique.
Mistake 1: Confusing Right and Left M1

One common mistake is confusing the instructions for right-leaning M1 (M1R) and left-leaning M1 (M1L). Each of these increases creates a different type of stitch that slants to the right or left. Make sure to carefully read the pattern instructions to determine which type of M1 is required for your specific project. Mixing up the two can lead to uneven stitches and an unbalanced finished garment.
Mistake 2: Incorrect Orientation of the Needle
Another mistake when using M1 is inserting the needle incorrectly. It’s important to insert the needle from the correct direction to create a clean and smooth increase. For example, if the pattern specifies to pick up the bar between stitches from the front, make sure you are doing so. Inserting the needle from the wrong direction can result in twisted or distorted stitches.
Mistake 3: Not Keeping Tension Consistent
Tension is crucial in knitting, and this holds true when using M1 as well. It is important to maintain consistent tension throughout the M1 stitch to ensure it matches the surrounding stitches. Avoid pulling too tightly or loosely when making the increase, as this can create uneven stitches and affect the overall appearance of the project.
Mistake 4: Forgetting to Count the M1 Stitch
Lastly, a common mistake is forgetting to count the M1 stitch as a stitch in the pattern. This can lead to incorrect stitch counts and the overall shape of the project being compromised. Always remember to include the M1 stitch as part of your stitch count and follow the pattern instructions accordingly.
By being aware of these common mistakes and taking the time to carefully read and understand the pattern instructions, you can avoid these pitfalls when using M1 in your knitting projects. This will help ensure that your finished garments are neat, professional-looking, and of high quality.
Advantages of Using M1 Increases in Knitting Patterns
The term “m1” in knitting patterns refers to a type of increase called “make one.” It is a commonly used technique to add stitches to your knitting project, creating new stitches from the existing ones. There are several advantages to using m1 increases in your knitting patterns.
1. Invisible Increase
One of the main advantages of using m1 increases is that they are virtually invisible. Unlike some other types of increases that may create a visible hole or distortion in the fabric, m1 increases blend seamlessly into the knitting, making it difficult to spot where the increase was made.
2. Versatility
M1 increases can be used in a variety of knitting projects, including garments, accessories, and even lace patterns. They can be worked on either the right side or wrong side of the fabric, and can easily be incorporated into different stitch patterns. This versatility makes m1 increases a valuable technique for knitters.
3. Neat and Tidy Appearance

Compared to some other types of increases, m1 increases result in a neat and tidy appearance. They create a smooth and even line of stitches, which can be particularly important when working on projects with intricate stitch patterns or when looking for a clean and professional finish.
4. Easy to Learn and Memorize
The m1 increase is a relatively simple technique to learn and memorize. It involves picking up the horizontal strand of yarn between two existing stitches and knitting or purling into it. Once you have practiced m1 increases a few times, they become an intuitive and easy-to-remember part of your knitting repertoire.
Overall, m1 increases offer knitters a range of advantages, including an invisible appearance, versatility, neatness, and ease of use. By mastering this technique, you can enhance your knitting skills and create beautiful and professional-looking projects.
M1 increases in lace knitting patterns
M1 (Make One) increases are commonly used in lace knitting patterns to create additional stitches and increase the width or shape of the fabric. These increases are often used to create decorative motifs or to shape the garment.
When working M1 increases in lace knitting, there are a few different methods that can be used. One common method is the M1L (Make One Left) increase, where the stitch is created by lifting the bar between the stitch just worked and the next stitch onto the left-hand needle, and then knitting into the back of this lifted stitch.
Another method is the M1R (Make One Right) increase, where the stitch is created by lifting the bar between the stitch just worked and the next stitch onto the left-hand needle, and then knitting into the front of this lifted stitch.
These M1 increases are often used in lace patterns to create increases that are nearly invisible, blending in with the surrounding stitches. This allows the lace motifs to flow seamlessly and creates a more polished and professional look to the finished project.
It’s important to follow the specific instructions given in the knitting pattern for the M1 increase, as different patterns may use different methods or variations of the M1 increase. By carefully following the pattern instructions, you can achieve the desired shape and design of the lace knitting project.
- M1L: Lift the bar between the stitch just worked and the next stitch onto the left-hand needle, then knit into the back of this lifted stitch.
- M1R: Lift the bar between the stitch just worked and the next stitch onto the left-hand needle, then knit into the front of this lifted stitch.
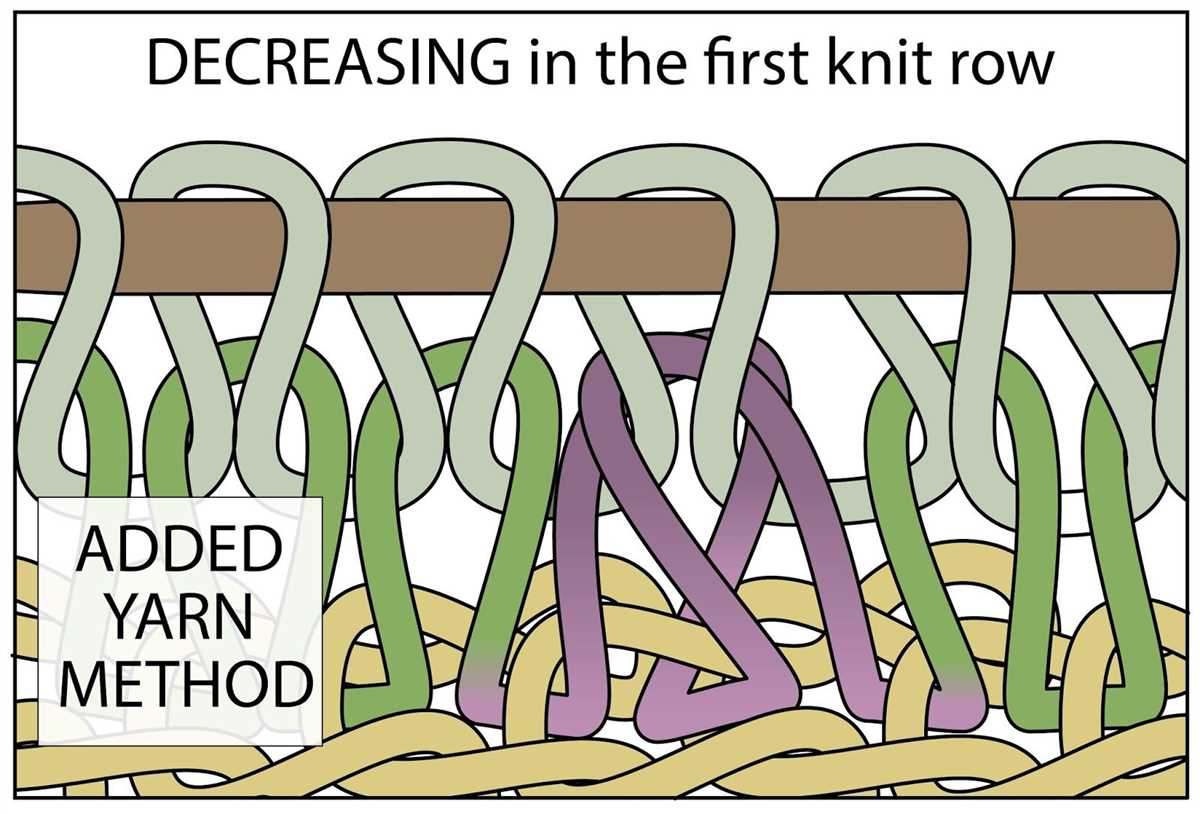
Using M1 decreases for shaping in knitting

When following knitting patterns, you might come across the abbreviation “M1” in the instructions. M1 stands for “make one” and is a common method used to create new stitches in a knitted fabric. It is typically used for shaping purposes, such as increases or decreases.
To perform an M1 increase, you can use different techniques depending on your preference and the desired result. One common method is the “M1L” (make one left) increase, where you lift the bar between stitches from the front and knit into the back loop. This creates a new stitch that slants to the left.
Advantages of using M1 decreases for shaping:
- Subtle and invisible: M1 decreases are not as noticeable as other methods like yarn overs or knit two together (K2tog) decreases. This makes the shaping blend more seamlessly into the overall design.
- Sturdy and secure: M1 decreases create a strong and tight stitch, ensuring that your knitted fabric maintains its structure and stability.
- Flexible and versatile: M1 decreases can be used in various knitting patterns and projects, allowing you to shape your garment or accessory in different ways.
Considerations when using M1 decreases:
- Placement: Make sure to follow the pattern instructions carefully to determine the correct placement of your M1 decreases. They can be worked either on the edge of a row or within the fabric.
- Gauge and tension: Pay attention to your knitting tension and gauge to ensure consistent and even M1 decreases throughout your project. Inconsistent tension can affect the overall appearance of your garment.
- Practice: If you are new to using M1 decreases, it’s a good idea to practice on a small swatch first to familiarize yourself with the technique and achieve the desired result.
Overall, M1 decreases are a valuable technique to have in your knitting skill set. They provide a flexible and discreet way to shape your knitted fabric while maintaining its integrity. By understanding and practicing M1 decreases, you can confidently tackle a variety of knitting patterns and bring your creative vision to life.
Q&A:
What does m1 mean in knitting pattern?
M1 stands for “make one” and is a common abbreviation used in knitting patterns. It is a specific increase technique that involves creating a new stitch by picking up the horizontal strand of yarn between two stitches and knitting into it.
How do you do m1 in knitting?
To make one (m1) in knitting, follow these steps: 1. Insert the left needle from front to back into the horizontal strand of yarn between the stitches. 2. Knit into the back loop of this strand as if it were a regular stitch. 3. Slip the new stitch onto the right needle. This will create a new stitch and increase the stitch count by one.
When would you use m1 in knitting?
M1 is typically used when a knitting pattern calls for an increase in the number of stitches. It creates a nearly invisible increase that is often used in lace patterns, raglan sleeves, and other decorative elements. It is also commonly used to shape garments and accessories.
Are there different variations of m1?
Yes, there are different variations of the m1 increase, such as m1L (make one left), m1R (make one right), and m1P (make one purl). These variations create the increase in different directions and are used to maintain the stitch pattern or match the surrounding stitches.
Is m1 the same as kfb (knit front and back)?
No, m1 and kfb are different increase techniques in knitting. M1 creates a new stitch by picking up the horizontal strand of yarn between stitches, while kfb involves knitting into the front and back loops of the same stitch to create two new stitches.
What does m1 mean in knitting pattern?
M1 stands for “make one” in knitting patterns. It is an increase technique where you create a new stitch by working into the strand of yarn between two stitches. This is often done by lifting the strand with your left needle and knitting into the back of it, creating a new stitch.
How do you do M1 in knitting?
To make one (M1) in knitting, you can use various techniques depending on the pattern instructions. One common way is to lift the strand of yarn between the stitches with your left needle from back to front. Then, insert the right needle into the front loop of the lifted strand from back to front, and knit into it as you would with a regular stitch. This creates a new stitch and increases the number of stitches on your needle by one.