Alternating Knit and Purl Stitches: The Perfect Pattern for Beginners

Knitting is an ancient craft that has stood the test of time, providing warmth and comfort to generations. While there are many different stitches and patterns to learn, the knit a row, purl a row pattern is a classic technique that every beginner knitter should master.
In this article, we will explore the knit a row, purl a row pattern in detail, explaining what it is and how to execute it. This simple yet elegant pattern can be used to create a wide variety of projects, from scarves and hats to blankets and beyond.
The knit a row, purl a row pattern consists of alternating knit and purl stitches across each row, creating a ridged texture. Knit stitches are made by inserting the right needle into the front of the loop on the left needle, bringing the yarn over the right needle from back to front, and pulling it through the loop. Purl stitches, on the other hand, are made by inserting the right needle into the front of the loop on the left needle from right to left, bringing the yarn under the right needle from back to front, and pulling it through the loop.
What is the knit a row purl a row pattern?

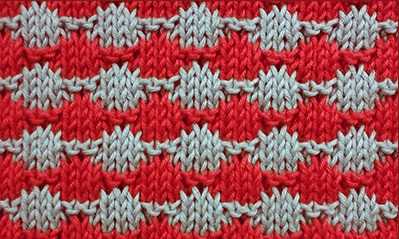
The knit a row purl a row pattern is a basic knitting technique used to create a textured fabric. It involves alternating between knitting stitches and purling stitches in each row. The result is a pattern that resembles a series of horizontal lines or ribs.
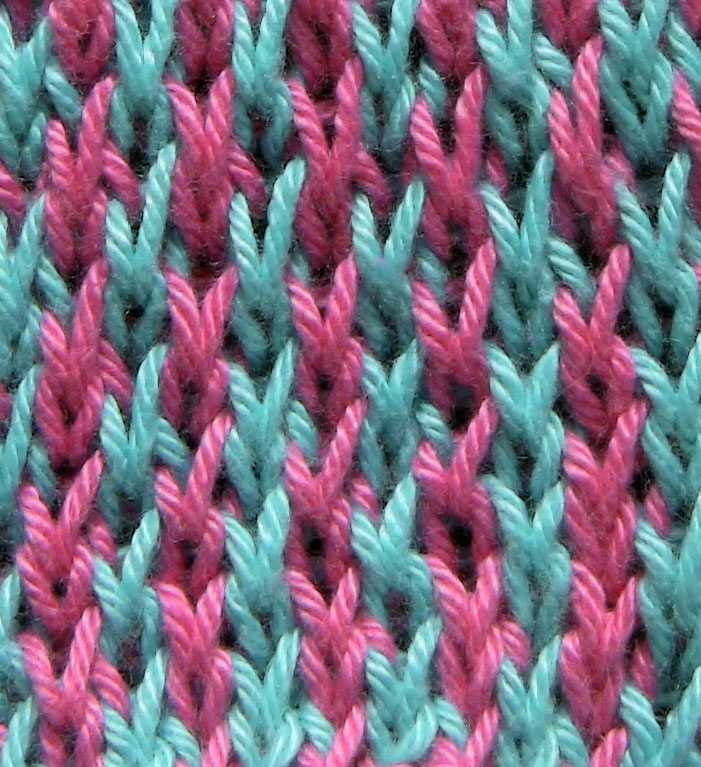
In this pattern, every other row is worked in the knit stitch, where the yarn is passed through the loop from back to front. This creates a smooth V-shaped stitch on the right side of the fabric. In the alternate rows, the purl stitch is used, where the yarn is passed through the loop from front to back. This creates a bumpy, or purl, stitch on the right side of the fabric.
This knit a row purl a row pattern is commonly used in various knitting projects, such as scarves, sweaters, and blankets. It can be used to create a simple and classic look, or combined with other stitch patterns to add complexity and visual interest to the finished piece. The alternating knit and purl stitches create a fabric that is stretchy, textured, and suitable for both warm and lightweight garments.
Here’s a simple example of how to work the knit a row purl a row pattern:

- Cast on an even number of stitches.
- Row 1: *Knit 1, purl 1* across the row. Repeat from * to * until the last stitch, then knit 1.
- Row 2: *Purl 1, knit 1* across the row. Repeat from * to * until the last stitch, then purl 1.
- Repeat rows 1 and 2 for the desired length.
- Bind off all stitches.
With this simple pattern, you can create a versatile fabric that can be used for a variety of knitting projects. Whether you’re a beginner or an experienced knitter, the knit a row purl a row pattern is a great technique to practice and incorporate into your knitting repertoire.
Basic knitting stitches: knit and purl

When it comes to knitting, two basic stitches form the foundation for all patterns: the knit stitch and the purl stitch. These stitches are the building blocks of any knitted project, whether you’re making a scarf, sweater, or any other item.
The knit stitch is the most common stitch and is often abbreviated as “K” in knitting patterns. To knit, you insert the right needle into the first stitch on the left needle from left to right, wrap the yarn around the right needle, and pull it through the stitch, letting the original stitch slip off the left needle. This creates a new stitch on the right needle.
The purl stitch, often abbreviated as “P” in knitting patterns, is the reverse of the knit stitch. To purl, you insert the right needle from right to left into the first stitch on the left needle, wrap the yarn around the right needle, and pull it through the stitch, letting the original stitch slip off the left needle. This also creates a new stitch on the right needle, but it creates a different texture on the fabric.
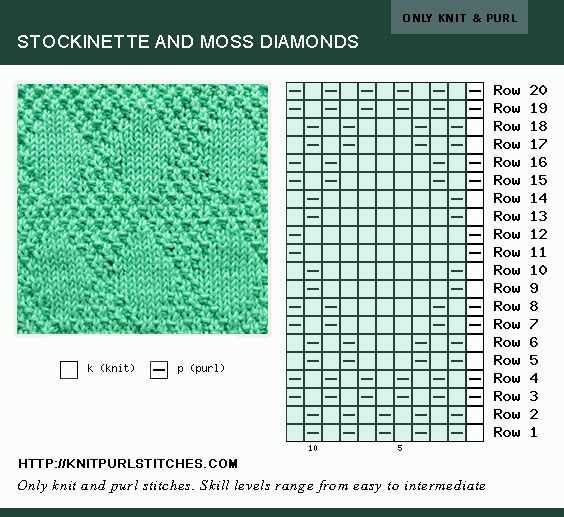
In knitting patterns, you will often see instructions like “knit a row, purl a row” or “knit 2, purl 2” to create different patterns and textures. Knitting a row of knit stitches followed by a row of purl stitches creates a classic ribbed pattern, while alternating knit and purl stitches within the same row can create various patterns like seed stitch or moss stitch.
By combining these two basic stitches in different ways, you can create an infinite variety of textured patterns in your knitting projects. Whether you’re a beginner or an experienced knitter, mastering the knit and purl stitches will open up a world of possibilities for your knitting ventures.
How to do the knit stitch

Knitting is a popular craft that involves creating fabric by interlocking yarn loops using knitting needles. One of the basic stitches in knitting is the knit stitch. It is a versatile stitch that is commonly used in various knitting patterns.
To do the knit stitch, follow these steps:
- Hold the knitting needles: Start by holding one knitting needle in your right hand and the other in your left hand. Hold the needle with the cast-on stitches in your left hand, and the empty needle in your right hand.
- Insert the right needle into the first stitch on the left needle: Insert the right needle from left to right through the front of the first stitch on the left needle.
- Wrap the yarn: With the yarn held in your right hand, bring it around the back of the right needle and towards the front, crossing over the two needles.
- Pull the right needle through: Using the right needle, pull it through the first stitch on the left needle, keeping the yarn in front of the work.
- Slip the old stitch off the left needle: With the right needle still through the first stitch, slip the old stitch off the left needle, transferring it to the right needle.
- Repeat the process: Continue steps 2 to 5 for each stitch on the left needle until all the stitches have been transferred to the right needle.
- Switch hands: Once all the stitches have been knit, switch the needles so that the empty needle is in your left hand and the needle with the stitches is in your right hand. This completes one row of knitting.
The knit stitch creates a smooth and tight fabric, making it suitable for a wide range of projects from scarves and sweaters to blankets and hats. With practice, the knit stitch can be easily mastered, allowing you to explore more complex knitting patterns and create beautiful handmade items.
How to do the purl stitch

The purl stitch is one of the basic knitting stitches and is commonly used in combination with the knit stitch to create various patterns in knitting. It creates a raised, textured stitch on the front side of the fabric, and a smooth V-shaped stitch on the back side.
To do the purl stitch, follow these steps:
- Hold the needle: Hold the working needle with the stitches in your right hand, and the empty needle in your left hand.
- Insert the needle: Insert the tip of the empty needle into the first stitch from right to left, going in front of the working needle.
- Wrap the yarn: Take the working yarn with your right hand and wrap it around the empty needle from back to front.
- Pull through: Use the tip of the empty needle to pull the wrapped yarn through the stitch, creating a new stitch on the empty needle.
- Slide off the old stitch: Slide the old stitch off the working needle, leaving the new stitch on the empty needle.
- Repeat: Repeat steps 2-5 for each stitch until you have completed the row.
When you knit a row purl a row pattern, you alternate between knitting and purling each row. This creates a ribbed or textured fabric that is commonly seen in scarves, sweaters, and other knitted garments. The purl stitch is an essential component of this pattern, as it adds depth and variety to the overall design.
With practice, the purl stitch becomes easier and more intuitive. It is important to maintain even tension and to keep the stitches consistent in size to ensure a neat and professional finish to your knitting project.
Understanding the knit a row purl a row pattern
When it comes to knitting, the knit a row purl a row pattern is one of the most basic and fundamental patterns that every beginner knitter should learn. This simple pattern creates a textured fabric that alternates between knit stitches and purl stitches, giving it a ribbed appearance. Understanding how to execute this pattern is essential for creating a variety of knitted projects, from scarves and hats to sweaters and blankets.
To knit a row purl a row, you will need basic knowledge of how to knit and purl stitches. The knit stitch is created by inserting the right-hand needle from left to right into the stitch on the left-hand needle, wrapping the yarn around the right-hand needle, and pulling the loop of yarn through the stitch, dropping it off the left-hand needle. The purl stitch, on the other hand, is created by inserting the right-hand needle from right to left into the stitch on the left-hand needle, wrapping the yarn around the right-hand needle, and pulling the loop of yarn through the stitch, dropping it off the left-hand needle.
To execute the knit a row purl a row pattern, simply knit one row, following the instructions for the knit stitch, and then purl one row, following the instructions for the purl stitch. Repeat these two rows until you have reached the desired length of your project.
One key tip to keep in mind when knitting the knit a row purl a row pattern is to pay attention to the position of your stitches. Knit stitches will create a smooth, V-shaped pattern on the right side of your work, while purl stitches will create a bumpy, horizontal pattern on the right side. By alternating between knit and purl stitches, you can create a visually interesting and textured fabric.
Overall, the knit a row purl a row pattern is a great way to practice your knitting skills and create a versatile fabric for a variety of projects. Whether you are a beginner just starting out or an experienced knitter looking for a simple yet effective pattern, mastering this technique will open up a world of possibilities for your knitting projects.
Benefits of the knit a row purl a row pattern
When it comes to knitting, there are various patterns and techniques that can be used to create beautiful and unique designs. One such pattern is the knit a row purl a row pattern. This pattern involves alternating between knitting and purling rows, creating a textured effect in the fabric.
1. Versatility: One of the main benefits of the knit a row purl a row pattern is its versatility. This pattern can be used to create a wide range of projects such as scarves, sweaters, blankets, and more. The alternating knit and purl stitches create a visually interesting texture that adds depth and dimension to the finished piece.
2. Relaxing and meditative: Knitting can be a wonderful way to relax and unwind, and the knit a row purl a row pattern is no exception. The repetitive nature of this pattern can be quite meditative, allowing the knitter to enter a state of flow and focus. This can be especially beneficial for those looking for a creative outlet or a way to reduce stress.
3. Enhances dexterity and coordination: Knitting requires a certain level of hand-eye coordination and dexterity. By practicing the knit a row purl a row pattern, knitters can improve their skills in these areas. The repetitive motion of knitting and purling can help strengthen the muscles in the hands and fingers, leading to improved coordination and fine motor skills.
4. Creates warmth and insulation: The alternating knit and purl stitches in the knit a row purl a row pattern create a fabric that is denser and more insulating than a simple stockinette stitch. This makes it an ideal pattern for creating warm and cozy projects such as hats, mittens, and blankets. The added texture also helps to trap air, increasing the overall warmth of the finished piece.
5. Adds visual interest to the fabric: Lastly, the knit a row purl a row pattern adds visual interest to the fabric. The alternating knit and purl stitches create a textured surface that can be visually appealing and unique. This pattern is great for showcasing different types of yarn and can be easily modified to incorporate different stitch patterns or designs.
Choosing the right yarn for the pattern
When it comes to knitting, choosing the right yarn for the pattern is essential for achieving the desired outcome. Different yarns have different qualities and characteristics, and selecting the appropriate one can make a significant difference in the finished project.
First and foremost, it’s crucial to consider the fiber content of the yarn. Common fibers used in knitting include wool, cotton, acrylic, and blends. Each fiber has its own unique properties, such as warmth, breathability, and durability. For a project that requires warmth, like a sweater, opting for wool or a wool blend would be a good choice. On the other hand, if the item is intended for summertime wear, cotton or a cotton blend would be more suitable.
In addition to fiber content, the weight or thickness of the yarn should also be taken into account. Yarn weight is determined by the thickness and is classified into different categories, such as lace, fingering, sport, worsted, and bulky. The pattern you are working on will specify the recommended yarn weight, and it’s important to follow this guideline to ensure the correct gauge and drape of the finished piece.
Another factor to consider is the texture of the yarn. Smooth, tightly plied yarns are excellent for showing intricate stitch patterns, while textured or fuzzy yarns can add dimension and interest to simpler designs. Additionally, the yarn’s color and dye lot should also be considered, especially when working on larger projects that require multiple skeins. It’s best to buy enough yarn from the same dye lot to ensure color consistency throughout the project.
In conclusion, choosing the right yarn for the pattern involves considering factors such as fiber content, weight, texture, and color. Taking these aspects into account will not only help you create a beautiful and well-fitting knit item but also enhance your overall knitting experience. So next time you start a new project, take a moment to carefully select the perfect yarn for your intended design.
What tools and materials do you need?
In order to knit using the “Knit a row purl a row” pattern, there are a few tools and materials that you will need to have on hand. These include:
- Knitting Needles: You will need a pair of knitting needles in the appropriate size for your chosen yarn. The size of the needles will depend on the thickness or weight of the yarn you are using. Be sure to check the recommended needle size on the yarn label.
- Yarn: Choose a yarn that you like and that suits the project you have in mind. The weight of the yarn will determine the size of the stitches and the overall look of the finished piece. Make sure to have enough yarn to complete your project, as well as some extra in case of mistakes or adjustments.
- Scissors: You will need a pair of scissors for cutting the yarn at the end of each row or when changing colors.
- Tape Measure: A tape measure will come in handy for checking the gauge of your knitting, as well as measuring your progress and sizing your finished piece.
- Stitch Markers: Stitch markers are useful for marking specific stitches or sections of your knitting, especially when following a pattern or making increases or decreases.
With these tools and materials, you will be ready to start your knitting project using the “Knit a row purl a row” pattern. Remember to choose the appropriate size needles and yarn for your desired outcome, and don’t forget to have fun and enjoy the process!
Step-by-step instructions for knitting the pattern
To create the knit a row purl a row pattern, follow these step-by-step instructions:
Materials needed:
- Yarn – choose a color and weight of yarn that you like
- Knitting needles – select a pair of knitting needles that are appropriate for the yarn weight
- Tape measure or ruler
- Darning needle
Instructions:
- Begin by casting on the desired number of stitches. This will depend on the size of your project and the width you want it to be.
- Hold the knitting needles in your dominant hand with the cast-on edge facing away from you.
- Insert the right needle into the first stitch from front to back, knitting it as usual to create a knit stitch.
- Next, bring the yarn to the front of the work between the needles.
- Insert the right needle into the next stitch from front to back, this time purling it by wrapping the yarn around the right needle from right to left.
- Continue alternating between knitting and purling stitches across the row until you reach the end.
- When you reach the end of the row, turn the work so that the opposite side is facing you.
- Repeat steps 3-7 for each row, knitting the knit stitches and purling the purl stitches as they appear.
- Continue knitting row-by-row, following the pattern as desired, until your project is the desired length.
- When you have completed the pattern, bind off the stitches to finish your project.
- Weave in any loose ends using a darning needle.
With these step-by-step instructions, you can easily create the knit a row purl a row pattern. Whether you’re a beginner or an experienced knitter, this pattern is versatile and can be used to create a variety of projects, from scarves and blankets to sweaters and hats. Enjoy the meditative rhythm of knitting as you create beautiful, textured pieces!
Tips for troubleshooting common mistakes

In the world of knitting, making mistakes is a common occurrence. Whether you’re a beginner or an experienced knitter, it’s important to know how to troubleshoot and fix these mistakes. Here are some tips to help you tackle common knitting errors:
Mistake: Dropped stitch
A dropped stitch can unravel your entire project if not fixed promptly. To fix a dropped stitch, use a crochet hook or a spare knitting needle to pick up the stitch. Insert the tool from the front or back (depending on the stitch direction) and pull it through. Place the stitch back on the left-hand needle and continue knitting.
Mistake: Uneven tension
If your knitting has areas of loose or tight tension, it can affect the overall appearance of your project. To fix uneven tension, pay attention to how you’re holding your yarn. Make sure to maintain a consistent tension throughout your knitted piece. If you have loose stitches, try pulling the working yarn tighter. If you have tight stitches, try loosening your grip on the yarn.
Mistake: Twisted stitches

Twisted stitches can happen when you accidentally knit or purl into the back loop instead of the front loop. This can create a twisted appearance in your knitting. To fix twisted stitches, simply slip the stitch onto the right-hand needle, insert the left-hand needle into the front loop, and then knit or purl the stitch as usual.
Mistake: Wrong stitch count
If you end up with the wrong stitch count while knitting a pattern, it can throw off the entire design. To fix this mistake, carefully count the stitches in each row to identify where the error occurred. You can then either add or decrease stitches as needed to correct the stitch count. Be sure to check your pattern for any specific instructions on adjusting the stitch count.
Mistake: Yarn overs in the wrong place
Yarn overs are intentional increases in knitting, but they can easily be placed in the wrong spot, resulting in an uneven look. To fix a yarn over in the wrong place, carefully drop the yarn over stitch off the needle, unravel it, and then re-knit it in the correct spot. Pay attention to your pattern instructions to ensure you’re placing the yarn overs correctly.
Mistake: Uneven edges
Uneven edges can make your knitting look messy and unpolished. To achieve a clean edge, always slip the first stitch of each row purlwise with the yarn in front. This will create a neat edge and make seaming or picking up stitches easier.
Ways to customize the pattern
When knitting a row and purling a row pattern, there are several ways to customize the pattern to add variety and personal touches to your knitting projects.
1. Changing the stitch pattern
One way to customize the pattern is by changing the stitch pattern used for each row. Instead of simply knitting one row and purling the next row, you can experiment with different stitch patterns such as ribbing, cables, or lace. This adds texture and visual interest to your knitting.
2. Adding color
Another way to customize the pattern is by adding color to your knitting. Instead of using a single color yarn, you can incorporate multiple colors using the row purl pattern. This can be done by using different color yarns for each row or by creating color blocks within the pattern. Color can add depth and vibrancy to your knitting projects.
3. Incorporating stitch variations
To further customize the pattern, you can incorporate stitch variations within the row purl pattern. This can be done by using different types of stitches, such as seed stitch, garter stitch, or moss stitch, to create different textures and patterns within the rows. These stitch variations can add unique visual elements to your knitting.
4. Changing the number of rows

Lastly, you can customize the pattern by changing the number of rows you knit and purl. Instead of knitting and purling the same number of rows, you can alternate the number of rows to create different effects. For example, knitting more rows than you purl will create a different texture compared to equal numbers of knit and purl rows.
Overall, there are countless ways to customize the row and purl pattern to suit your knitting preferences. Experiment with different stitch patterns, colors, stitch variations, and row numbers to create unique and personalized knitting projects.
Projects you can make with the knit a row purl a row pattern
The knit a row purl a row pattern is a versatile and popular technique in knitting. It creates a textured fabric that can be used for a variety of projects. Here are some ideas for projects you can make using this pattern:
- Scarves: Scarves are one of the most common projects made using the knit a row purl a row pattern. The alternating knit and purl stitches create an interesting texture that adds elegance and warmth to any scarf.
- Hats: You can also make hats using the knit a row purl a row pattern. The stretchiness of the pattern makes it perfect for creating snug and comfortable hats.
- Sweaters: The knit a row purl a row pattern can be used for making sweaters as well. It gives the fabric a unique texture and can be used to create different designs, such as cables or color-block patterns.
- Blankets: Knitting a blanket using the knit a row purl a row pattern can result in a cozy and beautiful piece. The texture of the pattern adds visual interest and makes the blanket extra warm.
- Accessories: You can also use this pattern to make various accessories like mittens, gloves, and headbands. The alternating knit and purl stitches create a stylish and trendy look for these items.
The knit a row purl a row pattern is a great choice for both beginners and experienced knitters. It is easy to learn and creates beautiful results. Whether you’re knitting a scarf for yourself or making a sweater as a gift, this pattern is sure to impress.
So, pick up your knitting needles and start experimenting with the knit a row purl a row pattern. The possibilities are endless!