Knit Like a Pro: Try This Unique Cable Panel Knitting Pattern

Knitting is a popular hobby that allows individuals to create beautiful and functional pieces of clothing and accessories. One of the most intricate and visually stunning techniques in knitting is cable knitting. Cable knitting involves crossing stitches over each other to create a twisted rope-like pattern. A cable panel knitting pattern is a design that incorporates cable stitches into a specific section of a garment, creating a focal point and adding interest to the overall design.
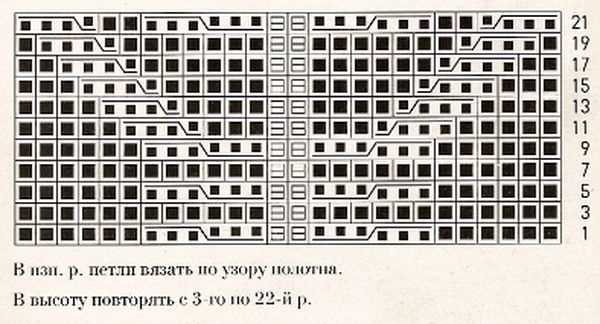
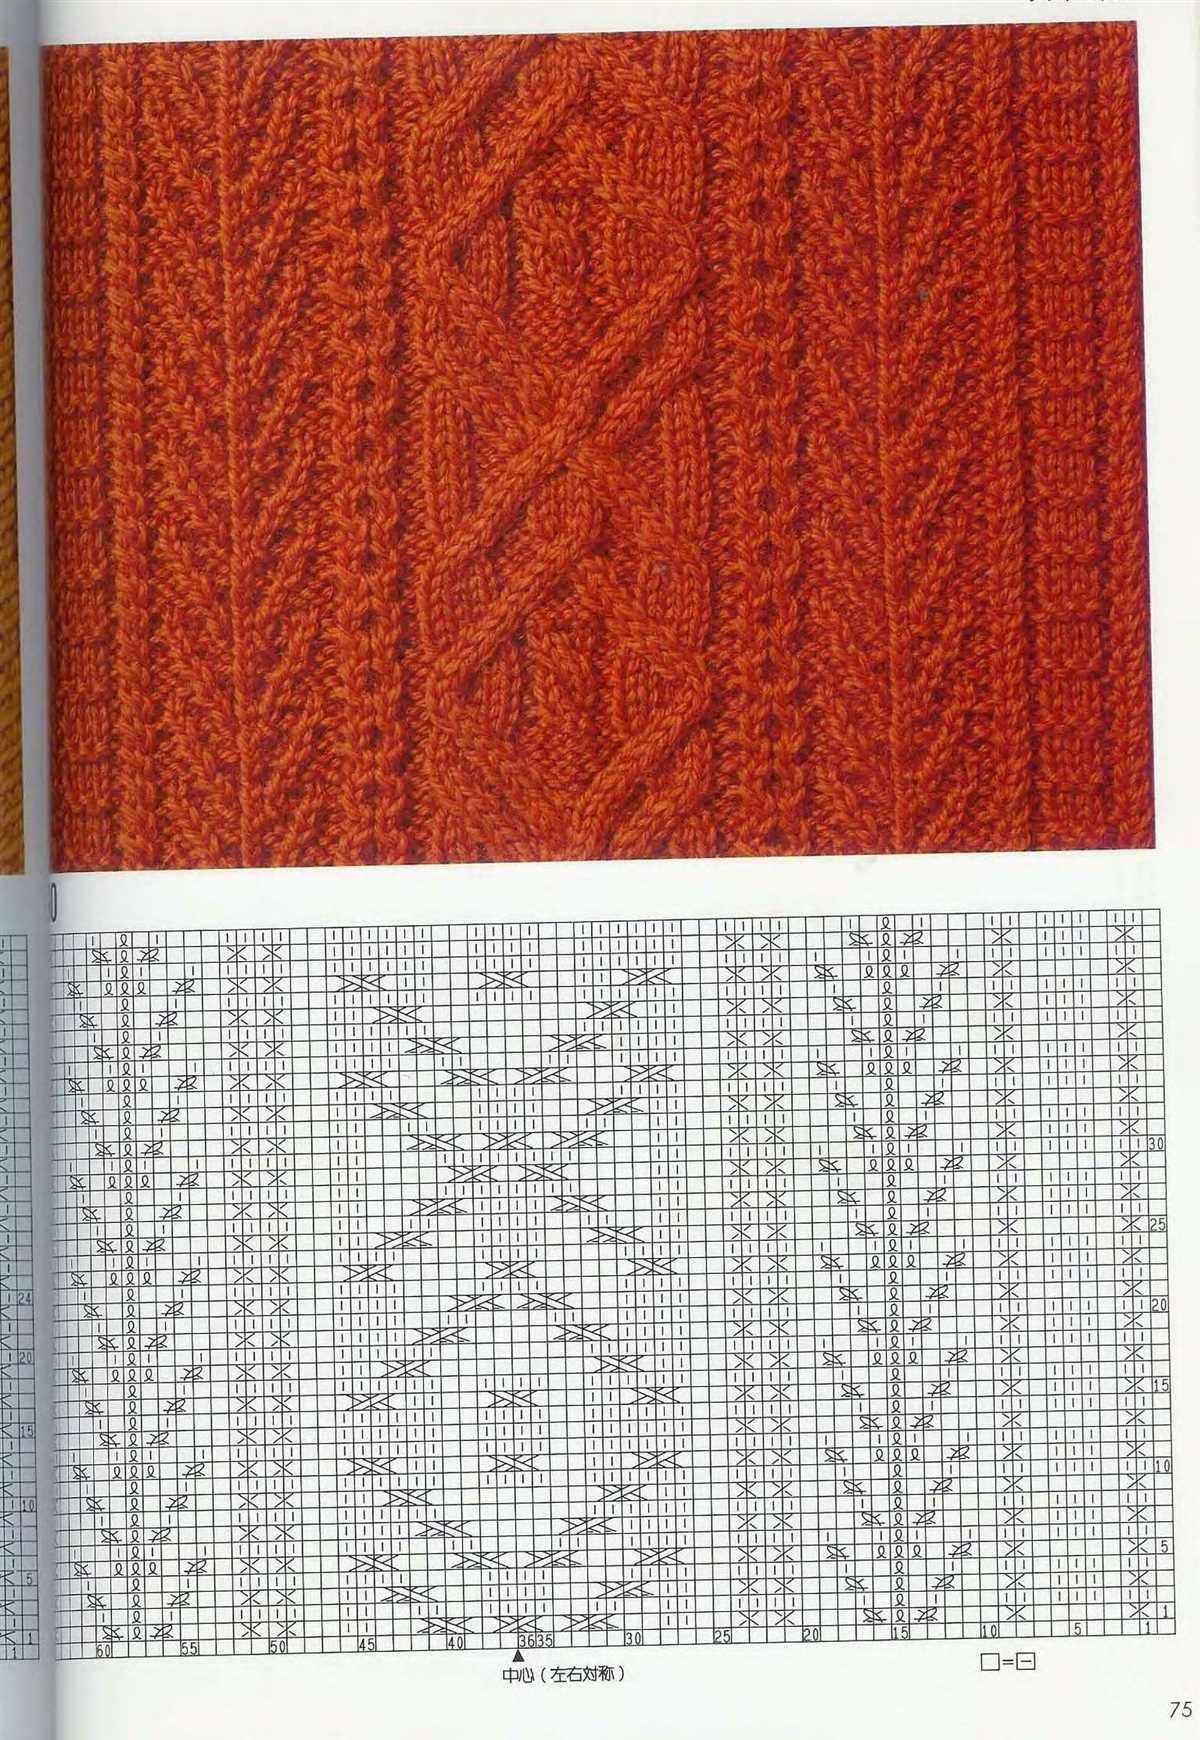
Creating a cable panel knitting pattern may seem daunting at first, but with a little practice and patience, it can become a rewarding and enjoyable experience. The pattern typically involves a chart or instructions that detail the specific cable stitches and their placement within the panel. Knitters can choose from a variety of cable patterns, ranging from simple twists to more complex braids and diamonds.
To create a cable panel knitting pattern, knitters must have a basic understanding of how to knit and purl stitches, as well as how to read a chart or follow written instructions. It’s also helpful to have a cable needle or double-pointed needle on hand to aid in the crossing of stitches. Once the cable panel is complete, it can be incorporated into a variety of projects, such as sweaters, scarves, hats, or blankets.
Cable Panel Knitting Pattern: Create Stunning Textured Designs
Knitting with cable panels is a sure way to add a touch of elegance and sophistication to your projects. The intricate and stunning designs created with cable patterns are perfect for those who seek to add texture and depth to their knitted pieces. Whether you’re knitting a cozy sweater, a warm scarf, or a stylish hat, incorporating cable panels will take your project to the next level.
One of the great things about cable panel knitting patterns is their versatility. With endless possibilities of cable designs and combinations, you can create unique and personalized pieces that truly reflect your individual style. Whether you prefer simple and classic twists or more complex designs, cable panels allow you to experiment and create stunning textured patterns that are sure to impress.
How to Knit Cable Panels
Knitting cable panels might seem intimidating at first, but with a bit of practice, it becomes an enjoyable and rewarding technique. To start, you’ll need a set of cable needles and a basic understanding of knitting abbreviations and techniques.
Begin by following the cable panel knitting pattern, which will guide you through the specific stitches and steps required to create your desired cable design. The pattern will typically include instructions on how to cross stitches over each other, creating the beautiful twisted patterns that cables are known for.
Once you’ve mastered the basics, you can experiment with different cable panel designs. You can create intricate braids, honeycomb patterns, or even intertwining cables that resemble vines or branches. The possibilities are endless, and each unique cable panel will add a touch of artistry to your knitting projects.
Incorporating Cable Panels Into Your Projects
Now that you’ve mastered the art of knitting cable panels, it’s time to start incorporating them into your projects. One popular way to use cable panels is to knit them as central focal points on garments, such as the front or back of a sweater or the center of a scarf. This draws attention to the stunning cable design and showcases your knitting skills.
You can also use cable panels to add interest and detail to accessories such as hats, gloves, and socks. By incorporating smaller cable patterns into these projects, you can achieve a cohesive and visually appealing look.
So, whether you’re a beginner or an experienced knitter, don’t be afraid to dive into the world of cable panel knitting patterns. With a bit of practice and creativity, you’ll be able to create stunning textured designs that are sure to impress.
What is a Cable Panel Knitting Pattern?
If you are a knitting enthusiast, you might be familiar with various knitting patterns that add texture and interest to your projects. One such pattern is the cable panel knitting pattern. A cable panel is a design element created by crossing stitches over one another to form intricate patterns resembling twisted ropes or cables.
The cable panel knitting pattern adds depth and visual appeal to your knitted fabric. It creates a raised design that stands out from the rest of the stitches, giving your project a unique and beautiful look. Cable panels can be used in various knitting projects, such as sweaters, scarves, hats, and blankets, to add an element of elegance and sophistication.
To create a cable panel, you need to follow a specific set of instructions. These instructions typically involve using a cable needle to hold a certain number of stitches aside while you work on the next set of stitches. Then, you go back to the held stitches and work them in the desired order, creating the cable twist. This process is repeated across the row or rounds to create the desired cable panel pattern.
It is important to note that cable panels can vary in complexity. Some patterns involve simple twists, while others may require intricate cable crosses and combinations. The cable panel knitting pattern allows you to unleash your creativity and experiment with different designs and textures. Whether you are a beginner or an experienced knitter, cable panels can be a fun and rewarding challenge to incorporate into your projects.
Choosing the Right Yarn and Needle Size
When it comes to cable panel knitting patterns, choosing the right yarn and needle size is essential for achieving the desired outcome. The right yarn will ensure that the cables stand out and have a beautiful texture, while the right needle size will give you the correct gauge and drape for your project.
Yarn
When selecting yarn for a cable panel knitting pattern, it’s important to consider the thickness, fiber content, and texture. A yarn that is too thin may not give your cables enough definition, while a yarn that is too thick may make the cables look bulky and distorted. Opt for a medium to heavy weight yarn that will showcase the cables while still providing a nice drape.
Needle Size
The needle size you choose will depend on the yarn you have selected and your personal knitting tension. If your yarn is thicker and has more texture, you may need to use larger needles to achieve the correct gauge. However, if your yarn is thinner, you may need to use smaller needles to give your cables more definition. It’s always a good idea to swatch before starting your project to ensure that you are achieving the correct gauge and that you are happy with the fabric you are creating.
Ultimately, choosing the right yarn and needle size for your cable panel knitting pattern will give you the best results. Experiment with different yarn and needle combinations to find the perfect match for your project. Remember, knitting is all about creativity and personal preference, so don’t be afraid to try new things and explore different options!
Understanding Cable Symbols and Abbreviations
If you are new to cable knitting, it is essential to understand the cable symbols and abbreviations used in patterns. These symbols and abbreviations are used to represent different cable stitches and actions. Understanding them will help you follow cable panel knitting patterns more easily and create beautiful, textured designs.
Cable Symbols:
1. C4B: This symbol represents a cable four back. To execute this cable stitch, slip two stitches onto a cable needle and hold it at the back of your work. Knit the next two stitches from the left-hand needle and then knit the two stitches from the cable needle.
2. C4F: This symbol represents a cable four front. To execute this cable stitch, slip two stitches onto a cable needle and hold it at the front of your work. Knit the next two stitches from the left-hand needle and then knit the two stitches from the cable needle.
3. Sl 2 sts to CN: This symbol represents slipping two stitches onto a cable needle. This is done to hold the stitches aside while you work on other stitches in the pattern.
Abbreviations:
1. CN: This abbreviation stands for cable needle. It is used to hold stitches while making cable stitches.
2. K: This abbreviation stands for knit. It means to insert the right-hand needle through the stitch from left to right and wrap the working yarn around the needle to create a new stitch.
3. P: This abbreviation stands for purl. It means to insert the right-hand needle through the stitch from right to left and wrap the working yarn around the needle to create a new stitch.
4. Sl: This abbreviation stands for slip. It means to transfer a stitch from the left-hand needle to the right-hand needle without knitting or purling it.
By familiarizing yourself with these cable symbols and abbreviations, you will be able to confidently tackle cable panel knitting patterns and create stunning designs. Remember to always consult the pattern key for any additional symbols or abbreviations specific to the pattern you are working on.
Step-by-Step Instructions for Knitting Cables

Knitting cables adds texture and interest to your knitting projects. While they may look complicated, knitting cables is actually quite simple once you understand the basic technique. Follow these step-by-step instructions to create beautiful cable patterns.
1. Gather the necessary supplies
Before you start knitting cables, make sure you have all the necessary supplies. You will need a pair of knitting needles, yarn in the weight and color of your choice, a cable needle (a short needle used to hold stitches temporarily), and a set of stitch markers.
2. Start with a basic cable pattern

If you’re new to knitting cables, it’s best to start with a basic cable pattern. This usually involves crossing a few stitches over each other to create the cable effect. Refer to your chosen knitting pattern for specific instructions on the cable pattern you want to create.
3. Work the setup rows

Begin by knitting a few setup rows to create a foundation for your cables. This is usually done in a simple stitch pattern such as garter stitch or stockinette stitch. These setup rows will help create the base for your cable pattern.
4. Place stitch markers

Once you’ve completed the setup rows, place stitch markers to mark the cable sections. These markers will help you keep track of where the cables will be formed in the pattern.
5. Cross the stitches
When you reach the cable section, you’ll need to cross the stitches to create the cable effect. This is done by slipping a few stitches onto the cable needle and holding them to the front or back of your work, then knitting the next set of stitches from the left-hand needle.
6. Work the cable row
Continue following the instructions in your cable pattern to complete the cable row. This may involve crossing stitches multiple times or incorporating other stitch patterns to create intricate designs.
7. Repeat the cable rows
Once you’ve completed the cable row, continue working the pattern as instructed. This may involve working additional setup rows, knitting plain rows in between the cable rows, or repeating the cable rows multiple times to create a longer cable panel.
8. Finish the project
Continue working the pattern until you’ve reached the desired length for your project. Finish off by knitting a few more setup rows or a border pattern, and then bind off your stitches to secure your work.
With these step-by-step instructions, you’ll be able to confidently knit cables and create stunning cable panel patterns in your knitting projects. Whether you’re knitting a cozy sweater, a warm scarf, or a decorative pillow, cables are sure to add a touch of elegance and style to your creations.
Knitting Tips and Techniques for Perfect Cable Panels
Knitting cable panels can add a beautiful and intricate detail to your garments. However, working with cables can be challenging, especially for beginners. With the right tips and techniques, you can achieve perfect cable panels every time.
1. Use Cable Needles
To create cable panels, you will need cable needles. Cable needles are short, double-pointed needles that hold the stitches while you create the cable. When working with cable needles, make sure to choose a size that matches your knitting needles to ensure an even tension.
2. Keep Your Stitches Loose
When working with cables, it’s important to keep your stitches loose. If your stitches are too tight, it will be difficult to maneuver the cable needle and create the desired effect. Take your time and knit with a relaxed hand to achieve a more even tension.
3. Understand Cable Symbols
Most cable patterns use symbols to represent different cable stitches. Before you start knitting, take the time to familiarize yourself with these symbols. This will make it easier to read and follow cable patterns, ensuring that you create the correct cable panels.
4. Count Your Stitches Regularly
It’s easy to get lost when working on cable panels, especially if the pattern is complex. To avoid mistakes, make sure to count your stitches regularly. This will help you stay on track and prevent any errors in the cable pattern.
5. Practice, Practice, Practice
Like any knitting technique, mastering cable panels takes practice. Don’t be discouraged if your first few attempts don’t turn out perfectly. Keep practicing, and soon you’ll be able to create stunning cable panels with ease.
By following these tips and techniques, you’ll be able to create perfect cable panels in your knitting projects. Whether you’re making a cozy sweater or a stylish hat, adding cable panels will elevate your design and impress others with your knitting skills.
Creating Different Cable Patterns: From Simple to Complex
Knitting with cable patterns can add texture and interest to your projects. Whether you are a beginner or an experienced knitter, there are various techniques and stitches you can use to create different cable patterns. By understanding the basics and gradually increasing the complexity, you can create beautiful and intricate designs.
1. Basic Cable: The basic cable pattern is a great starting point for beginners. It involves crossing stitches to create a twist effect. Start by knitting a few rows in stockinette stitch, and then introduce the cable twist by moving a set number of stitches to a cable needle. Hold the cable needle in the front or back of your work, knit the next set of stitches from the left-hand needle, and then knit the stitches from the cable needle. This simple technique creates a clean and classic cable pattern.
2. Rope Cable: Once you feel comfortable with the basic cable, you can move on to more complex patterns like the rope cable. This cable pattern involves multiple cable twists and creates a twisted rope-like effect. To achieve this look, you will need to cross stitches in various directions and manipulate the cable needle accordingly. The rope cable pattern adds visual interest and dimension to your knitted piece.
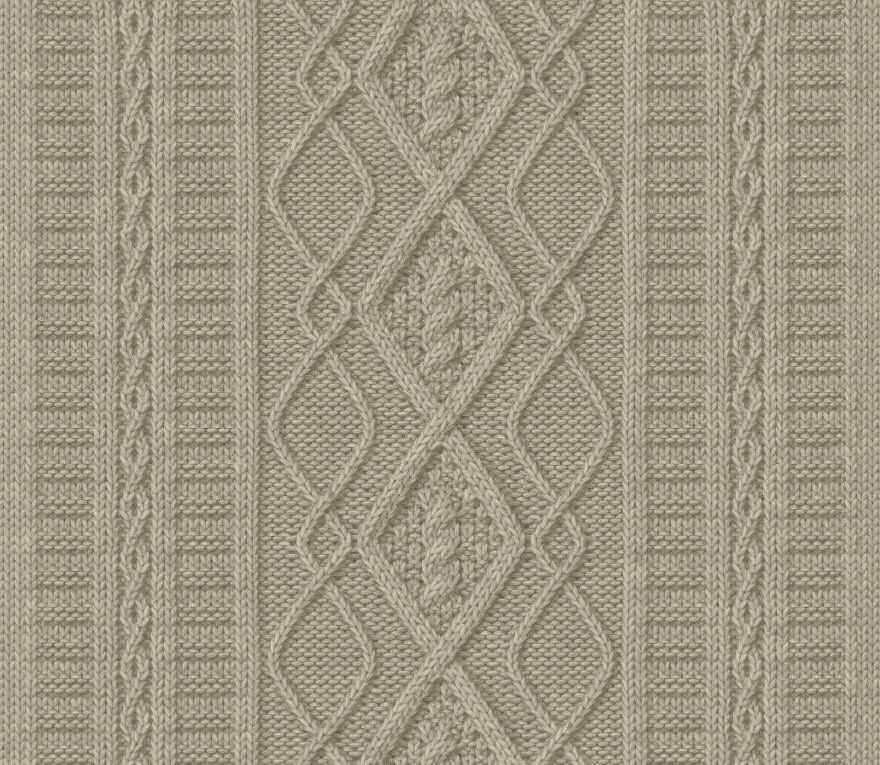
3. Diamond Cable: For a more intricate and advanced cable pattern, try the diamond cable. This pattern creates a series of interconnected diamonds across your knitting. It requires crossing stitches in various directions and incorporating decreases and increases to shape the diamonds. The diamond cable pattern is a statement design that showcases your knitting skills.
- 4. Honeycomb Cable:
The honeycomb cable pattern is a beautiful and complex design that resembles a honeycomb pattern. It involves crossing stitches in a grid-like pattern to create the honeycomb effect. This pattern requires precision and attention to detail as you need to keep track of the various cable crossings and twists. The honeycomb cable pattern is a challenging yet rewarding project for experienced knitters.
Overall, creating different cable patterns allows you to experiment with texture and design in your knitting. Whether you choose a simple basic cable or a complex honeycomb cable, each pattern adds its unique flair to your finished project. With practice and patience, you can master these techniques and create stunning cable knits that are sure to impress.
Avoiding Common Mistakes When Knitting Cable Panels
Knitting cable panels can be a challenging and rewarding experience. The intricate patterns and beautiful textures created by cables can elevate your knitting projects to the next level. However, it’s important to be aware of common mistakes that can occur when knitting cable panels, as they can affect the final result of your work.
1. Not keeping track of the cable pattern: Cable patterns often involve crossing stitches in a specific order. It’s crucial to use stitch markers or other aids to help you keep track of where you are in the pattern. This will help you maintain the correct cable pattern and prevent errors.
2. Miscounting stitches: In cable knitting, it’s important to keep an accurate count of your stitches, especially when working with complex cable patterns. Miscounting stitches can throw off the alignment of your cables and result in an uneven or distorted panel. Use stitch markers or row counters to help you stay on track.
3. Not using a cable needle: Cable knitting requires using a cable needle to hold stitches while you create the twists and crosses. Not using a cable needle can lead to dropped stitches or inconsistent tension in your cables. Take the time to learn how to use a cable needle properly to achieve clean and well-defined cable panels.
4. Tension issues: Maintaining consistent tension is crucial when knitting cable panels. Uneven tension can distort the cables and make the panel look sloppy. Take your time and pay attention to your tension as you work each cable twist. Practice knitting with a relaxed grip to achieve even tension throughout your project.
5. Skipping blocking: Blocking is an essential step in knitting cable panels. Blocking helps to even out stitches, open up the cables, and give your project a polished, professional look. Skipping this step can result in a finished piece that looks unfinished and lacks the desired drape and shape. Take the time to carefully block your cable panels to achieve the best result.
- Keep track of the cable pattern with stitch markers.
- Count your stitches accurately to maintain the alignment of your cables.
- Use a cable needle to hold stitches while creating twists and crosses.
- Pay attention to your tension to achieve consistent and well-defined cables.
- Don’t skip blocking to ensure a polished and professional finish.
Adding Borders and Edging to Cable Panels
When knitting a cable panel, adding borders and edging can give your project a finished and polished look. Borders and edging can also help to stabilize the edges of the cable panel and prevent it from curling or stretching out of shape.
Borders: One way to add a border to your cable panel is to simply knit a few rows of a contrasting color before or after the cable pattern. This can create a clean and defined separation between the cable panel and the rest of the knitting. You can also use a different stitch pattern for the borders, such as ribbing or seed stitch, to add texture and interest.
Edging: Another option for adding a border to your cable panel is to use an edging stitch. This can be done by knitting or purling a few stitches on the edges of each row, creating a decorative edge that complements the cable pattern. Common edging stitches include garter stitch, moss stitch, or a lace pattern.
A popular technique for adding an edging to a cable panel is to use a slip stitch selvedge. This involves slipping the first stitch of each row purlwise with the yarn held at the back. This creates a neat and tidy edge that is easy to sew or pick up stitches from for further edging or finishing.
Finishing: Once you have added borders and edging to your cable panel, it is important to properly finish and block your knitting. Blocking helps to even out the stitches, relax the fabric, and set the shape of the cable panel. You can do this by dampening the knitting, gently stretching it into shape, and pinning it down to a blocking board or towel to dry.
In conclusion, adding borders and edging to cable panels can enhance the overall look and structure of your knitting project. Whether you choose to use contrasting colors, different stitch patterns, or specialized edging techniques, these finishing touches will make your cable panel stand out and become a focal point of your design.
Modifying Cable Panel Patterns for Different Projects
Cable panel knitting patterns are a wonderful way to add texture and interest to your knitting projects. While many patterns are designed for specific projects, such as scarves or blankets, it is possible to modify these patterns to suit your desired project. Whether you want to incorporate a cable panel into a sweater, hat, or even a pair of socks, there are a few key considerations to keep in mind.
Choosing the Right Pattern: The first step in modifying a cable panel pattern is to choose a pattern that matches the overall size and shape of your desired project. For example, if you are looking to add a cable panel to a hat, you will want to find a pattern that is designed for a hat or a similar small project. Keep in mind that the number of stitches in the pattern should match (or be easily adaptable to) the number of stitches in your project.
Adapting the Cable Panel: Once you have chosen a pattern that is the right size for your project, you can then modify the cable panel to suit your needs. This may involve adjusting the number of stitches in the cable panel, changing the width or height of the cables, or even adding or removing cables altogether. It is important to keep track of your modifications by taking notes or creating a chart, especially if you plan to use the same modified cable panel in future projects.
Integrating the Cable Panel: After you have modified the cable panel to fit your project, you will need to integrate it into the overall design. This may involve adjusting stitch counts or pattern repeats to accommodate the cable panel, as well as incorporating the cables into any shaping or decreases that are required. Pay close attention to the pattern instructions and make any necessary adjustments to ensure a seamless integration of the cable panel.
Experimenting and Customizing: Modifying cable panel patterns for different projects allows you to experiment with different combinations of cables, stitch counts, and design elements. This gives you the opportunity to customize your knitting projects and create unique and personalized pieces. Don’t be afraid to try new techniques and make adjustments as you go – knitting is all about creativity and self-expression!
In conclusion, modifying cable panel patterns for different projects opens up a world of possibilities for adding texture and interest to your knitting. By choosing the right pattern, adapting the cable panel, integrating it into the design, and experimenting with customization, you can create one-of-a-kind pieces that showcase your creativity and skill. Happy knitting!
Inspiring Cable Panel Knitting Project Ideas
Knitting cable panels can add a touch of texture and intricacy to your knitting projects. Whether you’re a beginner or an experienced knitter, incorporating cable panels into your designs can create stunning results. Here are some inspiring ideas to get you started on your cable panel knitting journey.
1. Cable Panel Sweater
A cable panel sweater is a classic and timeless knitting project. You can choose to create a simple cable panel running down the front of the sweater or go for a more intricate design with multiple cable panels. It’s a perfect way to showcase your knitting skills and create a cozy and stylish garment.
2. Cable Panel Scarf
A cable panel scarf is a great project for beginners who want to dip their toes into cable knitting. You can choose a simple cable panel pattern and knit it in a soft and warm yarn to create a cozy and stylish accessory. It’s a versatile piece that can be worn with any outfit, adding a touch of elegance and sophistication.
3. Cable Panel Hat
A cable panel hat is another beginner-friendly project that can be completed quickly. You can choose a cable panel pattern that fits your style and knit it into a hat using a soft and warm yarn. It’s a perfect accessory for the colder months and can keep you warm and stylish at the same time.
4. Cable Panel Blanket
A cable panel blanket is a larger project that can be a labor of love. You can choose a cable panel pattern that you love and knit it into a cozy and warm blanket. It can be a great addition to your home decor and a comfy companion for cold winter nights.
5. Cable Panel Mittens
Cable panel mittens can be a fun and challenging project for intermediate knitters. You can choose a cable panel pattern that you love and knit it into a pair of cozy and stylish mittens. It’s a perfect way to keep your hands warm in the colder months while adding a touch of elegance to your outfit.
So, whether you’re looking to knit a sweater, scarf, hat, blanket, or mittens, incorporating cable panels into your projects can add a touch of texture and sophistication. Get inspired by these ideas and start your cable panel knitting journey today!
Resources for Cable Panel Knitting Patterns
Cable panel knitting patterns are a great way to add texture and interest to your knitting projects. Whether you’re a beginner or an experienced knitter, there are plenty of resources available to help you find the perfect cable panel knitting pattern.
If you’re new to cable knitting, it’s a good idea to start with a simple cable panel pattern. Look for patterns that include detailed instructions and clear diagrams or videos to help you learn the techniques involved. Websites such as Ravelry and LoveKnitting offer a wide range of cable panel knitting patterns for all skill levels, along with user reviews and photos to give you an idea of how the finished project will look.
Online Communities and Forums
Joining online knitting communities and forums can be a great way to connect with other knitters who share your interest in cable panel knitting patterns. These communities can provide valuable advice, tips, and support as you explore new patterns and techniques. Websites such as KnittingHelp and Knitting Paradise offer active forums where you can ask questions, share your projects, and find inspiration for your next cable panel knitting pattern.
Knitting Magazines and Books
Knitting magazines and books are also excellent resources for cable panel knitting patterns. Many knitting magazines feature regular columns or sections dedicated to cable knitting, where you can find new patterns and learn about the latest trends in cable panel design. Similarly, knitting books often include a variety of cable panel patterns, along with step-by-step instructions and helpful tips. Some popular knitting magazines and book authors to look out for include Vogue Knitting, Interweave Knits, and Debbie Bliss.
Pattern Libraries
Pattern libraries such as Knitty and Drops Design offer a wide selection of cable panel knitting patterns that you can browse and download for free. These libraries often include patterns for a range of skill levels, from beginner to advanced, and feature different types of cable panel designs, from simple twists to more intricate braids and lattice patterns. Make sure to read the pattern reviews and check the gauge and yarn requirements before starting a project to ensure the best results.
With so many resources available, finding the perfect cable panel knitting pattern is easier than ever. Whether you prefer to learn from detailed instructions, follow video tutorials, or connect with fellow knitters in online communities, you’re sure to find the inspiration and guidance you need to create beautiful cable panel projects. Happy knitting!