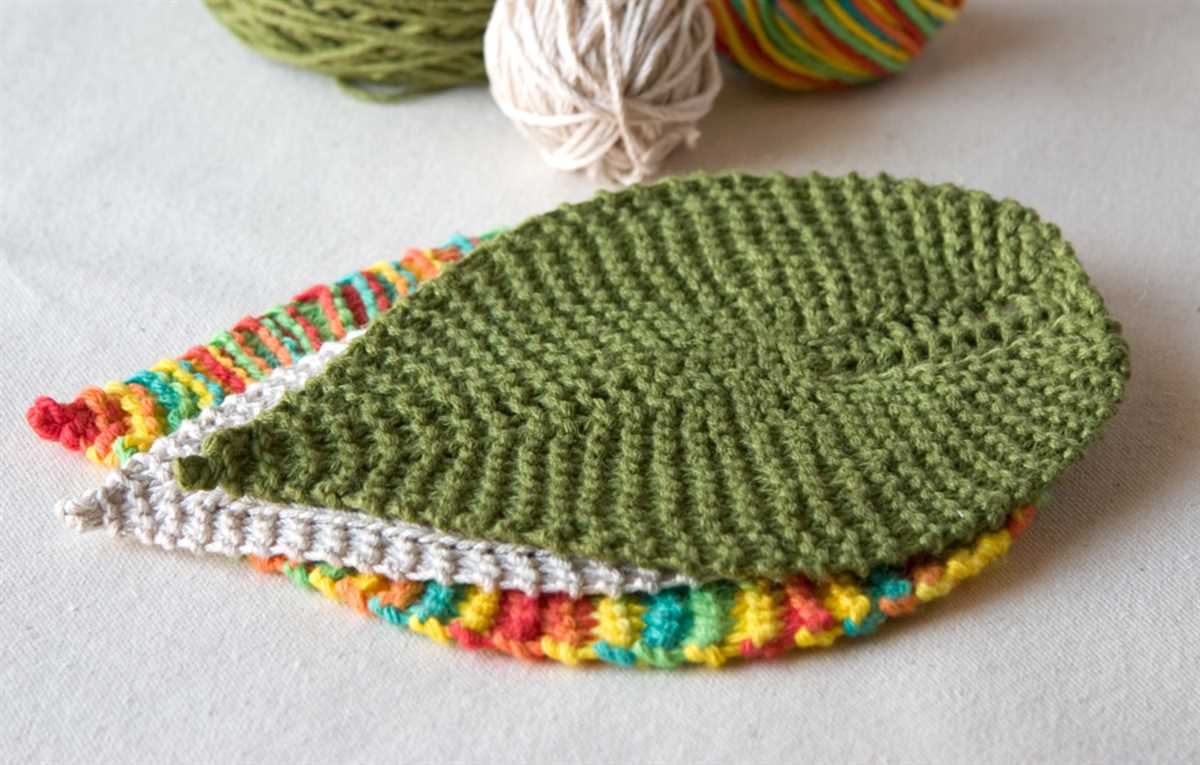
Leafy Knits Made Simple

Knitting is a wonderful hobby that allows you to create beautiful and functional pieces with just a few simple tools. Whether you’re a seasoned knitter or a beginner, adding a touch of nature to your knitting projects can bring a unique and whimsical element to your creations. One popular motif that is often incorporated into knitting patterns is the leaf.
If you’ve ever wanted to try your hand at knitting a leaf motif, you’re in luck! We’ve put together an easy leaf knitting pattern that even beginners can tackle. This pattern is great for adding a decorative touch to scarves, hats, blankets, and more.
This leaf pattern uses basic knitting stitches, such as knit and purl, and requires only a few materials. You’ll need a pair of knitting needles, your favorite yarn, and a tapestry needle for weaving in the ends. Once you’ve gathered your supplies, you’re ready to get started!
Learn to Knit an Easy Leaf Pattern

If you are looking to add a touch of nature to your knitting projects, learning how to knit an easy leaf pattern is the perfect way to do it. This simple yet beautiful pattern can be used to create a variety of items, such as scarves, shawls, or even embellishments on hats and mittens.
To start knitting the leaf pattern, you will need some basic knitting skills, including casting on, knitting, purling, and decreasing. You will also need a pair of knitting needles and some yarn in the color of your choice. Once you have everything ready, you can begin working on your leaf pattern.
Step 1: Cast on the desired number of stitches for your project. The leaf pattern works best with a multiple of 8 stitches, so you may need to adjust your cast-on number accordingly.
Step 2: Begin the leaf pattern by knitting the first two rows in the garter stitch, which means knitting every stitch on both rows. This will create a nice border for your leaf pattern.
Step 3: On the third row, start the leaf pattern by knitting 2 stitches, then purling 1 stitch, and repeating this pattern until the end of the row. This will create the veins of the leaf.
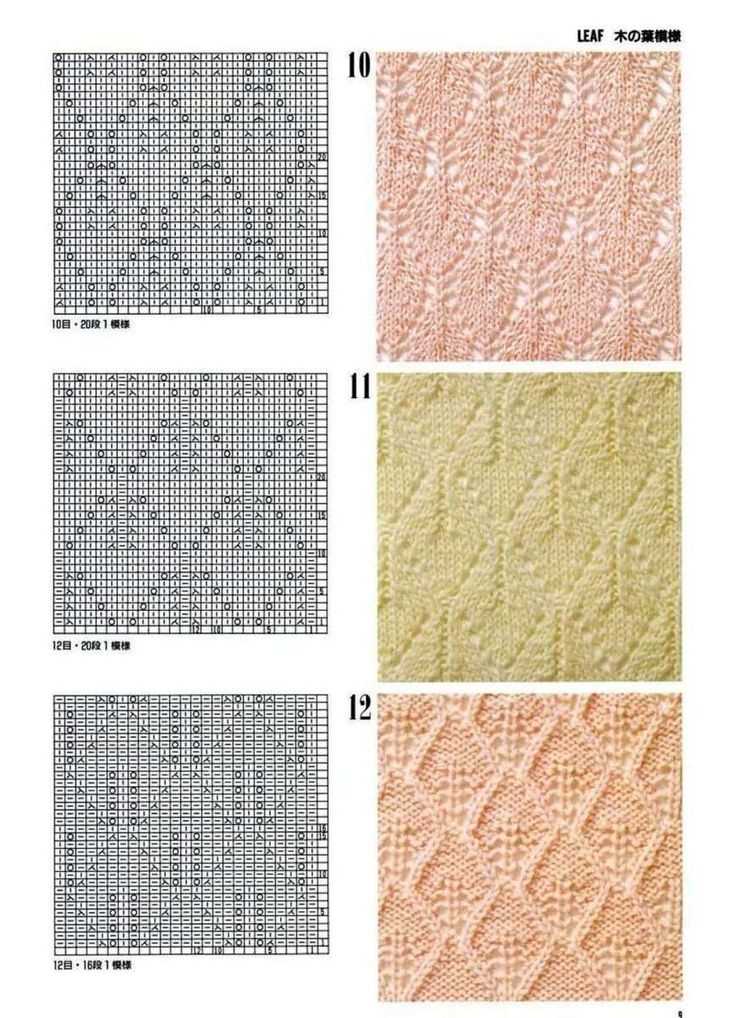
Step 4: Continue working on the leaf pattern by following the chart or instructions. Depending on the size of your project, you may need to repeat the stitch pattern several times.
Step 5: Once you have completed the leaf pattern, finish off your project by knitting a few rows in the garter stitch. This will create a nice edge and help the leaf pattern stand out.
With a little practice, you will be able to knit an easy leaf pattern effortlessly. Whether you are a beginner or an experienced knitter, this pattern is a great way to add some natural beauty to your projects. So grab your knitting needles and start creating your own leaf-inspired designs!
Choosing the Right Yarn for Your Leaf Knitting Project

When embarking on a leaf knitting project, one of the most important decisions you’ll make is choosing the right yarn. The yarn you select will determine the look, feel, and overall quality of your finished leaf. There are several factors to consider when making this decision, including the fiber type, weight, and color.
Fiber type: The fiber type will greatly influence the drape and texture of your leaf. Wool and alpaca yarns, for example, will provide warmth and a fuzzy appearance, while cotton and linen yarns will create a more lightweight and breathable leaf. It’s important to think about the specific characteristics you want your leaf to have and choose a yarn accordingly.
Weight: The weight of the yarn refers to its thickness. Thicker yarns will produce a larger and more substantial leaf, while thinner yarns will create a delicate and lightweight result. Consider the pattern you’re using and the desired size and weight of your finished leaf when selecting the yarn weight.
Color: The color of your yarn can have a significant impact on the overall aesthetic of your leaf. If you want your leaf to closely resemble a natural leaf, consider choosing a yarn color that matches the leaf’s actual color. Alternatively, you can opt for a more creative approach and select a yarn in a bold or vibrant color that will make your leaf stand out.
Additionally, it’s worth noting that not all yarns are created equal. Some yarns have a smoother texture, while others may be more prone to shedding or pilling. Take the time to read reviews and test the yarn before committing to a large project. By carefully considering the fiber type, weight, color, and quality of the yarn, you can ensure that your leaf knitting project is a success.
Essential Knitting Supplies You’ll Need
Knitting is a popular craft that allows you to create beautiful and cozy items with just a few basic supplies. Whether you’re a beginner or an experienced knitter, having the right tools is essential for successful and enjoyable knitting projects.
Yarn: The most important supply you’ll need for knitting is yarn. It comes in a variety of materials, weights, and colors, allowing you to choose the perfect yarn for your project. From soft, bulky yarn for warm scarves or blankets to fine, delicate yarn for lacy shawls or baby clothes, there are options for every type of knitting project.
Knitting Needles: Knitting needles are the tools used to create the actual stitches in your knitting. They come in different sizes and materials, such as metal, wood, or plastic. The size of your needles will depend on the thickness of your yarn and the desired gauge of your project. It’s important to have a variety of needle sizes in your collection, as different projects may require different sizes.
Scissors: A pair of sharp scissors is essential for cutting yarn and finishing off your knitting projects. Look for small, sharp scissors that can easily cut through your yarn without fraying or damaging it.
Tapestry Needles: Tapestry needles are used for sewing in loose ends and seaming pieces together in knitting projects. They have large eyes that can accommodate yarn and blunt tips that won’t split the fibers. These needles come in various sizes, so it’s useful to have a few different ones on hand.
Stitch Markers: Stitch markers are small rings or clips that help you keep track of your stitches and pattern repeats. They are especially useful for complex patterns or when knitting in the round. You can use contrasting yarn, store-bought markers, or even safety pins as stitch markers.
Measuring Tape: A measuring tape is essential for checking your gauge and measuring the size of your knitted pieces. Make sure to choose a flexible measuring tape that can easily wrap around your projects.
Tote Bag or Knitting Bag: Finally, having a dedicated bag for your knitting supplies is a great way to keep everything organized and portable. Look for a bag with compartments or pockets to hold your yarn, needles, and other accessories. A tote bag or backpack-style bag is ideal for carrying your knitting projects on the go.
With these essential knitting supplies, you’ll have everything you need to start your knitting journey and create beautiful hand-knit items. Happy knitting!
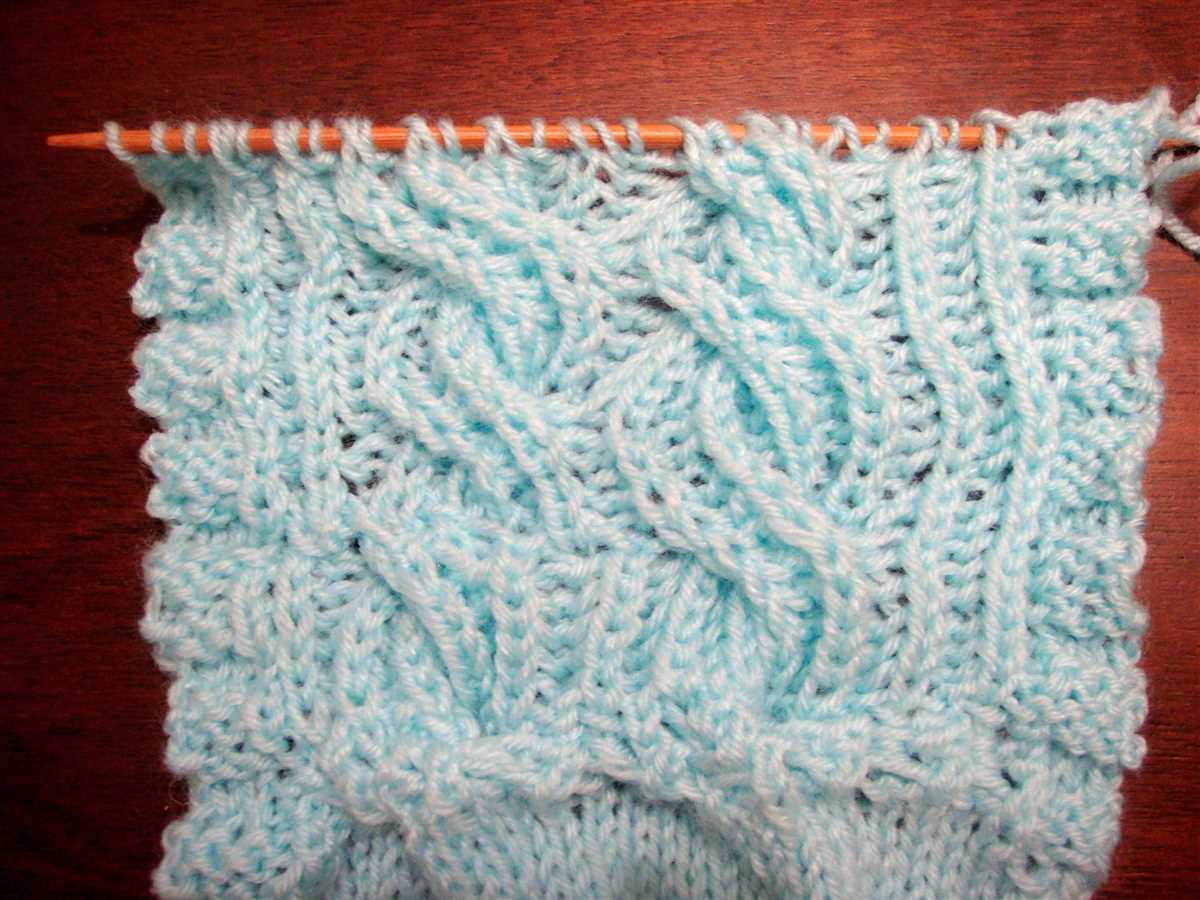
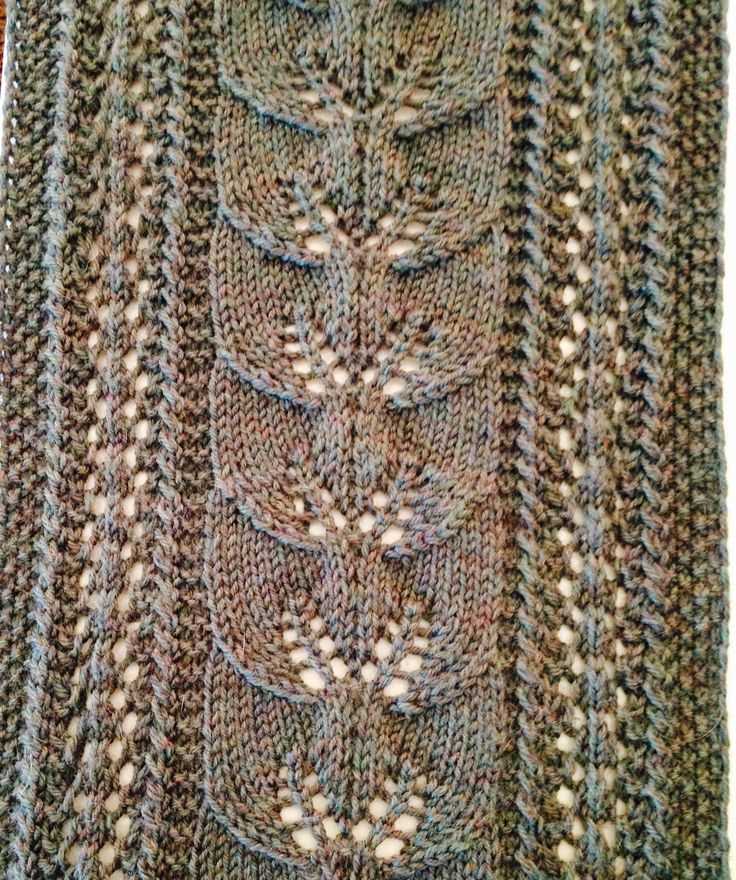
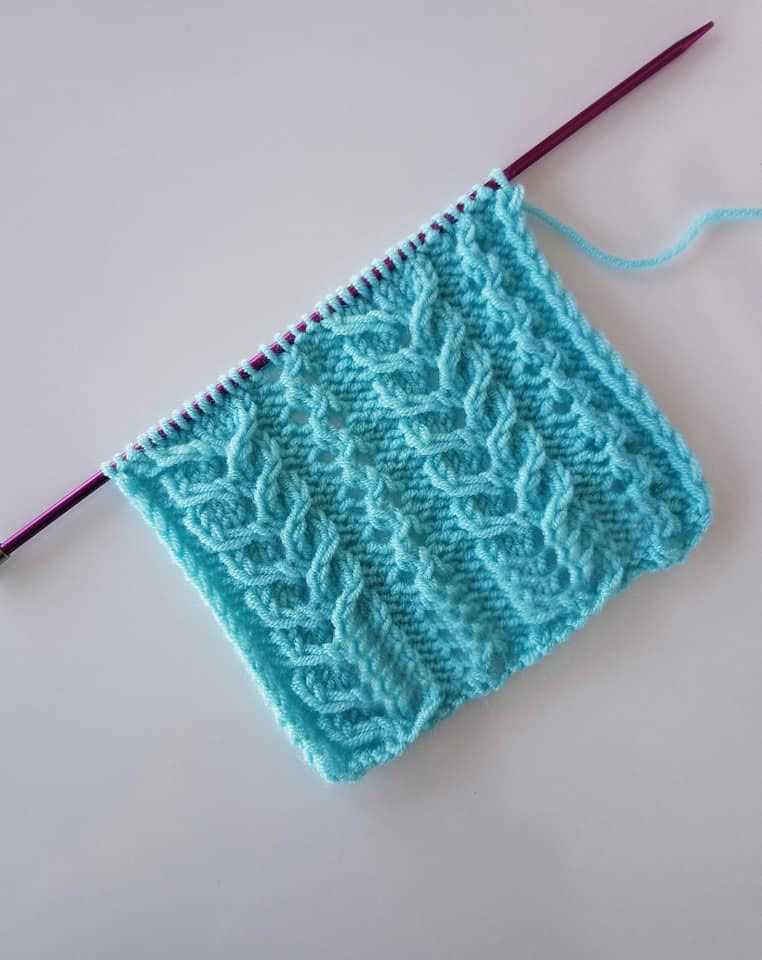
Understanding the Basic Leaf Knitting Stitch
If you’re looking to add a touch of nature to your knitting projects, the leaf knitting stitch is a wonderful choice. This simple yet beautiful pattern creates a delicate leaf design that can be incorporated into various projects such as scarves, shawls, or even blankets.
To start knitting the leaf stitch pattern, you’ll need to be familiar with some basic knitting techniques such as knit, purl, and yarn overs. The leaf pattern is built using a combination of these stitches to create the desired leaf shape. It’s a great project for knitters who have some experience but are looking to try something new.
To create the leaf shape, you’ll begin by knitting a central vein down the middle of the leaf. This is usually done by slipping stitches and then knitting them together in the following row. This creates a raised line that mimics the central vein found in real leaves.
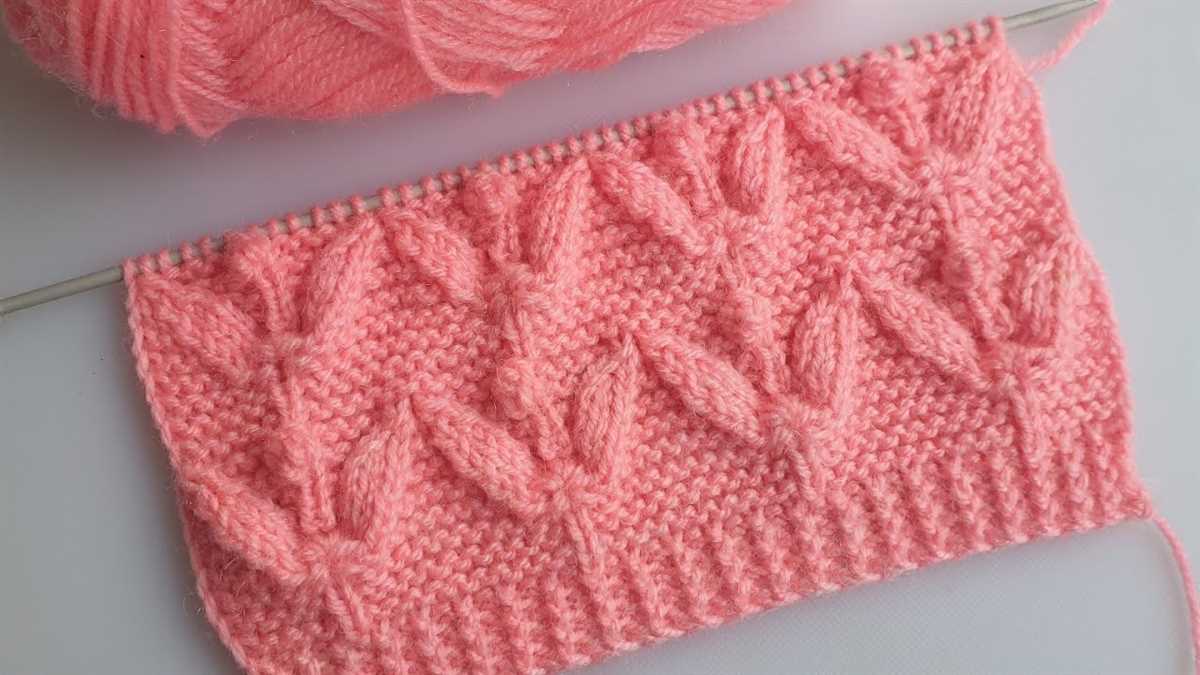
Next, you’ll use a combination of knit, purl, and yarn overs to create the leaf’s shape on both sides of the central vein. This involves increasing and decreasing stitches in specific ways to create the desired shape. By alternating between knit stitches and yarn overs, you’ll create the open spaces that give the leaf its airy and delicate appearance.
The leaf knitting stitch pattern can be customized to your liking by adjusting the number of stitches and rows. You can make smaller leaves for a more intricate design or larger leaves for a bold and eye-catching look. Once you get the hang of the basic leaf stitch, you can experiment with different yarn colors to create stunning variations that reflect the beauty of nature.
Whether you’re a seasoned knitter or just starting out, the leaf knitting stitch is a versatile pattern that can add a touch of elegance to your projects. With its simple yet intricate design and endless customization options, it’s a great way to incorporate nature-inspired motifs into your knitting repertoire.
Tips for Creating Lifelike Leaf Designs

Creating lifelike leaf designs in knitting can be a fun and rewarding project. With the right techniques and attention to detail, you can achieve realistic and stunning results. Here are some tips to help you create lifelike leaf designs:
1. Choose the Right Yarn:

When knitting leaf designs, it is important to choose a yarn that mimics the texture and color of real leaves. Look for yarns with variegated or speckled colors that resemble the natural variation found in leaves. Additionally, selecting a yarn with a bit of sheen can help capture the glossy appearance of leaves.
2. Study Real Leaves:
To create lifelike leaf designs, it is beneficial to study real leaves and observe their shape, vein patterns, and textures. Take time to examine the details of different types of leaves and try to recreate them in your knitting. This attention to detail will elevate your leaf designs and make them more realistic.
3. Use Stitch Patterns:
Experiment with different stitch patterns to create the texture and shape of leaves. For example, using lace or cable stitches can mimic the delicate veins and curves of leaves. Combining different stitch patterns can also add depth and dimension to your leaf designs.
4. Add Embellishments:
To enhance the lifelike appearance of your leaf designs, consider adding embellishments such as beads or embroidery to mimic the dewdrops or other intricate details found on leaves. These small touches can make a big difference in the overall realism of your knitted leaves.
5. Blocking and Shaping:
After completing your leaf designs, make sure to block and shape them properly. Blocking can help open up lace stitches and enhance the overall shape and definition of your leaves. Use pins or a blocking board to shape the leaves and allow them to dry completely before removing them.
By following these tips and incorporating attention to detail in your knitting, you can create lifelike leaf designs that are sure to impress. Whether you use these designs as standalone decorations or incorporate them into larger projects, the realistic appearance of the leaves will add a unique touch to your knitting creations.
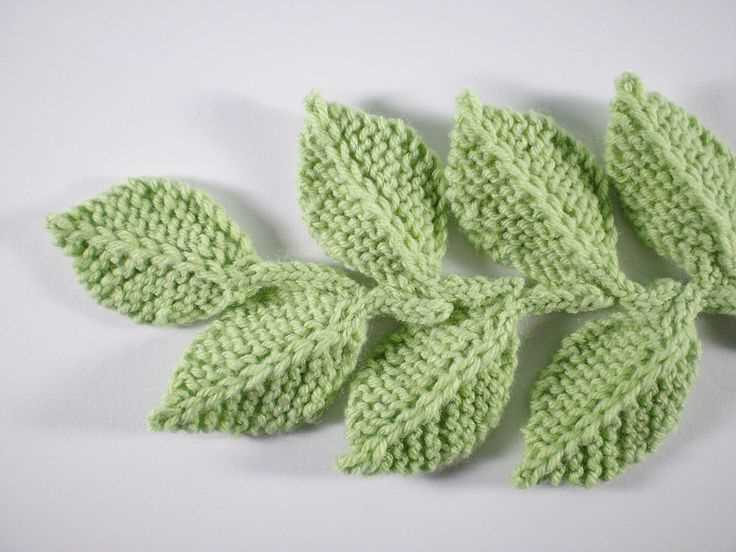
Step-by-Step Instructions for Knitting a Single Leaf
Knitting leaves can add a beautiful touch to any project, whether it’s a scarf, a hat, or a sweater. If you’re looking for an easy leaf pattern to start with, you’re in the right place. In this step-by-step guide, we’ll walk you through the process of knitting a single leaf.
Materials Needed:
- Worsted weight yarn in the color of your choice
- Knitting needles appropriate for the yarn weight
- Yarn needle
- Scissors
Step 1: Cast on
Start by casting on an odd number of stitches using your preferred cast-on method. For this leaf pattern, we recommend using the long-tail cast-on.
Step 2: Knit the first row
Knit across the first row. This will be the right side of your leaf.
Step 3: Purl the second row
Turn your work and purl across the second row. This will be the wrong side of your leaf.
Step 4: Knit the next row
Turn your work again, and knit across the next row.
Step 5: Create the leaf shape
To create the leaf shape, you will be decreasing stitches on one side while increasing stitches on the other side. Follow these instructions:
- Slip the first stitch purlwise, knit to the last two stitches, knit two together (K2tog).
- Turn your work and purl across.
- Repeat steps 1 and 2 until you have reached the desired number of stitches remaining.
Step 6: Bind off
Once you have the desired number of stitches left, bind off all the stitches. Cut the yarn, leaving a long tail for sewing.
Step 7: Finishing
Weave in any loose ends and block your leaf if desired. Your knitted leaf is now ready to be incorporated into your project!
Now that you have mastered the art of knitting a single leaf, you can experiment with different yarn colors and sizes to create a variety of beautiful leaves for your projects. Happy knitting!
Incorporating Leaf Patterns into Larger Knitting Projects
Knitting leaf patterns add an elegant and natural touch to any knitting project. Whether you are working on a cozy sweater, a delicate shawl, or even a decorative blanket, incorporating leaf patterns can elevate your design to the next level. With their intricate details and organic shapes, leaf patterns bring a sense of beauty and whimsy to your knitting.
One way to incorporate leaf patterns into larger knitting projects is to feature them as a central motif. For example, you can choose a sweater pattern that includes a large leaf design on the front or back. This creates a focal point and draws attention to the intricate leaf pattern. To make the leaf design stand out even more, you can use a different color of yarn or add some embroidery stitches to highlight the details.
Another option is to use leaf patterns as borders or edging.
Instead of using a plain and simple ribbing or garter stitch for the hem or cuffs of your project, try substituting it with a leaf pattern. This adds a touch of elegance and uniqueness to your knitting. You can also use leaf patterns as edging for scarves, blankets, or even pillowcases. By incorporating leaf patterns into the edges, you create a cohesive and visually appealing finished product.
If you are feeling adventurous, you can even experiment with combining different leaf patterns in one project. This adds an extra layer of complexity and visual interest to your knitting. You can create a repeating pattern of multiple leaf designs or mix and match different leaf shapes and sizes throughout your project. This allows you to explore your creativity and create a truly unique and one-of-a-kind piece.
Overall, incorporating leaf patterns into larger knitting projects is a wonderful way to add beauty and sophistication to your designs. Whether you choose to feature them as a central motif, use them as borders or edging, or combine them in various ways, leaf patterns are sure to make your knitting stand out and impress. So, grab your knitting needles and start adding some natural charm to your next project!
Adding Variations to Your Leaf Knitting Patterns
Knitting leaf patterns are a great way to add a touch of nature to your knitting projects. Whether you’re creating a cozy sweater or a decorative blanket, incorporating leaf motifs can give your designs a unique and organic look. To make your leaf knitting patterns even more interesting, consider adding variations to them. Here are a few ideas to get you started:
1. Different Leaf Sizes

Instead of sticking to one standard leaf size, experiment with different sizes to create visual interest. You can make some leaves smaller or larger than others, or even incorporate tiny leaves within a larger leaf motif. This variation can add depth and dimension to your knitting project.
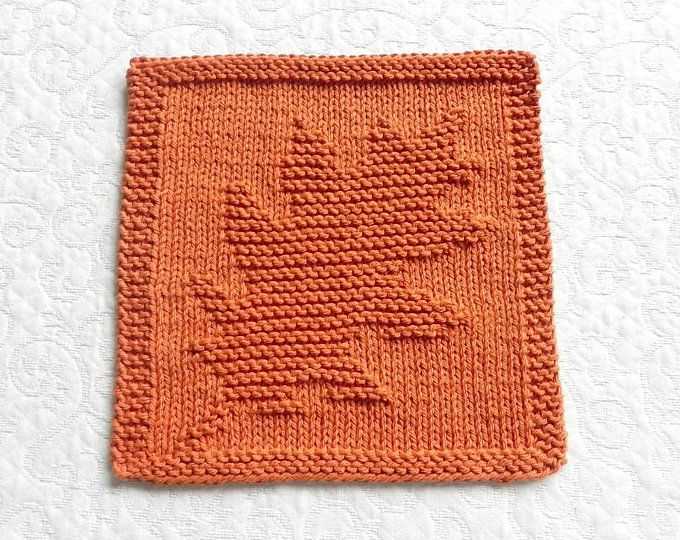
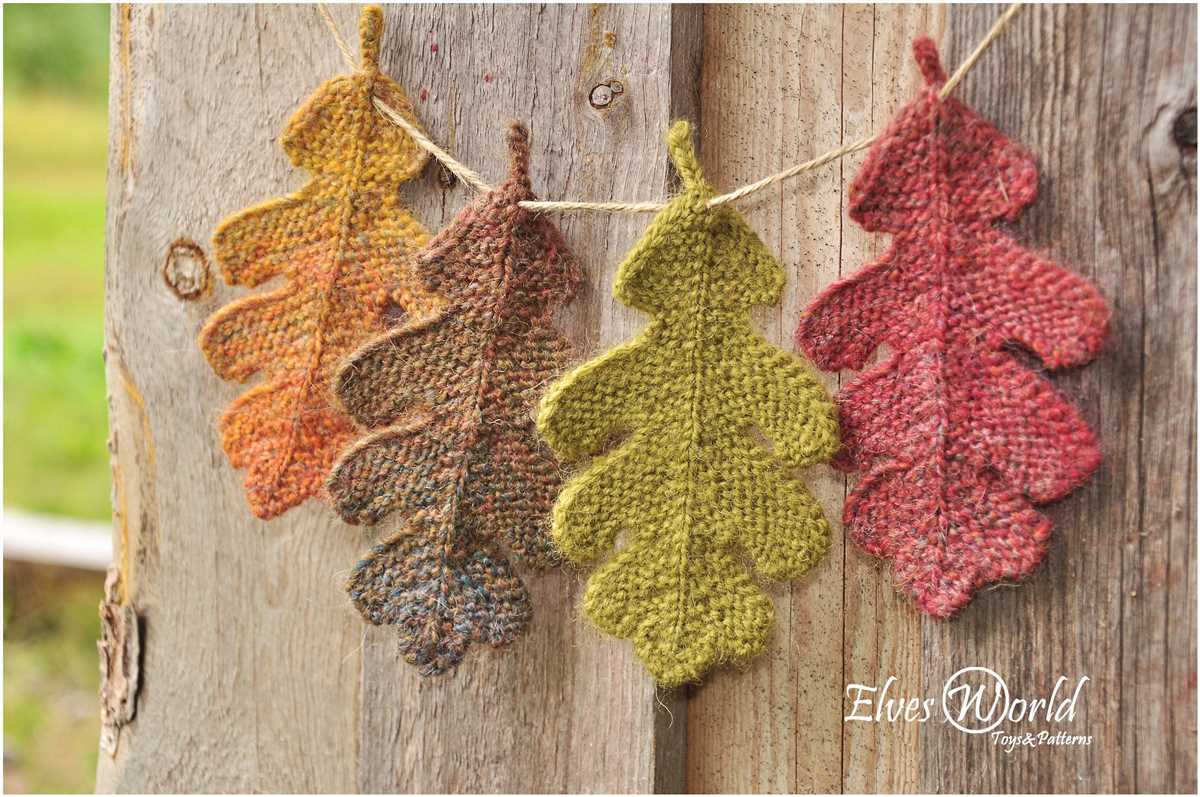
2. Varying Leaf Shapes

While the traditional pointed leaf shape is beautiful, there are many other leaf shapes you can try. Consider knitting patterns with round or oval-shaped leaves, or even experiment with leaf patterns that resemble maple, oak, or other types of leaves. Changing the shape of your leaves can create a diverse and captivating design.
3. Mixing Leaf Colors
Instead of knitting all your leaves in one color, consider using multiple yarn colors to add visual interest. You can use different shades of green for a realistic look or experiment with bold and vibrant colors to create a unique and eye-catching design. Mixing leaf colors can make your knitting project more dynamic and visually appealing.
4. Adding Leaf Embellishments
To make your leaf knitting patterns even more special, consider adding embellishments to your finished leaves. You can sew small beads onto the edges of the leaves to create a sparkling effect or use embroidery techniques to add veins or intricate details. These small touches can elevate your knitting project and make it truly stand out.
By adding variations to your leaf knitting patterns, you can take your designs to the next level. Let your creativity guide you and don’t be afraid to try new techniques and ideas. Whether you’re an experienced knitter or just starting out, experimenting with leaf variations can be a fun and rewarding way to enhance your projects.
Finishing Touches: Blocking and Weaving in Ends
Once you have completed your easy leaf knitting pattern, you may think that the hard work is over. However, there are a few important steps to take to ensure that your finished project looks its best. Blocking and weaving in ends are two essential finishing touches that can make a world of difference in the final appearance of your knitted leaf.
Blocking is the process of shaping and stretching your knitted piece to its desired dimensions. It can help even out stitches, open up lace patterns, and give your leaf a more professional and polished look. To block your leaf, you will need to soak it in lukewarm water with a mild detergent, gently squeeze out the excess water, and then shape it by pinning it to a blocking board or using blocking wires. Allow the leaf to dry completely in its blocked shape, and you will notice a significant improvement in its appearance.
Weaving in ends is another important step in finishing your knitting project. As you work on your leaf, you will likely have yarn tails or ends from changing colors. These loose ends can be unsightly and even lead to unraveling if left unattended. To weave in ends, use a tapestry needle to thread each end through several stitches on the wrong side of the leaf. Be sure to weave the ends in securely and trim any excess yarn. This will not only give your leaf a neater and more professional look but also ensure its longevity.
In summary, blocking and weaving in ends are essential steps in finishing your easy leaf knitting pattern. Blocking will help shape and enhance the appearance of your leaf, while weaving in ends will ensure a neat and professional finish. By taking the time to complete these finishing touches, you can be proud of your knitted leaf and showcase your knitting skills.
Ways to Use Your Knitted Leaves
Knitted leaves are a versatile and trendy way to add a touch of nature to your projects. Whether you’ve just learned how to knit or you’re an experienced knitter looking for a new project, there are plenty of creative ways to use your knitted leaves.
1. Embellish Accessories: One of the easiest ways to use your knitted leaves is to turn them into accessories. Attach them to hats, headbands, or scarves for a whimsical touch. You can also sew them onto bags or purses for a unique and personalized look.
2. Decorate Home Décor: Knitted leaves can also be used to spruce up your home décor. Attach them to pillowcases or create a leaf garland to hang on the wall. You could even sew them onto curtains or tablecloths for a one-of-a-kind look.
3. Create Jewelry: Get creative with your knitted leaves by turning them into jewelry. Use them as pendants for necklaces or earrings, or string them together to create a nature-inspired bracelet. The possibilities are endless, and you can customize the colors and sizes to fit your personal style.
4. Make Seasonal Crafts: Knitted leaves are perfect for seasonal crafts. Use them to decorate wreaths for fall or Thanksgiving, or create a festive centerpiece for your Christmas table. You could also incorporate them into your Halloween decorations or use them to add a touch of autumn to your Thanksgiving table settings.
5. Enhance Knitted Garments: Take your knitting to the next level by incorporating knitted leaves into your garments. Sew them onto sweaters, cardigans, or shawls for a unique and eye-catching detail. You can also create leaf-shaped appliques and attach them to hats or mittens for a fun and playful touch.
With so many creative possibilities, knitted leaves are a great way to add a touch of nature to your projects. Whether you choose to embellish accessories, decorate home décor, create jewelry, make seasonal crafts, or enhance knitted garments, your knitted leaves are sure to be a beautiful and unique addition to any project.
Share Your Leaf Knitting Creations with the Community
Now that you’ve learned how to create beautiful leaf patterns using knitting, it’s time to showcase your creations and share them with the knitting community. Whether you’re a beginner or an experienced knitter, sharing your work can be both inspiring and motivating. Here are a few ways to spread the leaf knitting love:
- Join social media knitting groups: There are numerous knitting groups on platforms like Facebook, Instagram, and Ravelry where you can connect with other knitters and show off your leaf knitting projects. Join these groups and share your creations with like-minded individuals who appreciate the art of knitting.
- Upload your patterns on knitting websites: If you’ve come up with a unique leaf knitting pattern, consider sharing it on knitting websites like KnittingPatternCentral or AllFreeKnitting. By sharing your pattern, you allow other knitters to recreate your leaf designs and contribute to the knitting community.
- Participate in knitting competitions: Many knitting competitions, both online and offline, encourage knitters to showcase their skills and creativity. Look for competitions that specifically include leaf knitting as a category and enter your designs. This will not only give you a chance to win prizes but also provide exposure for your work.
- Create a knitting blog or website: If you are passionate about knitting and want to share your leaf knitting journey in more detail, consider starting a knitting blog or website. This will allow you to share your patterns, tutorials, and experiences with a wider audience and connect with fellow knitters who are interested in leaf knitting.
- Teach leaf knitting workshops: If you have mastered the art of leaf knitting and want to help others learn, consider teaching leaf knitting workshops. You can reach out to local knitting stores or community centers to see if they would be interested in hosting a workshop. Teaching others not only spreads your knowledge but also brings people together who share a common interest.
Remember, sharing your leaf knitting creations with the community is not only a way to showcase your skills but also a way to inspire others and be inspired by their work. So don’t be shy–show off your leaf knitting projects and contribute to the wonderful world of knitting!