A Delicate Dance: The Feather and Fan Pattern in Knitting

The feather and fan pattern, also known as Old Shale or Old Shale Lace, is a popular knitting stitch pattern that creates a beautiful wavy design. This pattern is often used in lace knitting or as a decorative border on garments and accessories. It is a versatile pattern that can be used for a variety of projects, from delicate shawls to cozy blankets.
The feather and fan pattern is characterized by a series of increases and decreases that create a ripple effect. This gives the pattern its distinctive wave-like appearance. The pattern is created by alternating between knit and purl stitches, along with yarn overs and knit two togethers. This combination of stitches creates the openwork and texture that is characteristic of the feather and fan pattern.
The feather and fan pattern is relatively easy to master, making it suitable for knitters of all skill levels. It is a repetitive pattern that can be memorized quickly, allowing knitters to relax into a rhythm as they work. The pattern is also highly adaptable, allowing for customization and experimentation with different yarns and needle sizes.
Whether you’re a beginner knitter looking to expand your skills or an experienced knitter looking for a new project, the feather and fan pattern is a classic choice. Its timeless elegance and versatility make it a favorite among knitters, and its wavy design adds a touch of whimsy to any project. So why not give the feather and fan pattern a try and see what beautiful creations you can make?
What is the Feather and Fan Pattern?

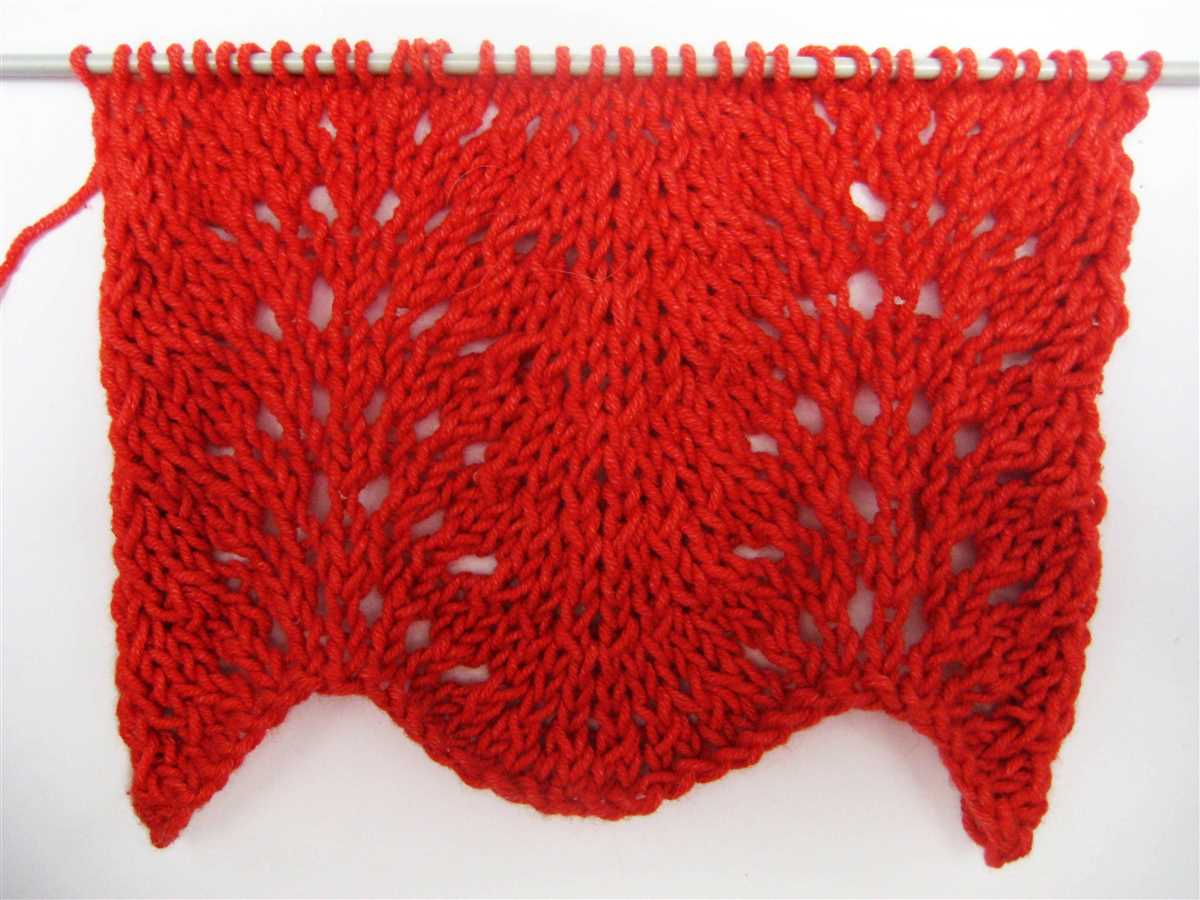
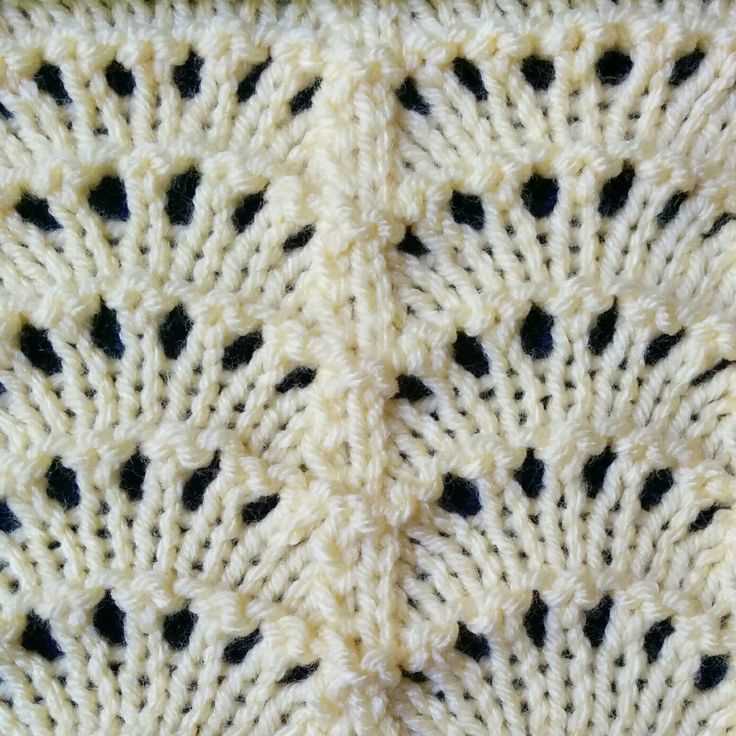
The feather and fan pattern is a popular lace knitting stitch that creates a wavy, scalloped edge. It is also known as Old Shale or Old Shale Lace. This pattern is often used in shawls, scarves, and blankets, adding texture and elegance to the finished piece.
The feather and fan pattern is characterized by its series of increases and decreases, which create the waves and points in the design. Typically worked over an odd number of stitches, the pattern is repeated across the row, resulting in a beautiful and intricate pattern.
The feather and fan pattern is relatively easy to learn, making it a popular choice for knitters of all skill levels. It is often used as a beginner lace pattern because it only requires basic knitting stitches such as knit, purl, yarn over, and knit two together. The repetition of these simple stitches creates the intricate pattern, making it accessible even to those who are new to lace knitting.
One of the great things about the feather and fan pattern is its versatility. It can be worked with any weight of yarn and can be easily adjusted for different sizes and projects. The pattern can be worked over any number of stitches, allowing you to customize it to fit your desired width. Additionally, you can incorporate different yarn colors or even add beading to further enhance the design.
The feather and fan pattern is a timeless lace stitch that adds beauty and elegance to any knitting project. Whether you’re a beginner or an experienced knitter, this pattern is a great choice for creating stunning and intricate designs.
How to Knit the Feather and Fan Pattern?
The feather and fan pattern is a classic lace pattern in knitting that creates a beautiful undulating wave-like texture. It is a popular choice for shawls, scarves, and blankets, adding an elegant touch to any project. Here is a step-by-step guide on how to knit the feather and fan pattern.
Materials Needed:
- Knitting needles in the appropriate size for your yarn
- Yarn in your chosen weight and color
Instructions:
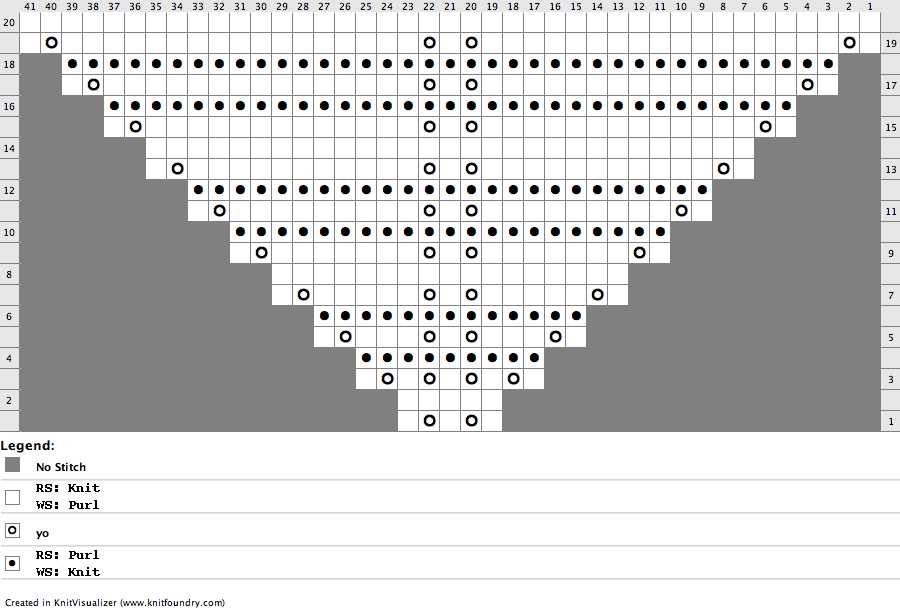
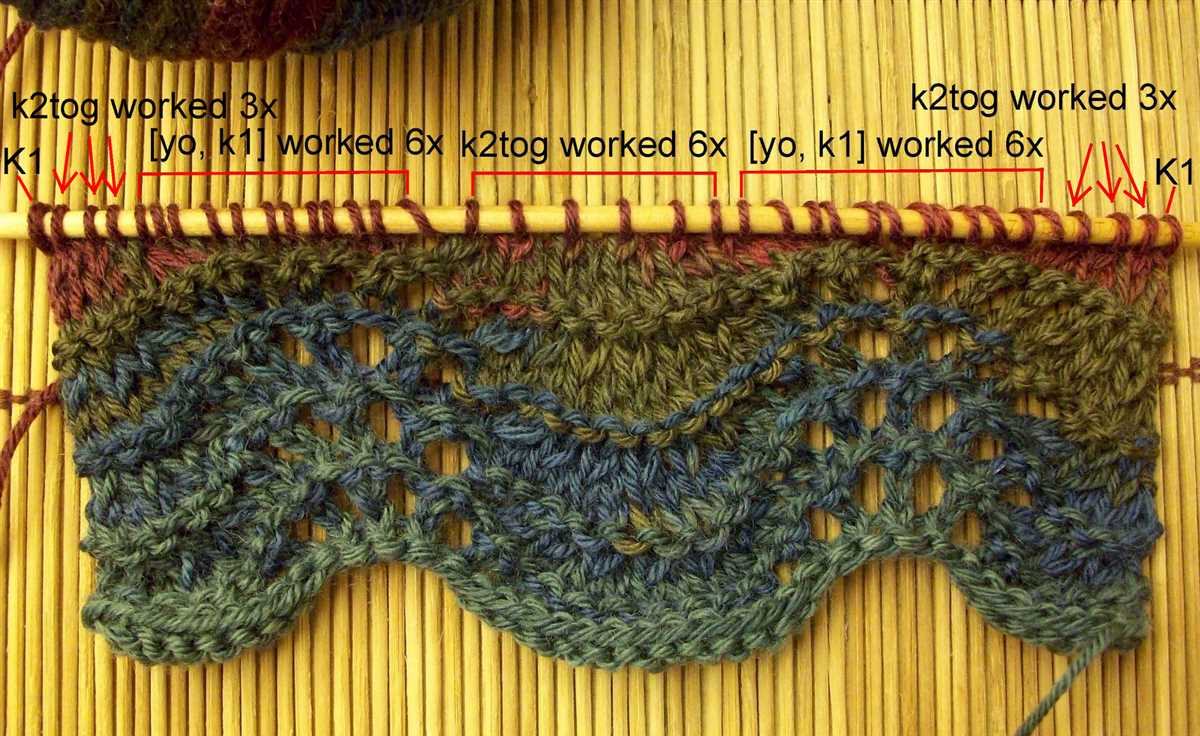
1. Cast on: Begin by casting on a multiple of 18 stitches, plus an additional 2 stitches. This pattern requires a multiple of 18 stitches to work properly.
2. Set-up row: Knit the first 2 stitches.
3. Pattern Row 1: *Knit 2 together, knit 1, yarn over, knit 1, yarn over, knit 1, yarn over, knit 2 together, knit 2 together, knit 1, yarn over, knit 1, yarn over, knit 1, yarn over, knit 1, yarn over, knit 2 together; repeat from * to last 2 stitches, knit 2.
4. Pattern Row 2: Knit all stitches.
5. Repeat: Repeat pattern rows 1 and 2 until your project reaches the desired length, ending with pattern row 1.
6. Bind off: Bind off all stitches in pattern, keeping the tension loose to maintain the elasticity of the pattern.
With these simple steps, you can create the beautiful feather and fan pattern in your knitting projects. Experiment with different yarn colors and textures to create unique and stunning pieces.
Cast On
The first step in knitting the feather and fan pattern is to cast on the desired number of stitches. This is the process of creating the foundation row of stitches that will be worked in the pattern. There are different methods of casting on, but for the feather and fan pattern, a simple long-tail cast on is commonly used.
To begin the long-tail cast on, the knitter must first estimate the length of yarn needed to cast on the desired number of stitches. This can be done by wrapping the yarn around the knitting needle a certain number of times, such as one wrap for each stitch. Once the length is estimated, this is called the “long tail.” The tail is held in the right hand, while the working yarn is held in the left hand.
With the needle in the right hand, the knitter first inserts the needle under the long tail and over the working yarn. Then, the needle is brought back under the working yarn and through the loop created by the long tail, creating a new stitch on the needle. This process is repeated for each stitch needed to be cast on until the desired number of stitches has been achieved.
It is important to keep the tension consistent while casting on, to ensure that all the stitches are of the same size. This can take some practice to achieve, but with time and patience, the knitter can become proficient in casting on and create a strong and even foundation row for their feather and fan pattern.
Knit the First Row
Before you can begin the feather and fan pattern in knitting, you need to start with knitting the first row. This is the base row on which the pattern will be built. To knit the first row, you will need your knitting needles and the yarn of your choice.
Start by casting on the desired number of stitches onto one of your knitting needles. You can use any cast-on method that you are comfortable with. Make sure to leave a long enough tail of yarn so that you can weave in the ends later.
- Once you have cast on the stitches, hold the knitting needle with the cast-on stitches in your right hand.
- Hold the other knitting needle in your left hand, with the point facing to the right.
- Insert the left needle into the first stitch on the right needle, from left to right.
- Wrap the yarn around the right needle, forming a loop.
- Using the point of the right needle, pull the loop of yarn through the stitch on the left needle, creating a new stitch on the right needle.
Continue in this manner, knitting each stitch from the left needle onto the right needle, until all the stitches have been transferred. Make sure to keep your tension even and consistent throughout the row.
Once you have completed knitting the first row, you can proceed to the next step of the feather and fan pattern, which involves creating the pattern repeat. But first, take a moment to admire your first row of knitting and the foundation you have laid for the beautiful feather and fan pattern.
Knit the Second Row
Once you have completed the first row of the feather and fan pattern, it’s time to move on to the second row. The second row is an important step in creating the beautiful waves and fans that give this pattern its signature look.
To knit the second row, you will be working with the stitches that you created in the first row. Begin by knitting two stitches together, then yarn over. Repeat this pattern of knitting two stitches together and yarn over until you reach the end of the row.
In the second row, the stitches that were created by knitting two together and yarn over in the first row will create the pattern of fans. As you continue knitting subsequent rows, the pattern will become more pronounced and the fans will begin to take shape.
It’s important to pay attention to this second row, as it sets the foundation for the rest of the pattern. Take your time and make sure you are knitting the stitches correctly, as any mistakes made in this row can affect the overall appearance of the pattern.
As you progress further into the feather and fan pattern, you will continue to knit rows in the same manner, creating the distinct waves and fans. With each row, you will see the pattern come to life and the beauty of this knitting technique will become more apparent.
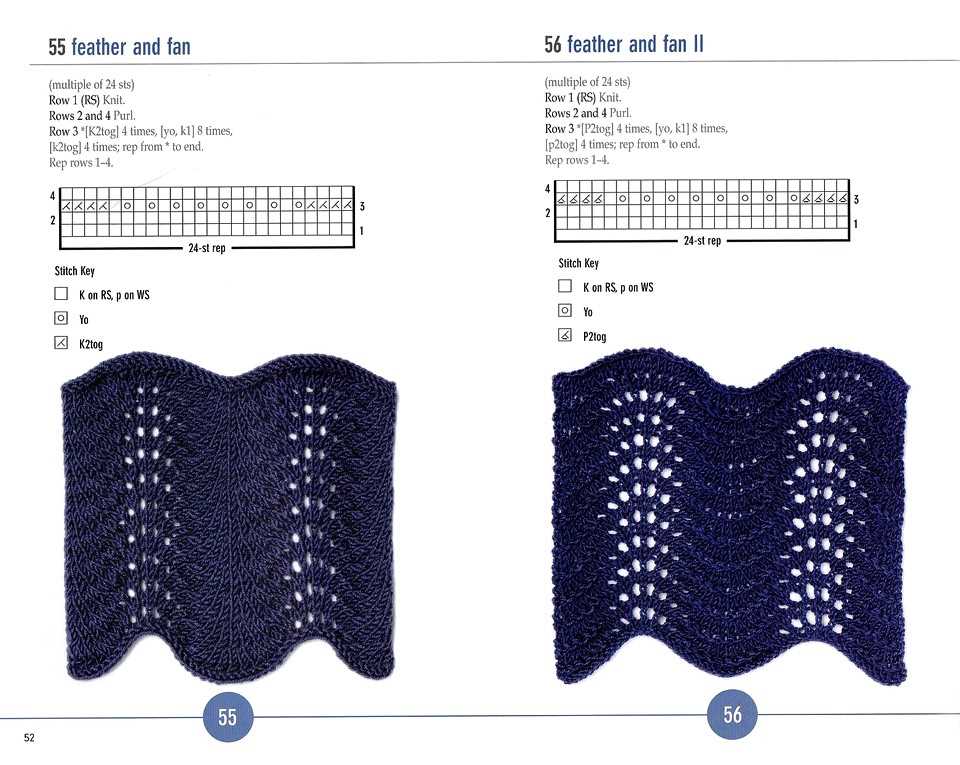
Repeat Rows 2 and 3
After completing Row 1 of the feather and fan pattern in knitting, you will move on to repeating Rows 2 and 3 until you reach your desired length. The repetition of these two rows creates the beautiful undulating waves characteristic of the feather and fan stitch.
Row 2: To begin Row 2, you will start with a knit stitch. Knit 2 stitches together to decrease one stitch. Then, yarn over and knit 1 stitch. Repeat this pattern across the row, ending with a knit stitch.
Row 3: Row 3 is similar to Row 1, with a series of knit, purl, and yarn over stitches. Start Row 3 with a knit stitch, followed by 2 purl stitches. Yarn over and purl 2 stitches together, and then repeat this pattern across the row. The row ends with a knit stitch.
After completing Row 3, you will return to Row 2 and repeat the pattern again. The repetition of these two rows creates the rhythmic pattern that gives the feather and fan stitch its distinctive look. Continue repeating Rows 2 and 3 until you reach the desired length of your project.
Knitting the Feather and Fan Pattern in the Round
The Feather and Fan pattern, also known as Old Shale, is a classic lace knitting pattern that creates a beautiful wave-like design. While traditionally knit flat, it can also be adapted for knitting in the round, allowing you to create seamless projects such as hats, cowls, and even sweaters.
To knit the Feather and Fan pattern in the round, you will need to make a few modifications to the original flat pattern. Instead of working the wrong side rows, you will be continuously knitting in the round. This means that every round will be a right side row, and you will only need to follow the pattern for the right side rows.
When knitting the Feather and Fan pattern in the round, it’s important to note that the stitch count may vary depending on the number of pattern repeats and any additional stitches required for the project. Make sure to adjust the instructions accordingly and divide your stitches evenly among double-pointed needles or use magic loop technique if working with circular needles.
Begin the pattern by casting on the required number of stitches, making sure it is divisible by the number of stitches needed for one full pattern repeat. Work the setup round as instructed, which usually involves knitting a certain number of stitches to establish the pattern repeat.
Once the setup round is complete, continue working the Feather and Fan pattern by repeating the specified sequence of knit and yarn-over stitches for each pattern repeat until you reach the desired length. Remember to always keep track of your stitch counts and marker placements if necessary.
When you’ve finished knitting the Feather and Fan pattern in the round, you can bind off your stitches using a stretchy bind-off method such as the traditional bind-off or the tubular bind-off for a more polished edge. Weave in any loose ends, block your project if necessary, and marvel at the gorgeous waves of the Feather and Fan pattern!
Tips for Knitting the Feather and Fan Pattern
Knitting the feather and fan pattern can be a fun and rewarding project. This classic lace pattern creates a beautiful ripple effect and is often used for shawls, scarves, and blankets. Here are some tips to help you master this pattern:
1. Choose the Right Yarn
When knitting the feather and fan pattern, it’s important to choose the right yarn. Opt for a lightweight yarn with good stitch definition, such as a fingering or lace weight yarn. This will help showcase the intricate details of the lace pattern.
2. Use Lifelines
The feather and fan pattern can be quite intricate, with multiple increases and decreases in each row. To avoid frustration and mistakes, consider using lifelines. A lifeline is a thin piece of thread or dental floss that is threaded through the stitches on a row, serving as a safety net. If you make a mistake, you can easily rip back to the lifeline and avoid having to start over completely.
3. Practice Stitch Counting
Keeping track of your stitch count is essential in the feather and fan pattern. The ripple effect is created by adding and decreasing stitches in specific sections of the pattern. Take the time to count your stitches at the end of each row to ensure you haven’t missed any increases or decreases.
4. Block your Finished Piece
Blocking is an important step in lace knitting, as it helps open up the stitches and shape the finished piece. After completing your feather and fan project, wet block it by soaking it in lukewarm water and gently shaping it to the desired dimensions. Pin it in place and allow it to dry completely before unpinning.
With these tips in mind, you’re ready to tackle the feather and fan pattern. Enjoy the process of creating a beautiful lace piece that showcases your knitting skills!
Modifying the Feather and Fan Pattern

The feather and fan pattern in knitting is a popular choice for creating beautiful and intricate designs. It is commonly used in shawls, blankets, and scarves to add texture and visual interest. However, it is also a versatile pattern that can be modified to suit your preferences and create unique variations.
One way to modify the feather and fan pattern is to change the number of stitches in each repeat. By increasing or decreasing the number of stitches, you can alter the width and density of the pattern. For example, if you want a more delicate and lacy look, you can decrease the number of stitches in each repeat. On the other hand, if you prefer a denser and more structured appearance, you can increase the number of stitches.
Another way to modify the feather and fan pattern is to change the number of rows in each repeat. By adding or subtracting rows, you can adjust the length and height of the pattern. This can be particularly useful when you want to create a longer or shorter item using the feather and fan pattern. Additionally, you can experiment with different increases and decreases within each row to create unique effects and shapes.
Furthermore, you can modify the feather and fan pattern by incorporating different stitch patterns or yarn combinations. For example, you can alternate between the feather and fan pattern and a simple ribbing or seed stitch to create an interesting contrast. You can also use variegated or self-striping yarn to add an element of color to your project. By experimenting with different stitch patterns and yarns, you can create endless variations of the feather and fan pattern.
In conclusion, the feather and fan pattern in knitting is a versatile and adaptable design that can be modified in various ways. Whether you change the number of stitches and rows, incorporate different stitch patterns, or play with different yarn combinations, you can customize the feather and fan pattern to suit your preferences and create unique and beautiful projects.
Changing Needle Size
Changing needle size can have a significant impact on the appearance and drape of the feather and fan pattern in knitting. By using larger needles, the stitches will be looser and the resulting fabric will have a more open and airy look. This is great for creating lightweight and breathable garments, such as summer tops or shawls.
In contrast, using smaller needles will create tighter stitches and a denser fabric. This can be useful when knitting items that require more structure and warmth, like sweaters or blankets. The smaller stitches help to create a tighter and more insulating fabric.
When changing needle size, it’s important to consider the type of yarn you are using and the desired outcome of your project. Thinner yarns generally work well with smaller needles, while thicker yarns can handle larger needles. It’s also important to swatch and check your gauge before starting a project, as changing needle size can significantly affect the size and fit of your finished piece.
Overall, changing needle size can be a powerful tool in knitting. Whether you want a lightweight and airy fabric or a dense and warm one, experimenting with different needle sizes will allow you to achieve the desired effect in your feather and fan pattern projects.
Altering the Number of Stitches
One of the great things about the feather and fan pattern is that it can easily be modified to create different effects. One way to alter the pattern is by changing the number of stitches. By increasing or decreasing the number of stitches, you can create a different size or shape of the pattern.
For example, if you want to make a larger version of the feather and fan pattern, you can increase the number of stitches in each repeat. This will make the pattern wider and more open. On the other hand, if you want to make a smaller version of the pattern, you can decrease the number of stitches in each repeat. This will create a more compact and delicate design.
To alter the number of stitches, you will need to make adjustments in each section of the pattern. You can start by determining the number of stitches in each repeat and then make the necessary changes. Keep in mind that altering the number of stitches may also affect the number of rows in the pattern, so you may need to adjust the overall length of your project.
When altering the number of stitches, it’s important to keep track of your changes and make notes on the pattern. This will help you remember what adjustments you made and ensure that you can reproduce the same design in the future. It’s also a good idea to make a practice swatch before starting your project to see how the pattern looks with the new stitch count.
In conclusion, altering the number of stitches in the feather and fan pattern can give you more creative freedom and allow you to customize the design to your liking. Experimenting with different stitch counts can lead to unique and beautiful results in your knitting projects.
Adjusting the Number of Repeats
One of the great things about the feather and fan pattern in knitting is its flexibility. You can easily adjust the number of repeats to customize the size of your project. Whether you want to make a small scarf or a large blanket, simply changing the number of repeats will give you the desired dimensions.
To adjust the number of repeats, you will need to understand the pattern repeat and how it is constructed. The feather and fan pattern is made up of four rows, with the first and last rows being the same. This means that the pattern repeat actually consists of three rows.
To increase or decrease the size of your project, you will need to modify the number of repeats in the row. For example, if you want to make a larger blanket, you can add more repeats to each row. Conversely, if you want to make a smaller scarf, you can reduce the number of repeats in each row.
When adjusting the number of repeats, it is important to keep in mind that changing the pattern repeat will also change the overall look of the project. Adding more repeats will create a wider fabric with more pronounced waves, while reducing the number of repeats will result in a narrower fabric with lighter waves.
It is also worth noting that adjusting the number of repeats will affect the amount of yarn you need for your project. Adding more repeats will require more yarn, while reducing the number of repeats will reduce the amount of yarn needed.
Projects to Try with the Feather and Fan Pattern
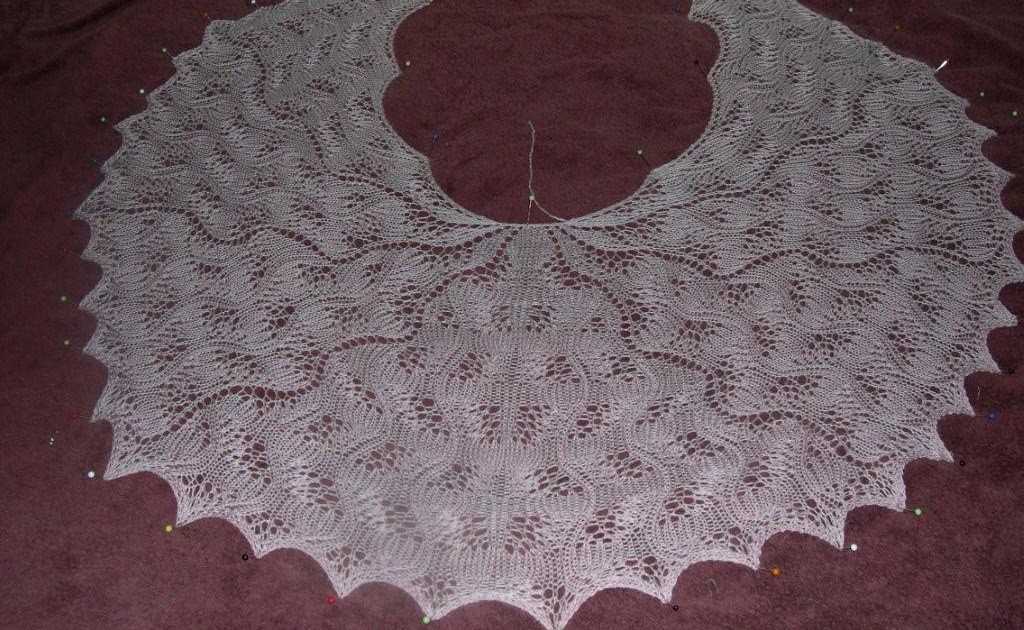
The feather and fan pattern is a versatile stitch that can be used in a variety of knitting projects. Its delicate and lacy design makes it ideal for creating lightweight and airy garments and accessories. Here are a few project ideas to try using the feather and fan pattern:
1. Feather and Fan Shawl
A feather and fan shawl is a classic and elegant project that showcases the beautiful lacework of the stitch pattern. Knit with a lightweight yarn, such as lace or fingering weight, the shawl can be worn as a stylish accessory to dress up any outfit or as a cozy wrap for cool evenings.
2. Feather and Fan Baby Blanket
The feather and fan pattern is also perfect for creating a soft and cozy baby blanket. Knit with a soft and washable yarn, such as cotton or acrylic, the blanket will be both beautiful and practical for little ones. The delicate lacework adds a touch of elegance to a baby’s nursery.
3. Feather and Fan Scarf
A feather and fan scarf is a great way to add a touch of elegance to your winter wardrobe. Knit with a warm and cozy yarn, such as wool or alpaca, the scarf will keep you warm while adding a feminine and delicate touch to your outfit.
4. Feather and Fan Socks
For those who love to knit socks, try incorporating the feather and fan pattern into your next pair. The lacework adds a stunning detail to the socks, making them unique and eye-catching. Choose a fine sock yarn for a lightweight and breathable finish.
With its beautiful lacework design, the feather and fan pattern offers endless possibilities for knitting projects. Whether you’re creating a shawl, baby blanket, scarf, or socks, this versatile stitch will add a touch of elegance and sophistication to your knitting repertoire.