Knit your own cuddly tiger with this free pattern

Knitting is a relaxing and creative hobby that allows you to create beautiful items from scratch. One of the most popular knitting projects is making stuffed animals, and a toy tiger is a fun and adorable choice. Whether you are an experienced knitter or a beginner looking for a new challenge, this free knitting pattern will guide you through the process of creating your own toy tiger.
This pattern is suitable for knitters of all skill levels and can be customized to your liking. You can choose different colors and yarns to make your tiger unique and personalized. The finished toy will make a great gift for a child or a playful addition to your home decor.
To get started, you will need basic knitting supplies such as knitting needles, yarn, and stuffing. The pattern uses basic stitches like knit, purl, increase, and decrease, so even beginners can easily follow along. So grab your favorite yarn and let’s get knitting!
Overview

The free knitting pattern for a toy tiger is a great project for knitters of all skill levels. This pattern provides step-by-step instructions on how to create an adorable stuffed toy that is perfect for children and animal lovers alike.
The pattern includes a list of materials needed, such as yarn, knitting needles, and stuffing, as well as the recommended gauge and measurements for the finished toy. Knitters can choose their own color combinations to create a unique and personalized tiger toy.
This pattern is written in a clear and concise manner, making it easy to follow for both experienced knitters and beginners. It includes helpful tips and techniques, such as how to use different stitches to create the desired effect. Knitters can also customize the toy by adding details such as stripes or facial features to make it even more lifelike.
Whether you’re looking for a fun and engaging project for yourself or a special gift for a loved one, this free knitting pattern for a toy tiger is sure to bring joy and creativity to your knitting experience.
Why choose a free knitting pattern for a toy tiger

If you enjoy knitting and want to create a unique toy for a child or to add to your collection, choosing a free knitting pattern for a toy tiger can be a great option. With a free pattern, you have the opportunity to save money while still creating something special.
One of the main benefits of using a free knitting pattern for a toy tiger is the ability to personalize the design. You can choose the colors, yarn types, and even add your own unique touches to make the toy truly one-of-a-kind. This allows you to exercise your creativity and make something that reflects your style and personality.
- Variety: When using a free knitting pattern for a toy tiger, you will find a wide range of options available. There are patterns for different sizes, styles, and levels of difficulty, ensuring that you can find the perfect pattern for your skill level and preferences.
- Cost-Effective: Knitting can be an expensive hobby, especially when purchasing patterns. However, with free knitting patterns, you can enjoy the craft without worrying about breaking the bank. This can be especially useful if you are just starting out with knitting or are on a tight budget.
By choosing a free knitting pattern for a toy tiger, you can unleash your creativity, save money, and enjoy the satisfaction of creating something with your own hands. Whether you’re adding to your collection or making a special gift for a loved one, a knitted toy tiger can bring joy and warmth for years to come.
Benefits of a free knitting pattern
Knitting is a beloved craft that brings joy and relaxation to many people. Whether you’re a beginner or an experienced knitter, having access to free knitting patterns can offer numerous benefits.
1. Cost-effective: One of the major advantages of free knitting patterns is that they allow you to create beautiful projects without spending a dime. Knitting can be an expensive hobby, with the cost of yarns and patterns adding up quickly. By utilizing free patterns, you can save money while still indulging in your love for knitting.
2. Variety: Another benefit of free knitting patterns is the vast selection available. You can find patterns for all skill levels and project types, from simple scarves and hats to intricate sweaters and toys. The variety ensures that there is always something new and exciting to knit, keeping your creativity flowing.
3. Skill development: Free knitting patterns offer an opportunity to improve your knitting skills and learn new techniques. With each pattern, you can challenge yourself by trying different stitches, constructions, or colorwork. As you successfully complete more projects, your knitting skills will continue to grow.
4. Community support: Knitting is not just about the end product; it’s also about the community and connections formed through this craft. Free knitting patterns often come with online communities or forums where fellow knitters can share their experiences, ask questions, and provide support. This sense of community can be invaluable, especially for beginners who may need guidance or encouragement along the way.
5. Customization: Free knitting patterns provide a great foundation for customization. You can modify patterns to fit your desired size, color scheme, or personal style. This freedom allows you to put your own creative twist on each project, making it truly unique and reflective of your personality.
In summary, free knitting patterns offer a host of benefits, including cost savings, a wide variety of options, skill development, community support, and customization. Take advantage of these patterns to enjoy the endless possibilities of knitting and unleash your creativity.
The popularity of toy tigers
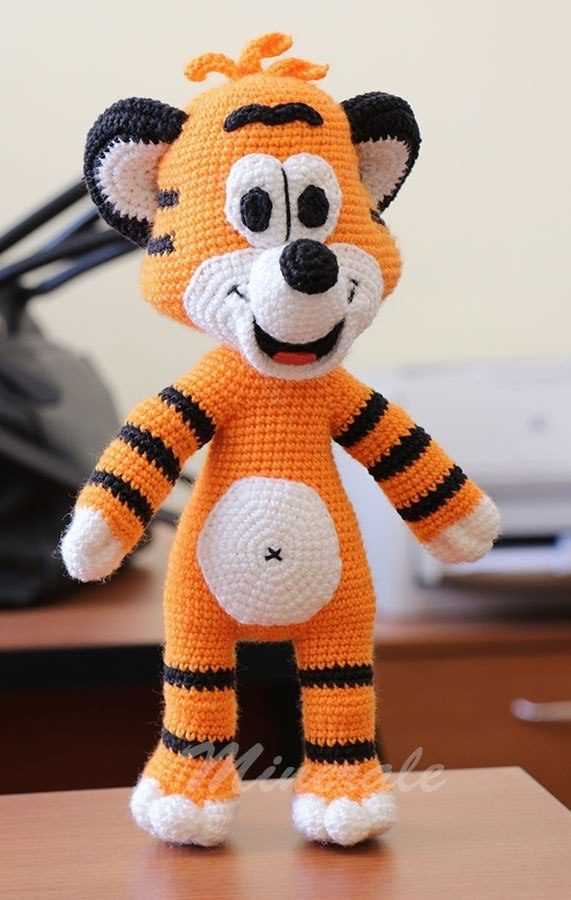
Toy tigers have become increasingly popular among children and adults alike. These adorable stuffed animals not only serve as cuddly companions but also ignite the imagination and creativity of their owners. With their striking orange and black stripes and cute little faces, toy tigers capture the hearts of people of all ages.
One of the reasons for the popularity of toy tigers is their association with strength and power. Tigers are often seen as symbols of courage and ferocity, and having a toy tiger can make one feel strong and fearless in their own world. Children, in particular, are drawn to the idea of having a toy tiger as their protector, while adults find comfort in the nostalgia and symbolism of these majestic creatures.
Moreover, toy tigers are not only loved for their appearance but also for the emotional and educational value they offer. Many children develop strong emotional attachments to their toy tigers, treating them as loyal friends and confidants. They can also serve as a tool for teaching children about wildlife conservation and the importance of protecting endangered species like tigers. By playing with a toy tiger, children learn to appreciate and respect these magnificent animals.
Toy tigers are also popular as collectibles. Many people enjoy building a collection of different toy tigers, showcasing their unique designs and styles. Whether it’s a traditional stuffed animal or a modern plush toy, each toy tiger in a collection tells a story and brings joy to its owner.
In conclusion, the popularity of toy tigers can be attributed to their visual appeal, symbolic significance, emotional value, and collectible nature. Whether they are for play, decoration, or education, toy tigers continue to captivate people’s hearts and remain a beloved choice among toy enthusiasts around the world.
Materials needed for knitting a toy tiger

Knitting a toy tiger requires several materials to create an adorable and cuddly stuffed animal. The following is a list of essential materials:
- Yarn: Choose a soft and durable yarn in orange and black colors to replicate the tiger’s fur pattern.
- Knitting Needles: Use knitting needles of appropriate size for the yarn chosen. Typically, a size US 7 (4.5mm) or US 8 (5mm) works well for medium weight yarn.
- Stuffing: A polyester fiberfill or any other suitable stuffing material to fill the toy and give it a plush feel.
- Tapestry Needle: A large-eyed tapestry needle is essential for sewing up the various parts of the toy and weaving in loose ends.
- Scissors: A pair of sharp scissors for cutting the yarn and trimming any excess.
- Safety Eyes or Embroidery Floss: Depending on your preference, you can use either safety eyes or embroider the tiger’s eyes with black embroidery floss.
- Stitch Markers: Stitch markers can be helpful to keep track of specific points in the pattern, especially for larger projects.
By gathering these materials, you’ll have everything you need to start knitting your very own toy tiger. The combination of the chosen yarn, needles, stuffing, and other supplies will ensure you create a beautiful and huggable toy that is ready to be cherished by children and adults alike.
Yarn

In the world of knitting, yarn is the essential material that brings life to any project. Yarn is a long, continuous thread that is spun from natural or synthetic fibers. It comes in a variety of colors, weights, and textures, allowing knitters to create an endless array of designs.
Types of Yarn: There are many different types of yarn available, each with its own unique qualities and properties. Some popular types include:
- Wool: Wool yarn is made from the fleece of sheep. It is known for its warmth and softness, making it perfect for cozy sweaters and accessories.
- Cotton: Cotton yarn is made from the fibers of the cotton plant. It is lightweight and breathable, making it ideal for summer garments and baby items.
- Acrylic: Acrylic yarn is man-made and is known for its affordability and easy care. It is often used for projects that need to withstand frequent washing.
- Alpaca: Alpaca yarn is made from the hair of alpacas, which are native to the Andes Mountains. It is incredibly soft and luxurious, perfect for creating luxurious accessories and garments.
Choosing the right yarn: When choosing yarn for a project, it is important to consider the pattern and the desired outcome. Factors such as fiber content, weight, and texture all play a role in the finished product. For example, if you are making a delicate lace shawl, you may want to choose a lightweight yarn with a silky texture. On the other hand, if you are making a cozy winter hat, you may opt for a bulky yarn that will provide warmth and structure.
Overall, yarn is a versatile and essential component of any knitting project. With so many options to choose from, knitters can truly let their creativity shine.
Knitting Needles
Knitting needles are essential tools for anyone interested in knitting. They come in various sizes, lengths, and materials, allowing for different knitting techniques and effects. The size of the needle determines the size of the stitches and the overall tension of the knitting project.
When choosing knitting needles, it’s important to consider the type of yarn being used and the desired outcome. Thicker yarns require larger needles to create loose, chunky stitches, while thinner yarns require smaller needles for tighter, more delicate stitches.
Most knitting needles are made of either metal, wood, or plastic. Metal needles are durable and provide a smooth surface for the yarn to slide easily. Wood needles are lightweight and warm to the touch, making them comfortable to use for extended periods. Plastic needles are affordable and lightweight, but they may not be as durable as metal or wood.
It’s also important to consider the length of the knitting needles. Shorter needles are ideal for small, intricate projects, such as socks or gloves, while longer needles are better suited for larger projects, like sweaters or blankets.
Whether you’re a beginner or an experienced knitter, having a variety of knitting needles in your collection is essential for tackling different projects and achieving various stitch patterns. So, invest in a set of good quality knitting needles and let your creativity soar!
Other Supplies
Along with the knitting needles and yarn, you will need a few other supplies to complete the toy tiger pattern. These additional items will help you create a professional and polished finished product.
Stuffing: To give your toy tiger a soft and cuddly shape, you will need to stuff it. Use polyester fiberfill or another suitable stuffing material to fill the body, legs, and head of the tiger. Make sure to stuff it firmly but not too tightly, as this will help the toy maintain its shape while still being huggable.
Embroidery floss: Embroidery floss is essential for adding the tiger’s eyes, nose, and mouth. Choose a color that matches or complements the yarn you are using for the body, or select a contrasting color for a more playful look. Use a small embroidery needle to stitch these features onto the tiger’s face, following the instructions provided in the pattern.
Tapestry needle: A tapestry needle with a large eye is necessary for sewing the various parts of the tiger together. This type of needle is thick and blunt, making it easier to work with the yarn and preventing it from splitting. Use the tapestry needle to join the limbs, attach the head to the body, and sew any other required seams.
Safety eyes: If you want to give your toy tiger a more realistic look, consider using safety eyes instead of embroidering them. Safety eyes are available in various sizes and colors, and they come with a washer to secure them in place. Follow the pattern’s instructions on where to insert the safety eyes, ensuring they are securely attached to prevent any choking hazards. If you are making the toy for a young child, you may want to consider using embroidered eyes instead for safety reasons.
Scissors and a tape measure: These basic tools will come in handy throughout the knitting process. Use scissors to cut the yarn and embroidery floss, and a tape measure to ensure your knitting and sewing are the correct sizes.
By gathering all of these additional supplies, you will have everything you need to successfully complete the toy tiger knitting pattern and create a delightful stuffed animal. Happy knitting!
Step-by-step instructions for knitting a toy tiger

Knitting toys is a fun and rewarding project that allows you to create unique and personalized gifts for children. If you’re looking for a cute and cuddly toy to make, why not try knitting a toy tiger? Here are step-by-step instructions to guide you through the process.
Materials you will need:

- Worsted weight yarn in orange, black, and white
- Pair of knitting needles (size 7 or as per your preference)
- Polyester fiberfill for stuffing
- Tapestry needle
- Scissors
Instructions:

- Knitting the body: Start by casting on 40 stitches using the orange yarn. Knit in the stockinette stitch for 8 inches, then decrease one stitch at the beginning and end of each row for the next 4 rows.
- Shaping the head and ears: Next, knit 16 stitches, slip the following 8 stitches onto a stitch holder, and knit the remaining 16 stitches. Knit these 16 stitches for 4 rows. Then, decrease 1 stitch at the beginning and end of the next 2 rows. Finally, bind off all stitches.
- Creating the ears: Take the stitches from the stitch holder and divide them onto two needles. Attach the orange yarn and knit these stitches for 2 rows. Then, decrease 1 stitch at the beginning and end of the next row. Bind off all stitches.
- Adding facial features: Using black yarn, embroider the eyes, nose, and mouth onto the tiger’s face. You can refer to a picture or use your creativity to create the desired expression.
- Assembling the toy: Fold the knitted body in half with the right sides facing each other. Use the tapestry needle and a length of the orange yarn to sew the side seam. Leave a small opening for stuffing.
- Stuffing and finishing: Stuff the toy tiger with polyester fiberfill through the opening. Once the toy is adequately stuffed, use the tapestry needle to sew the opening closed. Weave in any loose ends.
And voila! You have successfully knitted a toy tiger. This adorable toy is sure to bring joy to any child, and the best part is that you made it with your own two hands.
Casting on
Before you can start knitting your toy tiger, you need to cast on your stitches. Casting on is the process of creating the foundation row of stitches on your knitting needle. There are different methods for casting on, but we will be using the long-tail cast on method for this toy tiger pattern.
The long-tail cast on method is a popular and versatile method that creates a neat and elastic edge. To begin, hold your knitting needle in your right hand and make a slip knot at the end of your yarn. Place the slip knot on your needle and tighten it, leaving a tail of yarn that is approximately twice the length of the desired width of your knitting.
Next, hold the needle in your left hand and grip the tail of yarn securely with your thumb and index finger. With your right hand, bring the working end of the yarn (the end connected to the ball of yarn) over the needle from front to back. Then, bring the tail end of the yarn over the working end and between the needle and your left thumb, creating a loop.
Continue to repeat this motion, bringing the working end of the yarn over the needle and the tail end of the yarn between the needle and your thumb, until you have cast on the desired number of stitches. Make sure to keep the tension even as you go, neither too loose nor too tight. Once you have cast on all your stitches, you can begin knitting the first row of your toy tiger pattern.
Knitting the Body

Once you’ve gathered all the necessary materials and printed out the knitting pattern, it’s time to start knitting the body of your toy tiger. The body is knit in the round, which means you will be working in a continuous spiral without joining the rounds. This technique creates a seamless and smooth finish for your toy.
To begin, cast on the required number of stitches onto your double-pointed needles. This will usually be stated in the pattern. Make sure to distribute the stitches evenly across three or four needles, depending on your preference. This will allow you to knit in the round.
As you knit the body, follow the pattern instructions carefully, making sure to keep track of your progress. It’s helpful to use stitch markers to indicate the beginning or end of each round. This will make it easier for you to keep track of where you are in the pattern.
When knitting the body, you may need to use different knitting techniques, such as increasing or decreasing stitches, to shape the toy properly. These techniques are typically explained in the pattern, so be sure to read the instructions thoroughly before proceeding.
As you continue knitting, you’ll see the body of your toy tiger starting to take shape. Remember to check your gauge periodically to ensure your tension is consistent and the toy is turning out to be the desired size. If necessary, adjust your needle size to achieve the correct gauge.
Keep knitting until you reach the desired length for the body of your toy tiger. Once you’re satisfied with the length, you can proceed to the next step of the pattern, which may involve shaping the head or adding additional details. Follow the instructions provided in the pattern to complete your toy tiger’s body.
Shaping the head and limbs

When knitting a toy tiger, one of the key steps is shaping the head and limbs to give them a more realistic appearance. This can be achieved through a combination of increasing and decreasing stitches, which will create the desired curves and angles.
To shape the head, start by increasing stitches evenly around the first few rounds. This will give the head a rounded shape. Then, for the muzzle, decrease stitches gradually to create a more defined snout. Pay attention to the pattern instructions for the specific number and placement of increases and decreases.
For the limbs, such as the legs and tail, you may need to increase stitches to create a thicker base and then decrease stitches towards the end to taper the shape. This will give the limbs a more natural and lifelike appearance. Again, follow the pattern instructions for the exact number and placement of increases and decreases.
Keep in mind that shaping the head and limbs may require some trial and error to achieve the desired result. It’s always a good idea to knit a small swatch or practice piece to familiarize yourself with the shaping techniques before starting on the main project.
Here is an example of a pattern for shaping the head:
- Round 1: Knit all stitches
- Round 2: Increase 1 stitch in each stitch (double the number of stitches)
- Round 3-6: Knit all stitches
- Round 7: Decrease 1 stitch in every 4th stitch (about 25% of stitches should be decreased)
- Round 8-10: Knit all stitches
Remember to adjust the number of rounds and the frequency of increases and decreases based on the pattern instructions for your specific toy tiger. With practice and attention to detail, you’ll be able to shape the head and limbs of your toy tiger to perfection.
Adding Details

Now that you have completed the basic shape of your toy tiger, it’s time to add some details to make it come to life! Here are some ideas to enhance your knitting project:
- Embroider the tiger’s face using black yarn for the eyes and nose. You can use a French knot technique to create realistic-looking eyes.
- Add a pink or red thread to embroider the tiger’s mouth. You can use a backstitch to outline the shape.
- Create stripes on the tiger’s body using a different color of yarn. You can use the intarsia technique to knit in the stripes as you go.
- Attach small pieces of felt or fabric to the ears to give them a more realistic texture.
- Use safety eyes instead of embroidered ones for a different look.
Remember, these are just suggestions to get you started. Feel free to use your creativity and add any other details you like. Don’t be afraid to experiment and make the toy tiger truly unique.
Once you have finished adding all the details, your toy tiger will be ready to be enjoyed or given as a special gift. The possibilities are endless, and you will have a one-of-a-kind toy that you can be proud of!