The Intricate “Knit 2 Purl 1” Pattern: Enhancing Your Knitting Skills

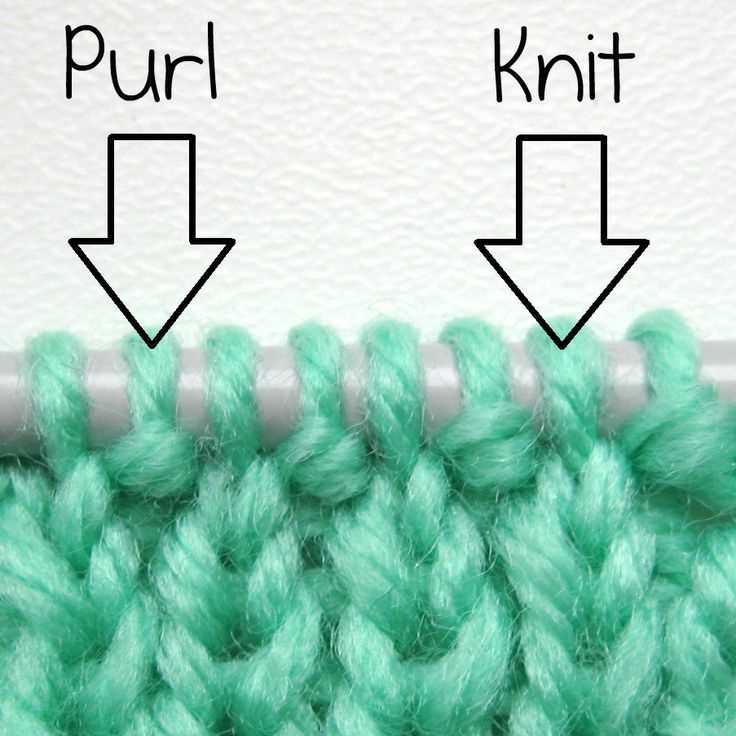
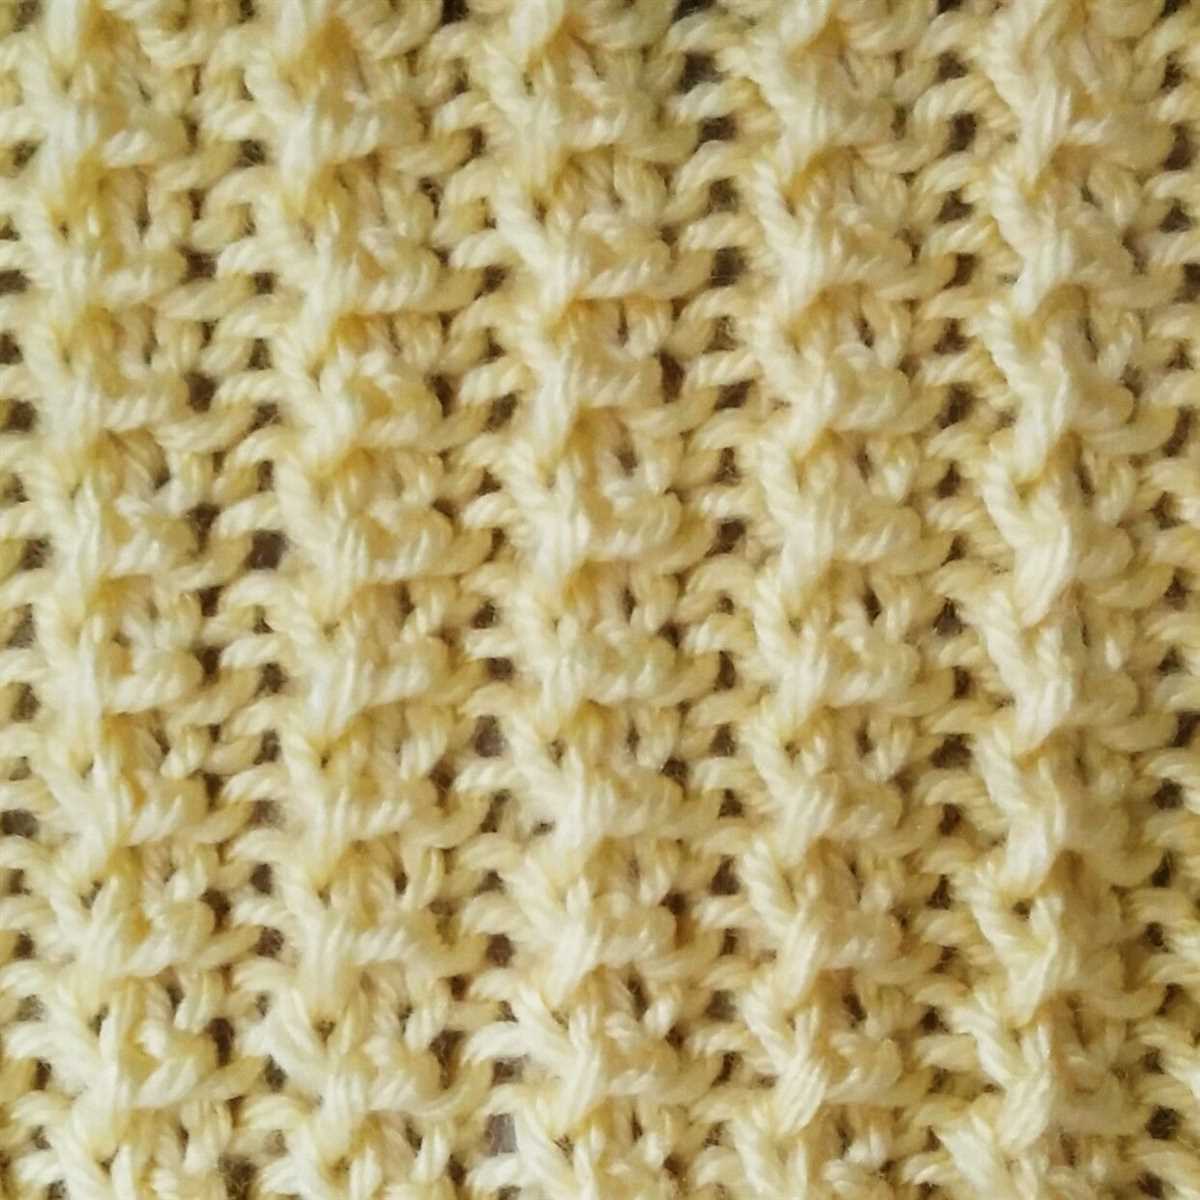
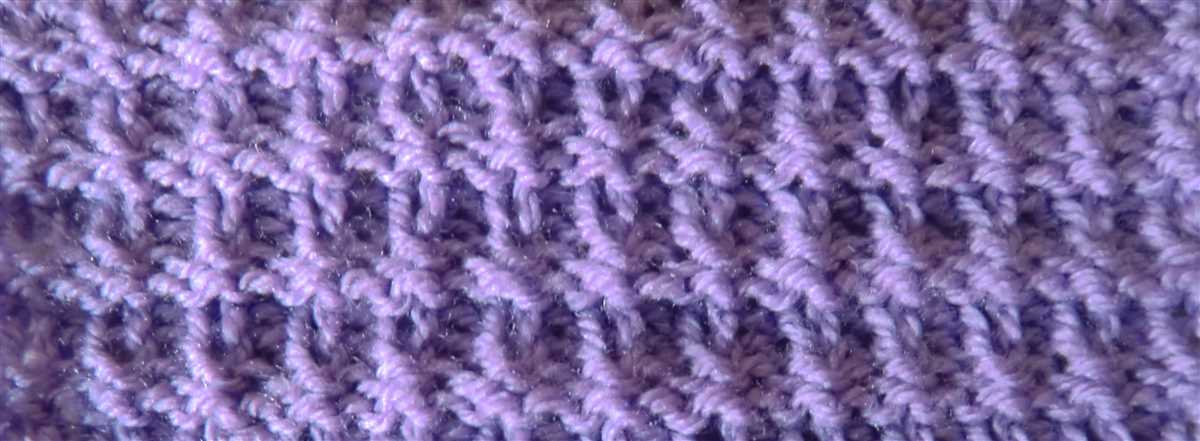
Knit 2 purl 1 pattern is a commonly used stitch pattern in knitting. It creates a textured fabric that is both visually appealing and has a nice drape. This pattern involves alternating between knitting two stitches and purling one stitch, creating a ribbed effect.
The knit 2 purl 1 pattern can be used in a variety of projects, from scarves and hats to sweaters and blankets. It is a versatile pattern that can be easily customized by changing the number of knit and purl stitches or the size of the needles used.
One of the main benefits of the knit 2 purl 1 pattern is that it adds elasticity to the fabric. This makes it an ideal choice for items that need to stretch, such as socks or gloves. The ribbed texture also traps air, making the fabric warmer and more insulating.
Whether you’re a beginner or an experienced knitter, the knit 2 purl 1 pattern is a great stitch to add to your repertoire. It’s simple to learn and creates a beautiful end result. So grab your knitting needles and give this pattern a try!
What is the Knit 2 Purl 1 Pattern and How to Knit It

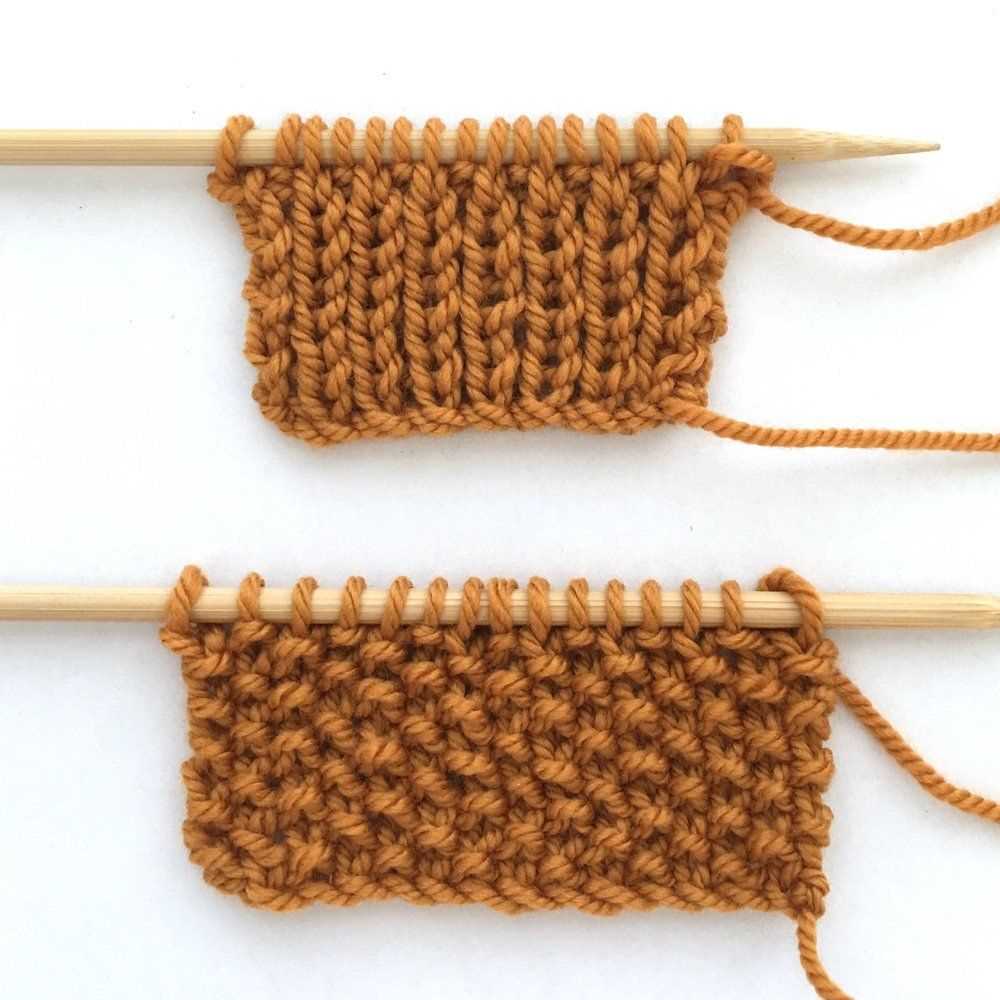
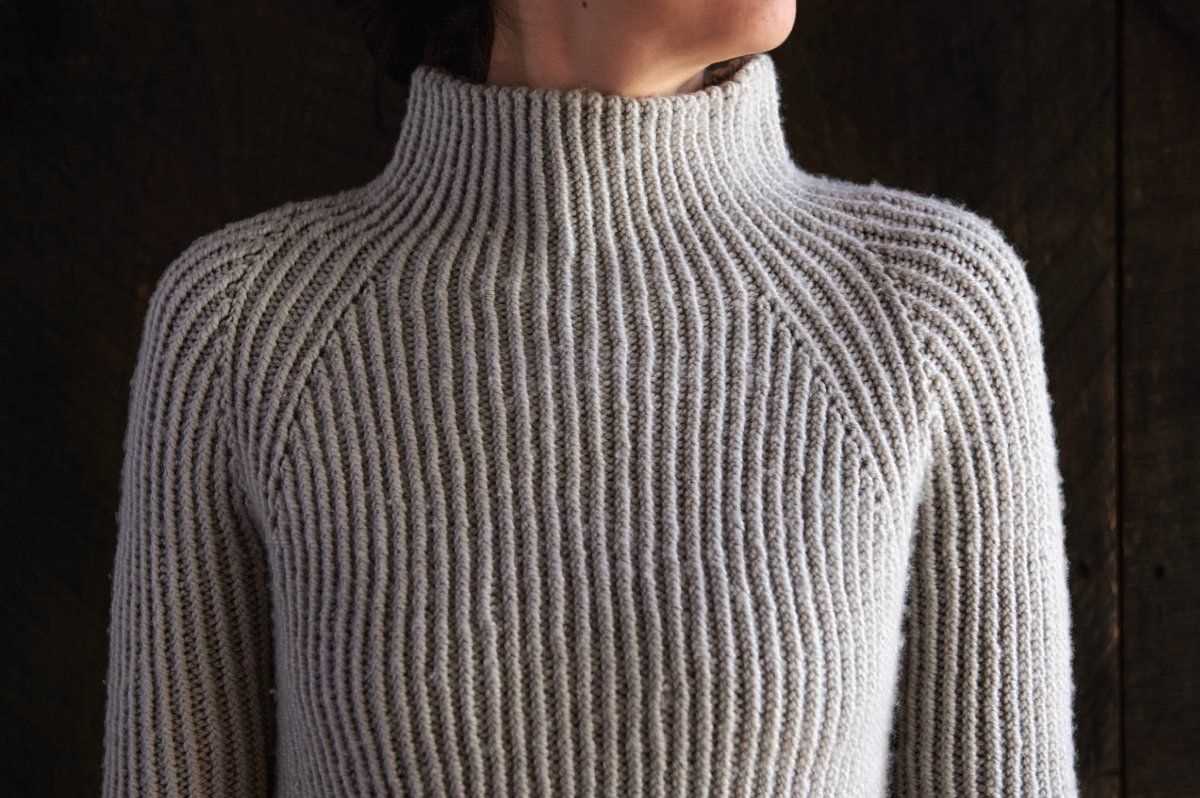
The knit 2 purl 1 pattern, also known as K2P1, is a popular knitting stitch pattern used to create a variety of textured designs. It is commonly used in ribbing, which is a stretchy and decorative pattern often used for cuffs, collars, and hems. The K2P1 pattern alternates between knitting two stitches and purling one stitch, creating a raised ribbed effect.
To knit the K2P1 pattern, you will need a pair of knitting needles and yarn of your choice. Start by casting on an even number of stitches, as the pattern requires an even number of stitches to work properly. Then, follow these steps:
- Row 1: Knit 2 stitches, purl 1 stitch. Repeat this pattern to the end of the row.
- Row 2: Purl 2 stitches, knit 1 stitch. Repeat this pattern to the end of the row.
- Repeat rows 1 and 2 until you reach the desired length.
The K2P1 pattern can be easily adjusted to fit different projects. For wider ribbing, you can increase the number of knit stitches and decrease the number of purl stitches in each row. For example, you can try knitting 3 stitches and purling 1 stitch, or knitting 4 stitches and purling 1 stitch to create a different variation of the ribbed pattern.
This versatile knitting pattern is great for creating a wide range of garments and accessories, such as scarves, hats, sweaters, and socks. The ribbing adds elasticity to the fabric, making it a popular choice for cuffs and waistbands. Additionally, the raised texture of the ribbed pattern adds visual interest to any knitting project.
Benefits and Uses of the Knit 2 Purl 1 Pattern
Knitting is a popular hobby that not only allows people to create beautiful and functional items, but also offers numerous benefits for mental health and relaxation. One commonly used knitting pattern is the knit 2 purl 1 pattern, which has its own unique benefits and uses.
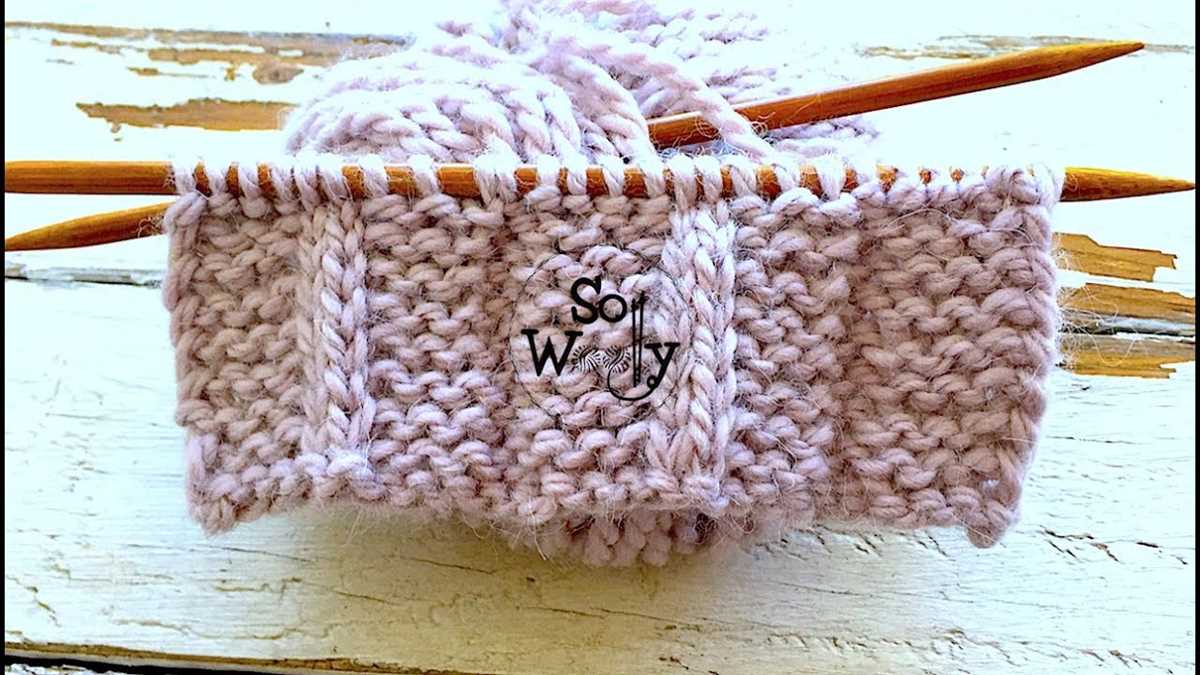
1. Textured and Versatile Fabrics: The knit 2 purl 1 pattern creates a textured fabric with alternating rows of knits and purls. This texture adds depth and interest to various knitted items like scarves, hats, sweaters, and blankets. The alternating knits and purls also create a stretchy and flexible fabric, making it suitable for a wide range of projects.
2. Enhanced Warmth and Insulation: The alternating knits and purls in the knit 2 purl 1 pattern create air pockets within the fabric, which enhance its insulating properties. This makes it an ideal pattern for colder climates or for knitting cozy winter accessories. The textured fabric traps heat and keeps the wearer warm and comfortable.
3. Pattern Variety: The knit 2 purl 1 pattern can be combined with other patterns, stitches, or colors to create a wide variety of design possibilities. This pattern can be used as a base for more intricate designs or can be repeated throughout a project to create a simple yet elegant look. The versatility of this pattern allows knitters to experiment and customize their creations.
4. Relaxation and Mindfulness: Knitting is known for its therapeutic benefits, and the knit 2 purl 1 pattern is no exception. The repetitive nature of this pattern allows knitters to enter a state of flow, where their mind calms down, and they can focus solely on their knitting. This promotes relaxation, reduces stress, and enhances mindfulness.
5. Skill Development: The knit 2 purl 1 pattern, while simple, is a great way to practice and improve knitting skills. It helps knitters become more comfortable with basic stitches, such as knit and purl, and promotes consistency in tension and gauge. Knitting this pattern repeatedly can also increase speed and efficiency in hand movements.
In conclusion, the knit 2 purl 1 pattern offers a range of benefits and uses for knitting enthusiasts. It creates textured and versatile fabrics, enhances warmth and insulation, allows for pattern variety, promotes relaxation and mindfulness, and helps develop knitting skills. Whether you are a beginner or an experienced knitter, this pattern is sure to enhance your knitting projects and bring joy and satisfaction.
Getting Started: Supplies and Tools for Knitting the Knit 2 Purl 1 Pattern
Before you begin knitting the knit 2 purl 1 pattern, you will need to gather a few essential supplies and tools. These items will ensure that you have everything you need to successfully complete this pattern and create beautiful, textured designs.
The first item you will need is a set of knitting needles. For the knit 2 purl 1 pattern, it is recommended to use straight or circular needles in the appropriate size for your chosen yarn. Additionally, you may also want to have a set of double-pointed needles on hand if you plan to knit in the round.
Next, you will need to select the right yarn for your project. The knit 2 purl 1 pattern works well with a variety of yarn weights, from fingering to bulky. Consider the finished look you want to achieve and choose a yarn that complements your desired aesthetic. Additionally, be sure to check the yarn label for recommended needle size to ensure compatibility.
When knitting the knit 2 purl 1 pattern, it can be helpful to have a few other tools on hand. One essential tool is a pair of scissors for cutting your yarn. You may also want to have stitch markers to help keep track of your stitches and a tapestry needle for weaving in your loose ends.
As you start your knitting project, it is also important to have a tape measure or ruler nearby. This will help you check your gauge and ensure that your stitches and rows are the correct size. Following the pattern’s instructions and achieving the correct gauge is crucial for creating a well-fitting and finished project.
In summary, to get started with the knit 2 purl 1 pattern, you will need knitting needles in the appropriate size, suitable yarn, scissors, stitch markers, a tapestry needle, and a tape measure or ruler. Having these supplies and tools on hand will make the knitting process smoother and ensure that you are well-prepared to create beautiful, textured designs with the knit 2 purl 1 pattern.
Step-by-Step Guide: How to Knit the Knit 2 Purl 1 Pattern

Knitting is a popular hobby that allows people to create beautiful and unique garments. One of the classic knitting patterns is the Knit 2 Purl 1 pattern, which creates a textured fabric with alternating knit and purl stitches. In this step-by-step guide, we will walk you through the process of knitting the Knit 2 Purl 1 pattern.
Materials you will need:

- Yarn of your choice
- Knitting needles appropriate for your yarn
- Tapestry needle
- Scissors
Step 1: Start by casting on an appropriate number of stitches for your desired project. The Knit 2 Purl 1 pattern works best with a multiple of 3 stitches, so you might want to cast on 15, 18, or 21 stitches, depending on the width you want.
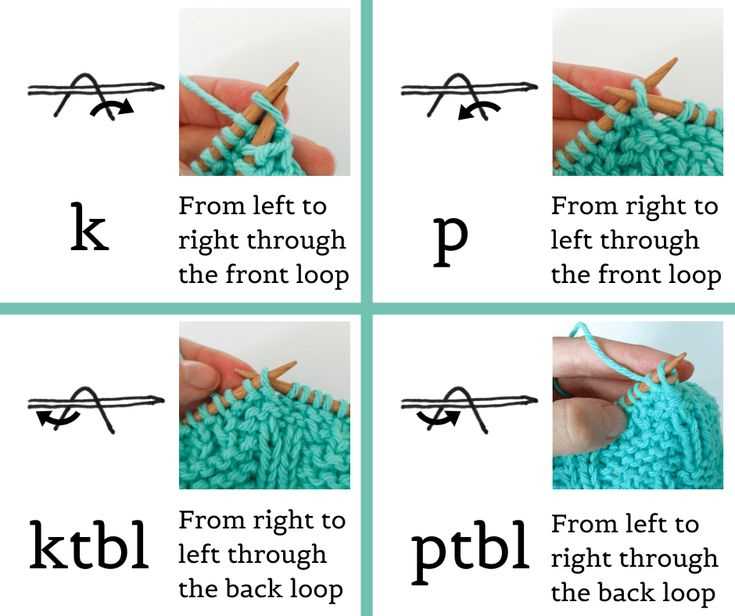
Step 2: Once you have cast on your stitches, begin the first row by knitting the first two stitches. Insert the right-hand needle into the front of the first stitch on the left-hand needle, then wrap the yarn around the right-hand needle and pull it through the stitch, slipping the original stitch off the left-hand needle. Repeat this process for the second stitch.
Step 3: For the third stitch, instead of knitting, you will purl. Insert the right-hand needle into the front of the third stitch on the left-hand needle, then wrap the yarn around the right-hand needle and pull it through the stitch. Slip the original stitch off the left-hand needle.
Step 4: Repeat steps 2 and 3 until you reach the end of the row. You should have a series of knit and purl stitches.
Step 5: Turn your work to begin the next row. On this row, you will knit the knit stitches and purl the purl stitches. This means that when you come to a knit stitch, you will knit it, and when you come to a purl stitch, you will purl it.
Step 6: Continue repeating steps 2 to 5 for the desired length of your project. The Knit 2 Purl 1 pattern creates a textured fabric that is perfect for scarves, blankets, and other cozy items.
Step 7: Once you have reached the desired length, finish off your project by binding off all the stitches. Cut the yarn, leaving a long tail, and thread it through the tapestry needle. Insert the needle into the first stitch, then into the second stitch, and pass the first stitch over the second stitch. Repeat this process until you have bound off all the stitches. Finally, weave in any loose ends.
With this step-by-step guide, you will be able to confidently knit the Knit 2 Purl 1 pattern and create beautiful and textured items. Enjoy the process of knitting and embrace the creativity that comes with exploring different stitch patterns!
Common Mistakes to Avoid When Knitting the Knit 2 Purl 1 Pattern
When knitting the Knit 2 Purl 1 pattern, it’s important to be aware of common mistakes that can occur. By avoiding these errors, you can ensure a smooth and consistent pattern throughout your knitting project. Here are some common mistakes to watch out for:
1. Mixing Up Knit and Purl Stitches
One of the most common mistakes when knitting the Knit 2 Purl 1 pattern is mixing up knit and purl stitches. It’s important to pay close attention to the pattern instructions and properly identify which stitch to use. Mixing up the stitches can result in an inconsistent pattern and may require unraveling and starting again.
2. Not Counting Stitches
Accurately counting stitches is crucial when knitting the Knit 2 Purl 1 pattern. Failing to count stitches can lead to mistakes in the pattern and may result in an uneven or distorted finished product. Make sure to take the time to count your stitches regularly to ensure you’re on track.
3. Tightening Stitches Too Much
Another common mistake is tightening stitches too much. When knitting the Knit 2 Purl 1 pattern, it’s important to maintain an even tension. Tightening the stitches excessively can lead to a tight and stiff fabric, making it difficult to knit future rows. Practice maintaining a consistent tension to achieve the desired results.
4. Skipping or Adding Stitches
Skipping or adding stitches can easily throw off the Knit 2 Purl 1 pattern. It’s important to follow the pattern instructions carefully and count stitches regularly to ensure accuracy. Skipping or adding stitches can disrupt the pattern and result in an uneven and distorted finished product.
5. Not Checking Gauge
Before starting your knitting project with the Knit 2 Purl 1 pattern, it’s essential to check your gauge. Gauge refers to the number of stitches and rows per inch. Failing to check your gauge can result in a finished product that is either too small or too large. Take the time to swatch and check your gauge to ensure the correct fit.
Avoiding these common mistakes when knitting the Knit 2 Purl 1 pattern will help you achieve a successful and beautiful finished product. Remember to pay close attention to the pattern instructions, count your stitches, maintain consistent tension, and check your gauge regularly. Happy knitting!
Tips and Tricks for Perfecting the Knit 2 Purl 1 Pattern
The knit 2 purl 1 pattern is a popular knitting technique that creates a textured fabric with a repeating pattern of two knit stitches followed by one purl stitch. This pattern is often used to add depth and visual interest to various knitting projects, such as scarves, hats, and sweaters. However, achieving a consistent and perfect pattern can be challenging for beginners. Here are some tips and tricks to help you master the knit 2 purl 1 pattern:
1. Use stitch markers
Stitch markers are invaluable tools when working with complex knitting patterns. When knitting the knit 2 purl 1 pattern, it’s easy to lose track of where you are in the pattern, especially when working on larger projects. Placing a stitch marker after every set of knit stitches can help you keep track of your progress and ensure that you’re consistently following the pattern.
2. Pay attention to tension
Consistent tension is crucial when working on the knit 2 purl 1 pattern. Pay close attention to the tension of your stitches to ensure that they are uniform throughout the project. Uneven tension can cause the pattern to look distorted and uneven. Practice maintaining an even tension by knitting a swatch before starting your project. Adjust your knitting style or needle size if necessary to achieve the desired tension.
3. Read the pattern carefully
Before starting your project, take the time to thoroughly read and understand the knit 2 purl 1 pattern instructions. Familiarize yourself with any specific abbreviations or variations of the pattern that may be mentioned. Understanding the pattern will help you avoid mistakes and make the knitting process smoother.
4. Count your stitches
To ensure that you are following the knit 2 purl 1 pattern correctly, it’s important to count your stitches regularly. Counting your stitches will help you identify any mistakes or missed stitches early on, allowing you to correct them before they become more difficult to fix. Use a row counter or keep track of your stitches on a piece of paper to make the counting process easier.
5. Practice, practice, practice

Like any knitting technique, mastering the knit 2 purl 1 pattern takes practice. The more you knit using this pattern, the more comfortable and efficient you will become. Start with small projects, such as dishcloths or headbands, to get the hang of the pattern before moving on to larger projects. Don’t be discouraged if your first few attempts aren’t perfect – remember that practice makes perfect!
By following these tips and tricks, you’ll be well on your way to perfecting the knit 2 purl 1 pattern. Whether you’re a beginner or an experienced knitter, this pattern can add a beautiful texture to your knitting projects and expand your knitting skills.
Advanced Variations of the Knit 2 Purl 1 Pattern
The knit 2 purl 1 pattern is a classic knitting technique that creates a textured fabric with a combination of knit and purl stitches. While the traditional pattern is quite beautiful, there are also advanced variations that can add even more interest and complexity to your knitting projects.
One advanced variation of the knit 2 purl 1 pattern is the twisted knit 2 purl 1 pattern. Instead of simply knitting the stitches, you can twist them to create a more intricate texture. To do this, insert your needle into the back of the second stitch on your left-hand needle, knit it, then purl the next stitch as usual. This twist adds a subtle twist to the fabric and gives it a unique look.
Another variation is the cable knit 2 purl 1 pattern. This technique involves crossing stitches over each other to create a cable-like effect. To create the cable, knit the first stitch, then instead of purling the next stitch, slip it onto a cable needle and hold it in the front or back of your work. Knit the next stitch, then bring the slipped stitch back onto the left-hand needle and purl it. This creates a twist in the fabric, resembling a cable. Repeat this pattern to create a continuous cable pattern throughout your knitting project.
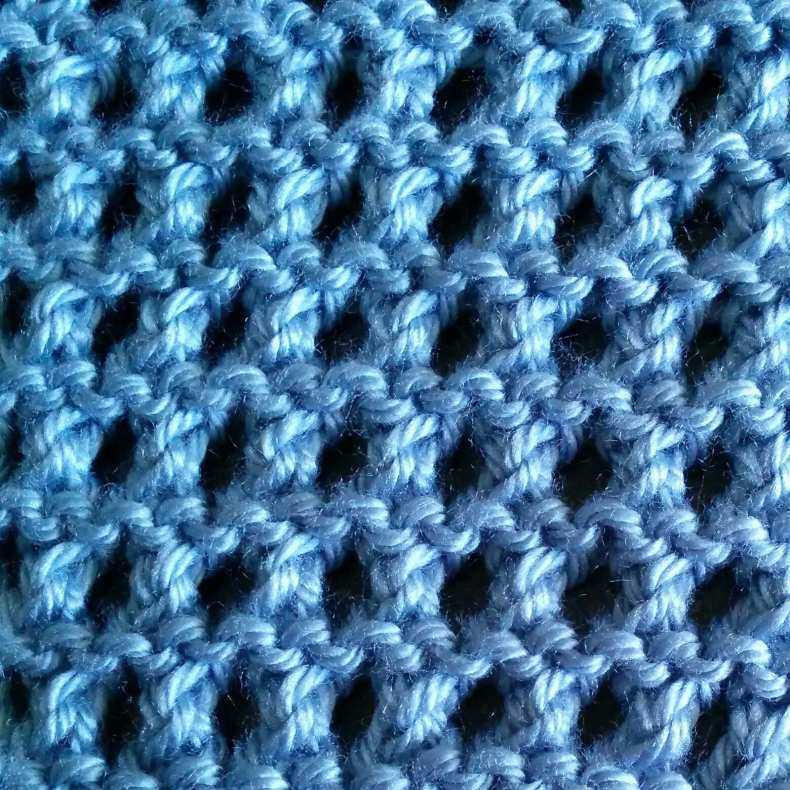
If you’re looking for a more lacy and delicate variation, you can try the eyelet knit 2 purl 1 pattern. To create eyelets, you can yarn over (wrap the yarn around the needle) between the knit and purl stitches. This creates an extra loop that adds an open and airy texture to the fabric. To incorporate eyelets into the knit 2 purl 1 pattern, simply yarn over before purling and then knit the next two stitches as usual.
These advanced variations of the knit 2 purl 1 pattern allow you to experiment with different textures and designs in your knitting projects. Whether you prefer a twisted, cabled or lacy effect, there is a variation that will suit your style. Have fun exploring these techniques and incorporating them into your knitting projects!
Knit 2 Purl 1 Pattern for Beginners: Easy Projects to Start With
Knitting is a popular hobby that allows you to create beautiful and functional items. If you’re just starting out, the knit 2 purl 1 pattern is a great place to begin. This pattern involves alternating between knitting two stitches and purling one stitch, creating a simple yet visually appealing texture.
One easy project to try with the knit 2 purl 1 pattern is a scarf. Scarves are versatile and can be worn by both men and women, making them a perfect gift idea. Choose a soft and cozy yarn in your favorite color and cast on the desired number of stitches. Then, follow the knit 2 purl 1 pattern until the scarf reaches your desired length. Finish off by binding off all stitches and weaving in any loose ends.
Materials needed:
- Yarn (worsted weight is recommended for beginners)
- Knitting needles (size recommended on yarn label)
- Scissors
- Tapestry needle (for weaving in ends)
Instructions:
- Cast on an even number of stitches.
- Row 1: *Knit 2, purl 1* – repeat from * to * across the row.
- Row 2: *Purl 2, knit 1* – repeat from * to * across the row.
- Repeat rows 1 and 2 until the scarf is the desired length.
- Bind off all stitches.
- Weave in any loose ends.
This knit 2 purl 1 pattern is not only easy to learn but also creates a textured fabric that adds interest to any project. Once you’ve mastered the basics, you can experiment with different yarns, colors, and stitch combinations to create unique and personalized items. Happy knitting!
Intermediate and Advanced Projects Using the Knit 2 Purl 1 Pattern
The knit 2 purl 1 pattern is a popular choice for both beginner and experienced knitters. It creates a beautiful texture and adds depth to your knitting projects. While it is commonly used in simple stitch patterns, it can also be incorporated into more intricate designs to create stunning results. Intermediate and advanced knitters can take advantage of the versatility of this pattern to create unique and eye-catching projects.
One intermediate project that can be made using the knit 2 purl 1 pattern is a knit sweater. The alternating knits and purls can be used to create interesting patterns or even a ribbing effect on the cuffs, collar, and hem. By experimenting with different color combinations and stitch variations, you can easily customize your sweater to suit your style and preferences. The knit 2 purl 1 pattern adds visual interest to the garment, making it a standout piece in your wardrobe.
For advanced knitters looking for a challenge, the knit 2 purl 1 pattern can be incorporated into complex lace patterns. This requires careful attention to detail and a good understanding of lace knitting techniques. By using the knit 2 purl 1 pattern in combination with yarn overs and various decreases, you can create intricate lace designs that are sure to impress. Whether you choose to knit a lace shawl, a delicate cardigan, or a beautiful afghan, the knit 2 purl 1 pattern will elevate your project to the next level.
If you’re feeling particularly adventurous, you can also experiment with cables using the knit 2 purl 1 pattern. By crossing stitches over each other, you can create elaborate and intricate cable designs. The knit 2 purl 1 pattern can be used to separate the cables and add texture to the surrounding fabric. This combination of cables and textured stitches adds depth and dimension to your knitting, resulting in a truly unique and impressive project. Whether you choose to knit a cable scarf, a cozy hat, or a warm blanket, the knit 2 purl 1 pattern will add a touch of sophistication to your knitting repertoire.
Exploring Different Yarns and Colors for the Knit 2 Purl 1 Pattern
The Knit 2 Purl 1 pattern is a classic knitting technique that creates a textured fabric by alternating knit and purl stitches. While the pattern itself is simple, the choice of yarns and colors can greatly enhance the final result. By exploring different yarns and colors, you can create unique and beautiful knitted pieces.
When selecting yarns for the Knit 2 Purl 1 pattern, consider the weight and texture of the yarn. A lighter weight yarn will create a more delicate look, while a heavier weight yarn will result in a chunkier fabric. Experiment with different types of yarn like merino wool, alpaca, or cotton to achieve different effects. The texture of the yarn, such as smooth or fuzzy, can also add depth to the pattern.
Color Choice
Choosing the right colors for your Knit 2 Purl 1 project can make a big impact on the overall design. You can opt for a monochromatic palette for a subtle and sophisticated look, using different shades of the same color. Alternatively, you can go for a bold and vibrant color scheme by combining complementary or contrasting colors.
For a more modern and trendy look, consider using variegated or self-striping yarns. These yarns already have multiple colors in them, which will create a beautiful gradient effect when used in the Knit 2 Purl 1 pattern. You can also experiment with yarns that have a speckled or marled appearance for a unique and eclectic look.
Whether you prefer a classic or contemporary style, playing with different yarns and colors for the Knit 2 Purl 1 pattern allows you to showcase your creativity and make each project truly one-of-a-kind. So grab your needles, explore the vast array of yarns available, and let your imagination run wild!
Conclusion
The knit 2 purl 1 pattern is a versatile and popular knitting stitch that is used in a variety of projects. It creates a textured fabric with a ribbed look, making it a great choice for hats, scarves, sweaters, and more. This simple yet effective pattern is a favorite among knitters of all skill levels.
Inspiration can be found from famous knitters and designers who have incorporated the knit 2 purl 1 pattern into their work. From traditional and classic designs to modern and innovative creations, these individuals have showcased the beauty and versatility of this stitch pattern.
Whether you are a beginner knitter looking to expand your skills or an experienced crafter seeking new design ideas, the knit 2 purl 1 pattern is sure to inspire and challenge you. With endless possibilities for creativity and customization, this pattern allows you to create unique and beautiful knitted pieces.
Inspiration from Famous Knitters and Designers
- Elizabeth Zimmermann: Known for her innovative and creative approach to knitting, Zimmermann often incorporated the knit 2 purl 1 pattern into her designs. Her book “Knitting Without Tears” is a great resource for knitters looking to explore this stitch pattern.
- Kaffe Fassett: Fassett is known for his bold and vibrant colorwork designs. He often uses the knit 2 purl 1 pattern to create texture and interest in his knitted garments and accessories.
- Brooklyn Tweed: This design company is known for their modern and stylish knitwear patterns. They have featured the knit 2 purl 1 pattern in many of their designs, showcasing its versatility and beauty.
Incorporating the knit 2 purl 1 pattern into your knitting projects can add depth and texture to your finished piece. Whether you choose to use it as a main stitch pattern or as an accent, this technique is sure to enhance your knitting skills and produce stunning results.