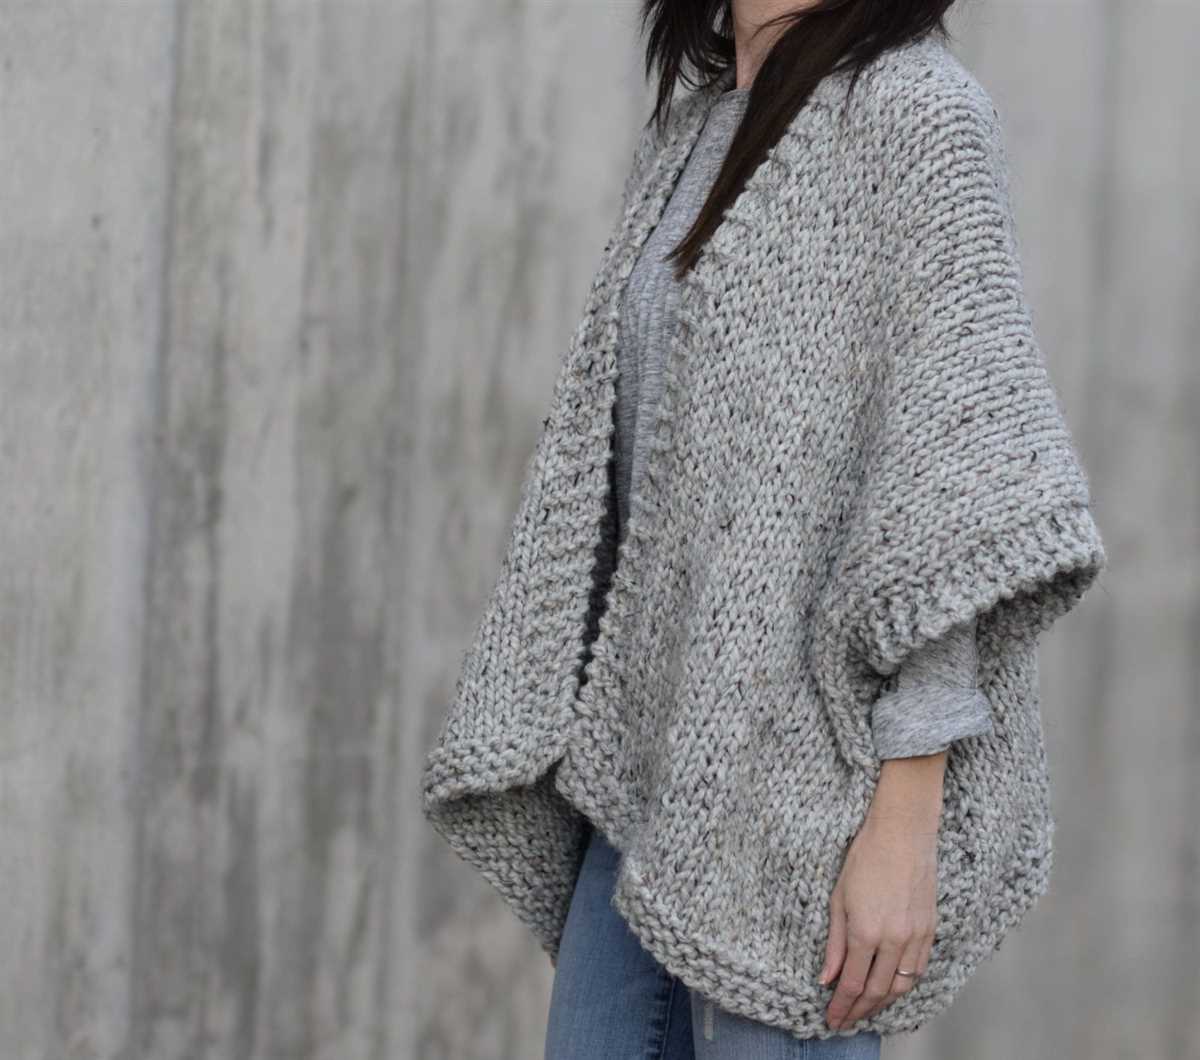
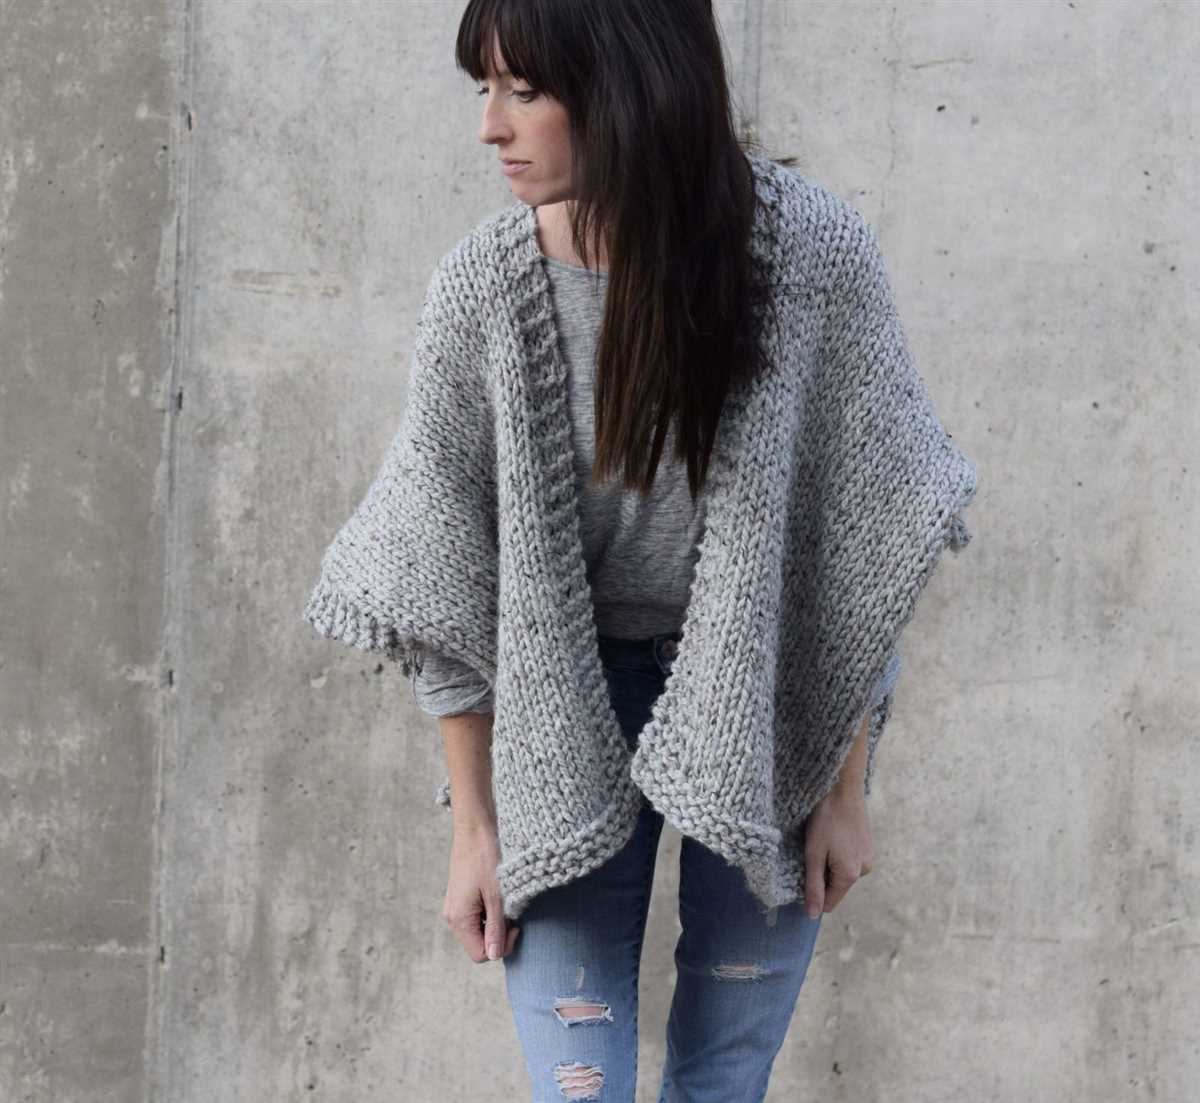
Effortless Kimono Pattern for Knitters

Looking for a stylish and easy-to-knit garment? Look no further than the knit kimono pattern! The knit kimono is a versatile and trendy piece that can be worn all year round. It’s perfect for layering over a tank top or a long-sleeved shirt, making it a must-have addition to your wardrobe.
What makes the knit kimono pattern so great is that it’s suitable for knitters of all skill levels. Whether you’re a beginner or an experienced knitter, you’ll be able to create a beautiful kimono that you’ll be proud to wear. The pattern uses basic knitting stitches, such as knit and purl, and requires minimal shaping.
One of the best things about the knit kimono pattern is that it’s customizable to your taste and style. You can choose from a variety of yarns, colors, and stitch patterns to create a kimono that suits your personality. Whether you prefer a classic, solid-colored kimono or one with a fun, eye-catching pattern, the possibilities are endless.
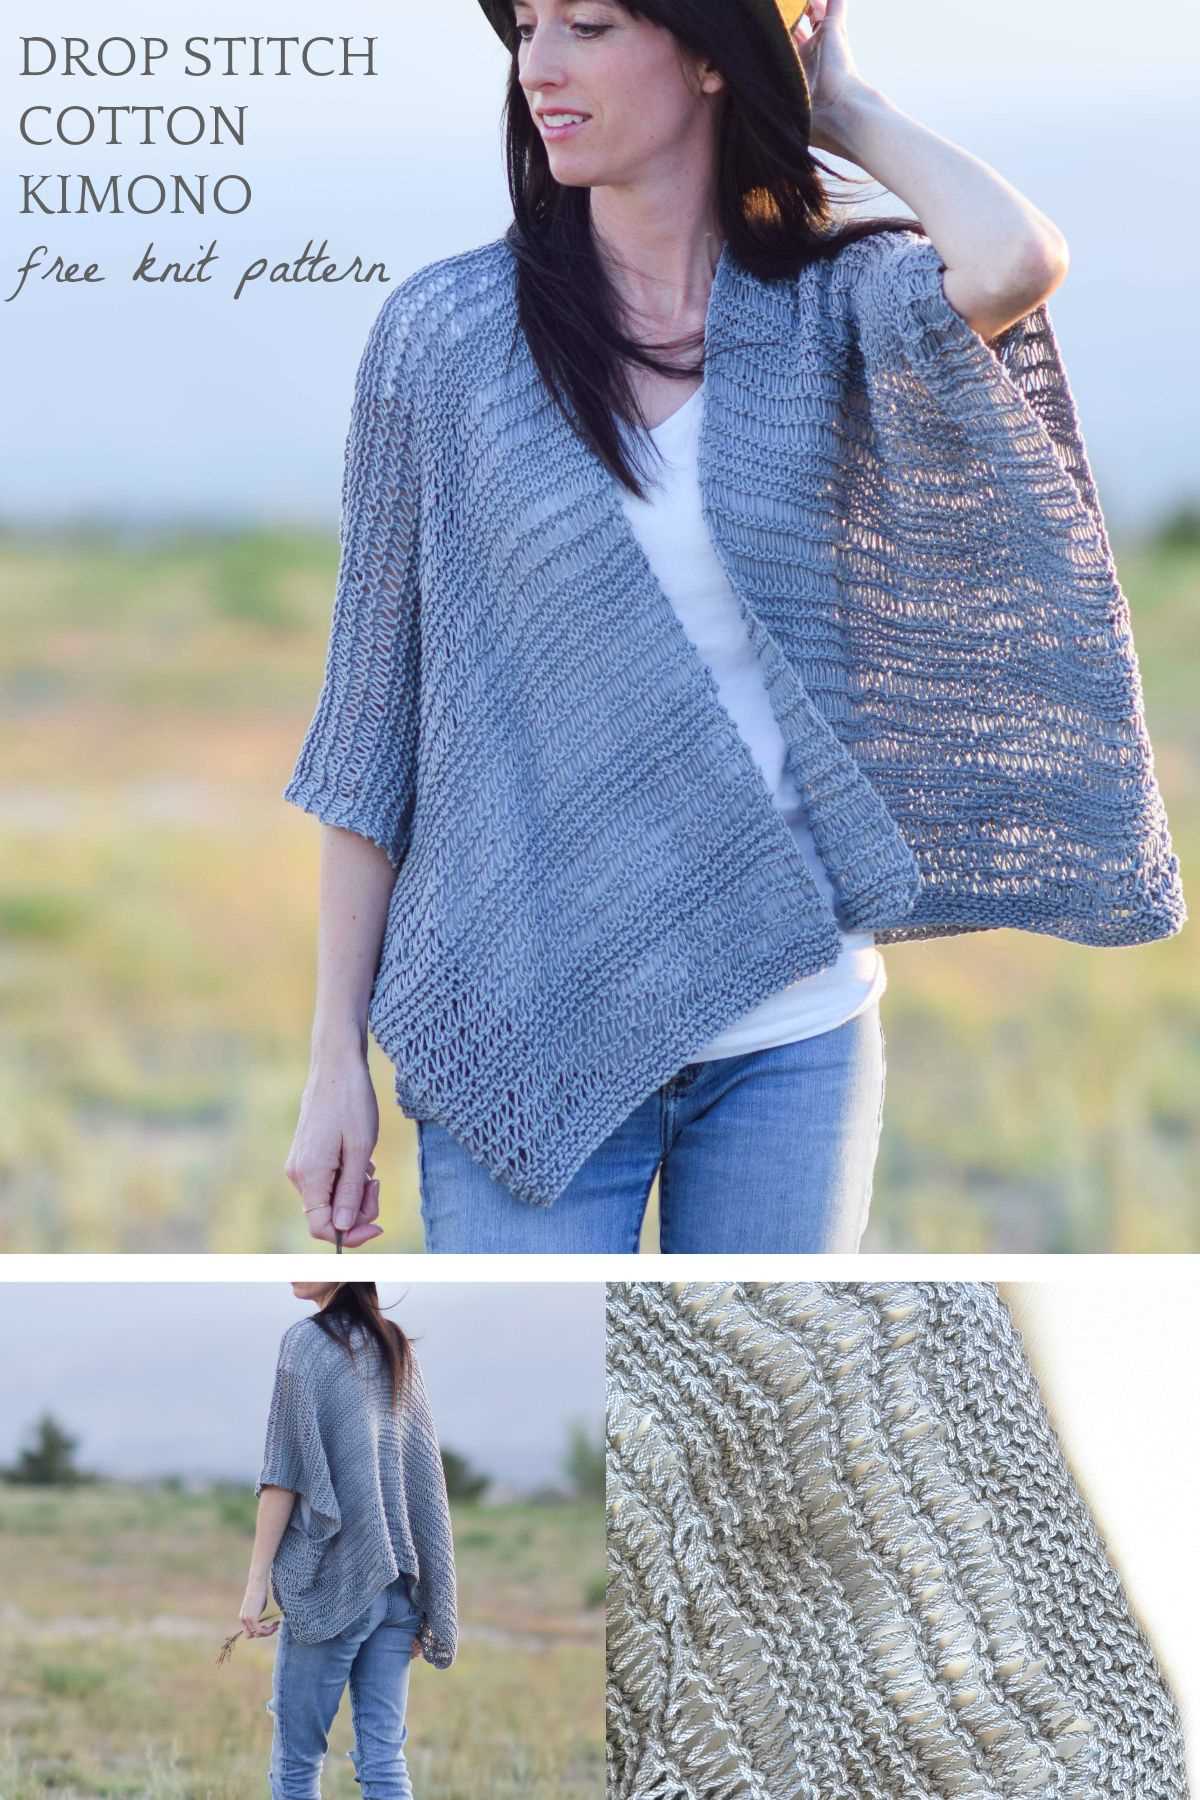
Easy Knit Kimono Pattern
Looking for a simple and stylish knitting project? Look no further than an easy knit kimono pattern. Kimonos are versatile and comfortable, making them a great addition to any wardrobe. Whether you’re a beginner or an experienced knitter, this pattern is perfect for you.
Materials
- Size 8 knitting needles
- Worsted weight yarn
- Tapestry needle
Instructions
- Cast on 100 stitches.
- Knit in garter stitch (knit every row) for 20 inches.
- Divide your stitches evenly onto three needles (33 stitches on each needle).
- Knit one row.
- Begin shaping the sleeves:
- Row 1: Knit 2 together, knit to last two stitches, knit 2 together.
- Row 2: Knit.
- Repeat rows 1 and 2 until you have 20 stitches remaining on each needle.
- Continue knitting in garter stitch for 10 inches.
- Bind off loosely.
- Seam the sides together, leaving enough room for armholes.
- Weave in any loose ends.
- Your easy knit kimono is now complete!
With just a few simple steps, you can create a stylish and comfortable kimono that you’ll love to wear. Customize it with your favorite colors and patterns, and it will quickly become a staple in your wardrobe. Whether you’re lounging at home or going out with friends, this easy knit kimono pattern is perfect for any occasion.
Materials needed for the Easy Knit Kimono Pattern

The Easy Knit Kimono Pattern requires a few specific materials to create a beautiful and comfortable kimono. Here is a list of the materials you will need:
- Knitting needles: You will need a pair of knitting needles in the appropriate size for your chosen yarn. The pattern recommends using circular needles for ease of knitting, but straight needles can also be used.
- Yarn: Choose a soft and lightweight yarn that is suitable for the kimono’s desired drape and comfort. The pattern usually specifies a specific type or weight of yarn, so be sure to check the pattern for recommendations.
- Tapestry needle: A tapestry needle is essential for weaving in loose ends and seaming the kimono together. Make sure to have one on hand before you begin.
- Scissors: A good pair of scissors is necessary for cutting the yarn and trimming any excess. Keep them nearby for easy access.
- Stitch markers: Stitch markers can be helpful for keeping track of specific stitches or sections of the pattern. They are especially useful in this kimono pattern to mark the armholes or other important sections.
With these materials, you will be well-equipped to start working on the Easy Knit Kimono Pattern. Make sure to have all the necessary materials ready before you begin, and enjoy the process of creating a beautiful and cozy kimono!
Choosing the right yarn and needles

When it comes to knitting a kimono, choosing the right yarn and needles is essential to achieve the desired result. The yarn you select will determine the overall look and feel of the finished garment, while the needles you use will affect the tension and drape of the fabric.
Yarn: It is important to consider the weight, fiber, and texture of the yarn when choosing a yarn for your kimono. A lightweight yarn, such as a fingering or sport weight, will create a delicate and drapey fabric, perfect for a lightweight kimono. On the other hand, a heavier yarn, like a worsted or chunky weight, will result in a more substantial and cozy kimono. Consider the fiber content as well, as different fibers will have different properties. For example, a silk or bamboo blend will give your kimono a soft and luxurious feel, while a cotton or linen blend will make it more breathable and suitable for warmer weather. Lastly, consider the texture of the yarn. A smooth yarn will showcase stitch patterns and details, while a textured or variegated yarn can add visual interest to a simple design.
Needles: The size and type of needles you choose will determine the tension and drape of your kimono. The recommended needle size can usually be found on the yarn label or in the pattern instructions. However, this is only a starting point, and you may need to adjust your needle size to achieve the correct gauge. If you want a loose and airy fabric, you can go up a needle size or two. Conversely, if you want a more dense and structured fabric, you can go down a needle size or two. Additionally, consider the type of needle you prefer. Straight needles are traditional and commonly used for knitting flat pieces, while circular needles are versatile and can be used for both flat and in-the-round knitting. The length of the needle will depend on the size of the kimono you are knitting. For smaller sizes, shorter needles may be more comfortable to work with, while longer needles are necessary for larger sizes.
By carefully selecting the right yarn and needles for your kimono, you can ensure that your finished garment meets your expectations in terms of both aesthetics and functionality.
Casting on and starting the pattern

To start knitting the easy knit kimono pattern, you will need to cast on your stitches. The number of stitches you need to cast on will vary depending on the size of the kimono you are making. Refer to the pattern instructions to determine the correct number for your size.
Once you have cast on your stitches, you can begin working the first row of the pattern. This will typically involve a combination of knitting and purling stitches, as well as increases or decreases to shape the kimono. Follow the pattern instructions carefully to ensure you are working the correct stitches and row counts.
Row 1: Knit.
Row 2: Purl.
Continue working the pattern rows as instructed until you have completed the desired length of the kimono. Along the way, you may need to make additional shaping adjustments or incorporate other stitch patterns, depending on the design of the kimono pattern you are using.
Remember to keep an eye on your tension and gauge as you work to ensure that your kimono is turning out as planned. If necessary, you can make adjustments to your needle size or tension to achieve the desired dimensions.
Creating the kimono body

The first step in creating your easy knit kimono is to knit the body. This is the main part of the kimono and determines its size and shape. To begin, you will need to cast on the required number of stitches, which will depend on your desired size. You can find the specific cast on instructions in the pattern.
Once you have cast on, you will start working the body of the kimono in a specific stitch pattern. This could be a simple garter stitch, stockinette stitch, or any other pattern mentioned in the pattern. It is important to follow the stitch pattern carefully, as it will create the texture and design of the kimono.
If the pattern suggests any shaping techniques, such as increasing or decreasing stitches, make sure to incorporate them at the specified points. These shaping techniques will help create the desired fit and silhouette of the kimono.
You will continue knitting the body until you reach the desired length, as mentioned in the pattern. This length can vary depending on your personal preference or the intended style of the kimono. Once you have reached the desired length, you can bind off the stitches to secure the body of the kimono.
Remember to weave in any loose ends or yarn tails from the cast on and bind off edges to ensure a neat and finished look. The body of your easy knit kimono is now complete and you are ready to move on to the next steps of the pattern, which may involve creating sleeves, adding finishing touches, or seaming the kimono together.
Knitting the sleeves
Knitting the sleeves of the kimono is an important step in completing this easy knit project. The sleeves add a stylish and functional element to the kimono, giving it a comfortable and relaxed fit. To ensure a seamless and professional finish, it is essential to follow the pattern instructions and be mindful of the placement and length of the sleeves.
First, start by casting on the required number of stitches for each sleeve. The pattern will typically provide you with the specific stitch count. As you knit the sleeves, you will be working in the round, either using double-pointed needles or a circular needle depending on your preference.
Once you have cast on, begin knitting the sleeves in the specified stitch pattern. This could be a simple stockinette stitch, a ribbed pattern, or any other stitch pattern indicated in the pattern. It is important to maintain an even tension and gauge throughout the knitting process to ensure that the sleeves match in size and appearance.
As you continue knitting, be sure to periodically try on the kimono to check the length of the sleeves. Adjust the length as necessary by either adding or decreasing the number of rows you knit. Remember that the sleeves should be slightly longer than your desired length to allow for any potential shrinkage or stretching that may occur after blocking.
Once the desired length is reached, you will need to bind off the stitches. This can be done using a simple bind off method or any other finishing technique recommended in the pattern. Ensure that the bind off is not too tight to allow for comfortable movement of the arms.
Repeat the above steps for the second sleeve, ensuring that both sleeves match in terms of length and appearance. Once the sleeves are completed, you can then move on to sewing them onto the kimono body using a mattress stitch or any other seaming technique specified in the pattern.
Knitting the sleeves of the easy knit kimono pattern requires attention to detail and precision to achieve a polished and professional finish. By following the pattern instructions and taking your time to knit the sleeves with care, you will be able to create a beautiful and stylish kimono that is both comfortable and fashionable.
Adding finishing touches
Once you have finished knitting your kimono, it’s time to add the finishing touches to complete the look. These final steps will enhance the overall appearance and ensure that your kimono is ready to be worn or gifted.
First, block your kimono to give it a polished finish. This involves wetting the garment and gently stretching it to the desired dimensions. Use blocking mats or towels to shape the kimono and allow it to dry completely before moving on to the next step.
1. Sew in loose ends: Take the time to sew in any loose ends from the knitting process. This will create a clean and professional look, as well as prevent any unravelling in the future.
2. Add a closure: Decide how you want your kimono to close – whether it be with buttons, a hook and eye closure, or a knitted tie. Sew on the closures securely, making sure they are evenly spaced and aligned.
3. Embellish with trim: Consider adding some decorative trim to your kimono for a personalized touch. It could be a lace trim, fringe, or even some embroidered details. Sew the trim onto the edges or cuffs of the kimono to elevate its overall design.
4. Personalize with a label: If you’re making the kimono as a gift or for yourself, adding a personalized label is a nice finishing touch. Use fabric or woven labels to sew onto the interior of the kimono, showcasing your name or a special message.
5. Finishing touches for a professional look: Steam the kimono to remove any wrinkles and give it a polished appearance. Check for any loose threads or imperfections, and fix them as necessary. Finally, give the kimono a thorough inspection to ensure it meets your expectations before wearing or gifting it.
By following these steps and adding these finishing touches, you can take your knit kimono from a simple project to a beautifully finished garment. Enjoy wearing or gifting your creation with pride!
Customization options and variations
The easy knit kimono pattern offers a variety of customization options and variations to suit your personal style and preferences. Whether you are an experienced knitter or a beginner, you can easily modify the pattern to create a kimono that is uniquely yours.
Size customization:
The pattern provides instructions for multiple sizes, allowing you to choose the perfect fit for your body shape. Whether you prefer a loose and flowy kimono or a more fitted silhouette, you can easily adjust the measurements to create a kimono that flatters your figure.
Color and yarn variations:
With the easy knit kimono pattern, you have the freedom to choose any color and type of yarn you like. Whether you prefer bold, vibrant hues or soft, muted tones, you can select yarn that matches your personal style. Additionally, you can experiment with different yarn weights and textures to achieve the desired drape and texture for your kimono.
Pattern modifications:

If you want to add your own personal touch to the kimono, you can easily modify the pattern. You can incorporate different stitch patterns, such as cables or lace, to create unique textures and designs. You can also add embellishments, such as buttons, beads, or embroidery, to enhance the aesthetic appeal of the kimono.
- You can choose to add pockets to the kimono for added functionality.
- Adding a belt or tie closure can give the kimono a more defined waistline.
- You can adjust the length of the kimono to make it shorter or longer, depending on your preference.
With the easy knit kimono pattern, the possibilities for customization are endless. Whether you want to create a one-of-a-kind piece for yourself or make personalized gifts for your loved ones, this pattern allows you to unleash your creativity and create knitted masterpieces.
Tips and Tricks for Knitting the Easy Knit Kimono Pattern
Knitting the Easy Knit Kimono Pattern can be a fun and rewarding project. To help you along the way, we have compiled a list of tips and tricks that will make the process smoother and more enjoyable.
1. Use the right yarn and needles: Make sure to choose a yarn and needle size that is recommended in the pattern. This will ensure that your kimono turns out the right size and has the desired drape. If you use a different yarn or needles, your kimono may not fit properly or have the desired look.
2. Take accurate measurements: Before you start knitting, take accurate measurements of your body. The pattern will provide guidance on the sizes available, so measure yourself accordingly. This will help you choose the right size and make any necessary adjustments to the pattern.
3. Read the entire pattern before starting: Before you begin knitting, carefully read through the entire pattern. This will give you a clear understanding of the steps involved and help you anticipate any tricky sections. It will also allow you to make any necessary modifications or adjustments in advance.
4. Use stitch markers: Stitch markers are a great tool to help you keep track of your stitches and pattern repeats. They can be especially helpful in this kimono pattern, as there may be sections where you need to repeat a certain number of stitches. By using stitch markers, you can easily keep track of your progress and ensure that you maintain the correct stitch count.
5. Take breaks and rest your hands: Knitting can be repetitive and can strain your hands and wrists. Make sure to take regular breaks and stretch your hands to prevent fatigue and discomfort. This will also help you maintain a consistent tension throughout your knitting.
6. Don’t be afraid to ask for help: If you encounter any difficulties or have questions about the pattern, don’t hesitate to ask for help. There are many online knitting communities and forums where you can find support and advice from experienced knitters. You can also reach out to the designer of the pattern for clarification or guidance.
By following these tips and tricks, you can be sure to have a successful knitting experience with the Easy Knit Kimono Pattern. Remember to enjoy the process and take pride in your finished kimono!