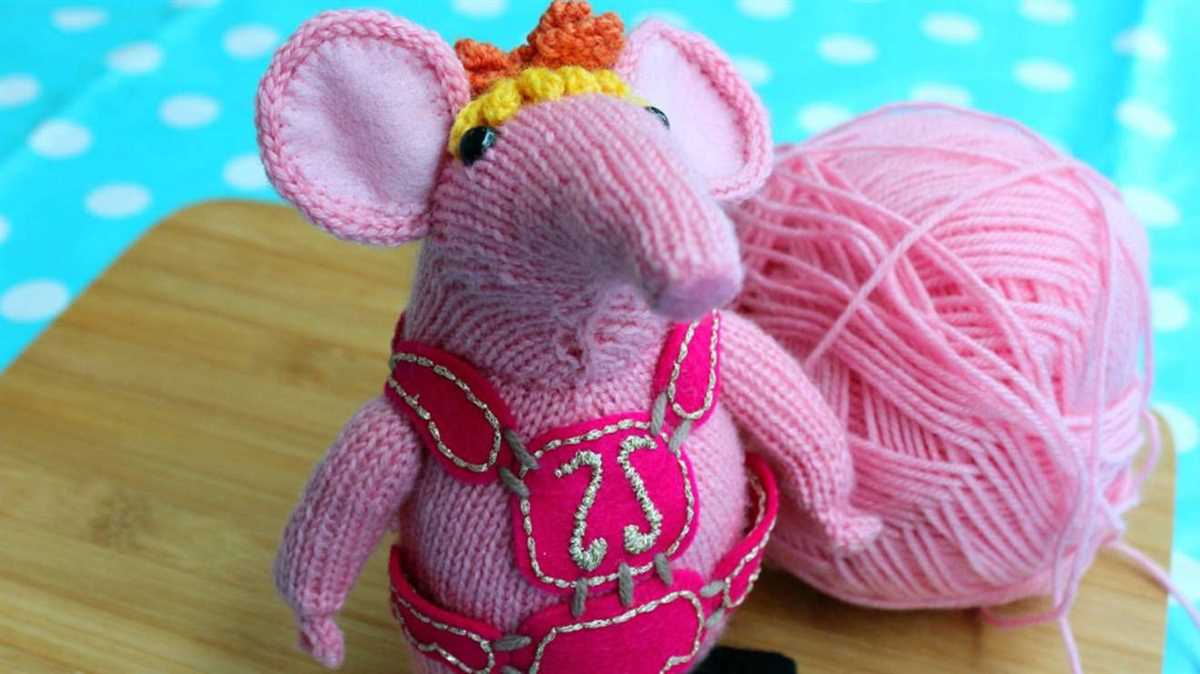
Knit Your Own Clangers for Free with This Pattern

If you’re a fan of the British children’s television show The Clangers, then you’re in luck! We have a free knitting pattern that will allow you to create your very own Clangers toys. The Clangers, a family of tiny, pink mouse-like creatures, have been delighting children and adults alike since the show first aired in 1969. With our knitting pattern, you can bring these lovable characters to life and add a touch of nostalgia to your home.
The pattern includes instructions for knitting the Clangers’ bodies, heads, arms, and ears. You can choose to make the Mom Clanger, Dad Clanger, or the adorable Baby Clanger. The finished toys measure approximately 5 inches tall, making them the perfect size for cuddling or displaying on a shelf. The pattern is suitable for intermediate knitters, but beginners can give it a try with a little patience and practice.
Knitting your own Clangers is not only a fun and creative project, but it also allows you to customize the colors and details to make each one unique. You can use any yarn of your choice, whether it’s a soft pastel shade like the original Clangers or a vibrant color that reflects your own personal style. Once you’ve finished knitting, you can add additional details like eyes, noses, and clothing to give your Clangers even more personality.
So why not channel your inner child and start knitting your very own Clangers today? With our free pattern, you’ll have a delightful set of toys that will bring back memories and provide hours of enjoyment for both yourself and your loved ones.
Free Clangers Knitting Pattern

If you are a fan of the Clangers, then you’re in luck! We have a free Clangers knitting pattern that you can use to create your very own Clanger characters. Whether you want to make Major Clanger, Mother Clanger, or even the Soup Dragon, this pattern has got you covered.
The Clangers are a beloved British children’s television series that first aired in 1969. The show features a family of small, mouse-like creatures living on a small blue planet in space. They communicate in whistles and live in caves made of scrap metal. The Clangers have become iconic characters and are loved by both children and adults.
To get started with the free Clangers knitting pattern, you will need some basic knitting skills and supplies. The pattern provides step-by-step instructions on how to knit each character, including the necessary stitches and techniques.
Once you have completed your Clanger, you can customize it with different colors and accessories to make it unique. You can also experiment with different yarn types to give your Clanger a soft and cuddly feel. The possibilities are endless!
If you’re looking for a fun and nostalgic knitting project, the free Clangers knitting pattern is the perfect choice. You can create your own little Clanger family and bring the magic of the show into your home. So grab your knitting needles and get started on this adorable project today!
What are Clangers?

Clangers are a group of small, pink, mouse-like creatures that live on a small blue planet. They have become popular characters in children’s television and have gained a cult following among adults as well. The Clangers were created by Oliver Postgate and Peter Firmin in the 1960s, and the original series ran from 1969 to 1972.
The Clangers communicate through a series of whistles and are known for their love of soup. They live in a crater on their planet and have a unique way of life. They have a spaceship-like structure called the “Saggy Baggy,” which they use to travel around their planet and explore the cosmos.
The Clangers have distinctive features, such as their long, pointed noses and soft, woolly bodies. They are often depicted wearing knitted clothes, which adds to their charm. The Clangers are friendly and peaceful creatures who encounter various adventures and challenges in their everyday lives.
Since their original series, the Clangers have been revived and brought back to television screens in 2015. They continue to capture the imaginations of both children and adults, and their knitting patterns have become popular among fans who want to recreate their beloved characters.
Why Knit Clangers?

Knitting Clangers can bring joy and nostalgia to both experienced knitters and beginners alike. The lovable Clangers characters, with their unique and quirky personalities, have been a beloved part of British television since the 1960s. By knitting your own Clangers, you’ll not only be able to create a charming toy or decoration, but also connect with a piece of British pop culture history.
Knitting Clangers provides an opportunity to showcase your knitting skills and creativity. The patterns for Clangers often involve intricate stitches and techniques, allowing knitters to challenge themselves and improve their abilities. From the small details on the Clangers’ faces to the tiny clothes they wear, each project requires attention to detail and precision. By knitting Clangers, you can showcase your talent and create a unique and special piece that can be cherished for years to come.
Not only is knitting Clangers a fun and creative hobby, but it also offers a sense of accomplishment. Seeing the finished Clanger come to life, with its bright colors and adorable features, can bring a great sense of pride and satisfaction. Knitting Clangers can also be a great way to relax and unwind after a long day, as the repetitive motions of knitting can be soothing and calming. The act of creating something with your own hands can be incredibly rewarding, and knitting Clangers allows you to do just that.
Furthermore, knitting Clangers can be a wonderful way to give a thoughtful and handmade gift to a loved one. Whether it’s a Clanger toy for a child or a Clanger ornament for a Clangers fan, the time and effort put into knitting a Clanger adds an extra touch of love and care. Handmade gifts have a special charm and sentimental value that can’t be replicated by store-bought items. By knitting Clangers, you can give a one-of-a-kind gift that will be treasured and appreciated.
In conclusion, knitting Clangers not only allows you to connect with a beloved piece of British pop culture, but also provides an opportunity to showcase your knitting skills, find joy in creativity, experience a sense of accomplishment, and give meaningful handmade gifts. So grab your knitting needles and start creating your very own Clangers today!
Materials Needed
To make a free clangers knitting pattern, you will need the following materials:
- Yarn: Choose a soft and durable yarn in colors of your choice. The original Clangers are made in pale pink, blue, and silver, but you can get creative with your colors.
- Knitting Needles: Select a pair of knitting needles that are suitable for the yarn you have chosen. The recommended size is typically mentioned on the yarn label.
- Tapestry Needle: This needle will be used to sew different parts of the Clangers together and weave in any loose ends.
- Toy Stuffing: To give your Clanger a soft and cuddly feel, you will need some toy stuffing. You can find this at craft stores or online.
- Buttons and Embroidery Thread: If you want to add any facial features or decorations to your Clangers, you can use buttons and embroidery thread. These can be used for eyes, mouths, and other details.
Once you have gathered all the necessary materials, you will be ready to start knitting your very own Clangers using the free knitting pattern. Make sure to follow the instructions carefully and take your time to create a high-quality Clanger toy.
Getting Started

Before starting your knitting project for the Free Clangers knitting pattern, it’s important to gather all the necessary materials and review the instructions thoroughly. Having everything prepared and understanding the pattern will help ensure a smooth and enjoyable knitting experience.
Materials:
- Knitting needles (size may vary depending on personal preference and desired gauge)
- Yarn (specific type and color as indicated in the pattern)
- Tapestry needle (for weaving in ends)
- Scissors
- Stitch markers (optional, but can be helpful for keeping track of stitches)
Instructions:
- Begin by casting on the required number of stitches as specified in the pattern. You may use any cast-on method you are comfortable with.
- Follow the pattern instructions step-by-step, knitting and purling as indicated. Take your time to ensure accuracy and pay attention to any special stitches or techniques mentioned.
- If the pattern requires shaping, such as decreasing or increasing stitches, make sure to follow the instructions precisely to achieve the desired shape and size.
- Continue knitting according to the pattern until the desired length or number of rows is reached.
- Once you have completed the pattern, finish off by binding off all stitches. Again, you can use any method you prefer.
- Weave in any loose ends with a tapestry needle to ensure a neat finish.
With these basic instructions in mind, you are ready to start your Free Clangers knitting project. Remember to have fun and enjoy the process of creating your own adorable Clangers!
Basic Knitting Techniques

Knitting is a craft that has been practiced for centuries, and it continues to be popular today. Whether you are a beginner or an experienced knitter, it is important to master the basic techniques in order to create beautiful and well-crafted projects. Here are some of the fundamental techniques every knitter should know.
Casting On
The process of casting on is how you start your knitting project. There are several different methods for casting on, including the long-tail cast-on, the knitted cast-on, and the cable cast-on. Each method creates a different edge and has its own advantages and uses.
Knit Stitch
The knit stitch is the most basic stitch in knitting. It is used to create the smooth, “V” shaped fabric that is characteristic of knitted items. To knit a stitch, you insert the right-hand needle into the front of the stitch on the left-hand needle, wrap the working yarn around the right-hand needle, and pull the new loop through the old stitch.
Purl Stitch

The purl stitch is the reverse of the knit stitch and creates a bumpy texture on the fabric. It is used to create ribbing, stocking stitch, and other stitch patterns. To purl a stitch, you insert the right-hand needle into the front of the stitch on the left-hand needle, wrap the working yarn around the right-hand needle from back to front, and pull the new loop through the old stitch.
Increasing and Decreasing
Increasing and decreasing are essential techniques for shaping your knitting. Increasing adds stitches to your work, while decreasing removes stitches. There are many different methods for increasing and decreasing, such as yarn over, knit two together, and slip, slip, knit. These techniques allow you to create shaping for garments, socks, and other knitted items.
Binding Off

Binding off, also known as casting off, is the final step in completing your knitting project. It creates a neat edge and prevents the stitches from unraveling. To bind off, you knit two stitches, then pass the first stitch over the second stitch and off the needle. Repeat this process until you have one stitch remaining, then cut the yarn and pull it through the last stitch to secure it.
Finishing

After you have bound off your knitting, there are still a few finishing touches to complete. This may include sewing seams, weaving in loose ends, and blocking the finished piece. Blocking involves shaping the knitted fabric to the desired dimensions and allowing it to dry, which can help even out the stitches and improve the overall appearance of the project.
By mastering these basic knitting techniques, you will have a solid foundation for creating a wide range of knitted items. With practice and patience, you can develop your skills and tackle more complex patterns and designs.
Knitting the Clanger Body
When knitting the Clanger body, it is important to follow the free knitting pattern provided. The pattern will guide you through each step and ensure that your Clanger turns out just right. Start by casting on the specified number of stitches using the recommended yarn and needle size. This will form the foundation of your Clanger’s body.
Next, you will begin knitting in the round to create the cylindrical shape of the Clanger body. This is typically done using circular needles, but double-pointed needles can also be used. Knit each round according to the pattern, taking care to keep your tension consistent throughout. This will help ensure that your Clanger has a smooth and even appearance.
As you continue knitting, you may need to switch colors or incorporate additional elements, such as stripes or texture. Follow the pattern instructions for these variations, making sure to change yarns or stitch patterns as directed. This will give your Clanger a unique and playful look.
Once you have completed all the rounds specified in the pattern, you will reach the desired height for your Clanger’s body. Bind off your stitches and secure any loose ends. The body is now complete and ready to be stuffed or filled with your desired material, such as toy stuffing or cotton wool. Make sure to leave a small opening for this purpose.
Overall, knitting the Clanger body requires attention to detail and following the pattern instructions closely. By doing so, you can create a charming and adorable Clanger toy that will be cherished for years to come.
Knitting the Clanger Head
Knitting the head of a Clanger is a fun and creative project that allows you to bring these beloved characters to life. With a few simple knitting techniques, you can easily create a soft and cuddly head that will be the perfect addition to any Clanger toy or decoration.
Materials
Before you begin, gather your materials. You will need:
- DK weight yarn in pink or gray for the head
- Double-pointed knitting needles in a size appropriate for your yarn
- A set of stitch markers
- A tapestry needle for sewing the head together
- Toy stuffing
Instructions
- Cast on: Begin by casting on the required number of stitches for the size of Clanger head you want to make. This can vary depending on the size of your needles and yarn weight. Use the long-tail cast on method for a neat edge.
- Knit in the round: Join the cast-on stitches in a circle and place a stitch marker to mark the beginning of the round. Knit each round in a continuous spiral until the head reaches the desired height.
- Shaping: To shape the head, you can increase or decrease stitches as needed. For example, to create the Clanger’s characteristic pointed top, you can gradually decrease stitches towards the center of the head. Follow the pattern or use your own creativity to shape the head to your liking.
- Finishing: Once the head is the desired shape and height, bind off all stitches. Cut the yarn and leave a long tail for sewing. Use a tapestry needle to sew the top of the head closed. Stuff the head firmly with toy stuffing, making sure to shape it as you go. Sew the bottom of the head closed, securing the stuffing inside.
By following these simple steps, you can create a charming Clanger head that will bring joy to both children and fans of the show. Whether you’re making it as a toy, a decoration, or a gift, the knitted Clanger head is sure to be a hit!
Knitting the Clanger Arms

When knitting a Clanger, one of the key components that brings these lovable characters to life are their arms. Knitting the Clanger arms requires attention to detail, as they need to be just the right size and shape to fit with the overall design.
To start, gather your materials including your preferred color of yarn and knitting needles. You will also need a yarn needle to sew the arms onto the body of the Clanger once they are complete.
Begin by casting on the required number of stitches for the arm, following the pattern instructions. You may need to use double-pointed needles or a circular needle, depending on the pattern. Pay close attention to any shaping required, such as increases or decreases, to ensure the arms have the correct shape.
As you work through the rows, remember to regularly check your tension to ensure an even consistency. This is especially important for the arms as you want them to be the same size and shape.
Once you have completed the required number of rows, it’s time to finish off the arms. This usually involves binding off the stitches and cutting the yarn, leaving a long tail for sewing.
Carefully sew the arms onto the body of the Clanger, making sure they are evenly placed and securely attached. This will ensure that the arms can be posed in different positions and will not easily come loose.
Finally, take a step back and admire your handiwork. The Clanger arms are an essential part of the overall design and bring these beloved characters to life. Whether you are knitting a Clanger for yourself or as a gift for someone else, the arms will be a key detail that will add charm and character to your creation.
Knitting the Clanger Legs
When knitting the clanger legs, it’s important to pay attention to the details in order to achieve the perfect look for your knitted Clanger toy. Various techniques can be used to create the legs, from simple stockinette stitch to more intricate cable or lace patterns.
Materials: To knit the Clanger legs, you will need a pair of knitting needles suitable for the yarn you choose, as well as a tapestry needle for weaving in ends. The type of yarn you use will depend on your personal preference, but a lightweight yarn in a color that matches your Clanger’s body is typically recommended.
Pattern: There are several patterns available online for knitting Clanger legs, ranging from basic to more complex designs. One popular pattern involves knitting the legs in the round using double-pointed needles. This creates a seamless look and eliminates the need for seaming.
Techniques: When knitting the Clanger legs, it’s important to maintain an even tension to ensure that the stitches are uniform and the finished legs look symmetrical. You may want to practice knitting a swatch before starting the legs to familiarize yourself with the pattern and check your gauge.
Finishing: Once the legs are knitted, you can stuff them lightly with fiberfill or other stuffing material to give them shape and structure. After stuffing, close the bottom of each leg using a tapestry needle and matching yarn. Be sure to securely weave in any loose ends to prevent unraveling.
In conclusion, knitting the Clanger legs can be a fun and satisfying project for knitters of all skill levels. Whether you choose a simple or more complex pattern, the key is to take your time and pay attention to the details. With a little patience and creativity, you can create adorable Clanger legs that will bring your knitted toy to life.
Assembling the Clanger

Once you have finished knitting all the individual pieces of your Clanger, it’s time to assemble them together. Follow these steps to bring your Clanger to life:
- Sew the body pieces together: Start by sewing the front and back body pieces together along the side and bottom edges. Use a whip stitch or any other method you prefer. Leave the top edge open for stuffing.
- Stuff the body: Fill the body of the Clanger with polyester fiberfill or any other stuffing material of your choice. Make sure to stuff it firmly, but not too tightly.
- Sew the top of the body: Once the body is stuffed, sew the top edge closed using the same method you used earlier.
- Attach the head: Sew the head piece to the top of the body, aligning the edges. Again, use a whip stitch or any other method you prefer.
- Sew the arms and legs: Attach the arms and legs to the sides of the body using a whip stitch. Make sure they are evenly spaced and securely attached.
- Add details: Finally, add all the cute details that make the Clanger come to life. Sew on the ears, eyes, nose, and any other embellishments you desire.
Congratulations! You have successfully assembled your Clanger. Now you can proudly display it as a fun and adorable decoration or gift it to a friend or loved one. Enjoy the satisfaction of seeing your knitting project come together in a delightful and charming way!
Q&A:
Where can I find free Clangers knitting patterns?
You can find free Clangers knitting patterns on various websites and knitting communities. Some popular options include Ravelry, LoveKnitting, and Pinterest. Simply search for “free Clangers knitting pattern” and you should be able to find a range of options to choose from.
Are there any specific materials required for knitting Clangers?
Yes, to knit Clangers, you will typically need a set of double-pointed knitting needles, preferably in a size appropriate for the yarn you are using. You will also need a darning needle for sewing the various parts together and stuffing for the Clangers’ bodies. The specific yarn and colors will depend on the pattern you choose to follow.
How difficult is it to knit Clangers?
The difficulty level of knitting Clangers can vary depending on your knitting skills and the pattern you choose. Some patterns may be more beginner-friendly, while others may require more advanced techniques such as colorwork or shaping. It is always a good idea to read through the pattern and any instructions or stitches you may be unfamiliar with before starting the project.
Can I sell Clangers that I knit using free patterns?
The copyright for each knitting pattern may vary, so it’s important to check the specific terms and conditions provided by the designer. Some free patterns may allow you to sell the finished Clangers, while others may only permit personal use. If in doubt, it’s best to reach out to the pattern designer directly for clarification.