Unique Row Knitting Patterns

Knitting is a wonderful craft that allows you to create beautiful, one-of-a-kind pieces. One of the basic techniques in knitting is working in rows. Rows knitting patterns are versatile and can be used to create a wide variety of projects, from scarves and blankets to sweaters and hats. They are perfect for beginners who are just starting to learn how to knit, as well as for more advanced knitters looking for a quick and easy project.
Rows knitting patterns are characterized by the repetition of a pattern across each row. This creates a structured and uniform look to the finished piece. Some popular row knitting patterns include the garter stitch, stocking stitch, and seed stitch. Each pattern creates a different texture and appearance, allowing you to customize your project to your liking.
One great thing about rows knitting patterns is that they can be easily modified to suit your needs. You can adjust the number of stitches and rows to make a project larger or smaller, or you can experiment with different colors and yarn weights to create a unique design. The possibilities are endless when it comes to rows knitting patterns.
Basic knitting stitches for rows patterns

When it comes to knitting, learning the basic stitches is essential. Whether you’re a beginner or an experienced knitter, mastering these stitches will allow you to create a wide range of beautiful rows patterns. Here are some of the most common basic stitches you’ll need to know:
Garter stitch

The garter stitch is the most basic stitch in knitting. It is created by knitting every row, resulting in a fabric that has a ridged texture. The garter stitch is perfect for simple rows patterns like scarves and blankets, as it creates a reversible fabric that lies flat and is stretchy.
Stockinette stitch
The stockinette stitch is another fundamental stitch that is often used in rows patterns. It is created by knitting one row and purling the next, resulting in a smooth fabric with a “v” pattern on one side and a purl bump texture on the other. The stockinette stitch is commonly used for sweaters, hats, and other garments.
Rib stitch
The rib stitch is a versatile stitch that is commonly used for creating rows patterns with textured or stretchy sections. It is created by alternating knit stitches and purl stitches in a regular pattern. The rib stitch can create various effects, such as a stretchy fabric or a ribbed texture. It is often used for cuffs, hems, and borders.
Seed stitch

The seed stitch is a simple stitch pattern that creates a textured fabric with a raised dotted effect. It is created by alternating knit and purl stitches in a row, and then switching the pattern in the next row. The seed stitch is great for adding texture and interest to rows patterns like scarves, dishcloths, and baby blankets.
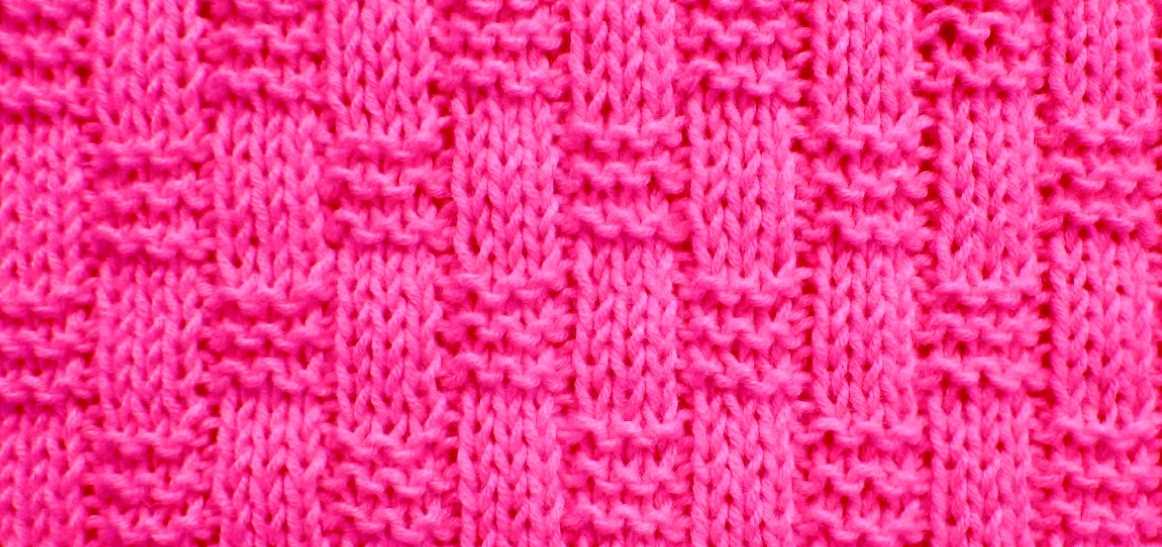
Moss stitch
The moss stitch is similar to the seed stitch but has a denser texture. It is also created by alternating knit and purl stitches, but the pattern is repeated for multiple rows before switching. The moss stitch creates a fabric with a bumpy texture and is often used for rows patterns like hats, cowls, and mittens.
These basic knitting stitches are the building blocks for many rows patterns. By mastering these stitches, you’ll have the skills to create a variety of beautiful and unique knitted pieces.
Garter Stitch

Garter stitch is a basic knitting pattern that is perfect for beginners. It is created by knitting every row, resulting in a fabric with ridges that run horizontally. The texture of garter stitch is squishy and reversible, making it a popular choice for scarves, blankets, and other cozy projects.
To knit in garter stitch, all you need to do is knit every stitch, whether you are working on the right side or wrong side of your project. This makes garter stitch an easy and relaxing pattern to work on, with no need to worry about purling or keeping track of stitch patterns.
The regular ridges created by garter stitch can be used to add interesting visual effects to your knitting. For example, you can change colors every few rows to create stripes, or experiment with different yarn weights and textures to create a textured fabric. The squishy nature of garter stitch also makes it a great choice for projects that require extra stretch and flexibility, such as hats or socks.
In addition to its simplicity, garter stitch is also a great pattern for practicing and honing your knitting skills. It helps you learn how to maintain an even tension and create neat edges, as the knit stitches on both sides of the fabric look the same. Garter stitch is also a great way to showcase the natural beauty of a yarn, as it has a tendency to highlight variegated or hand-dyed colors.
Stockinette Stitch
The stockinette stitch is one of the most basic and commonly used knitting stitches. It creates a smooth and flat fabric with a distinct right side (knit side) and wrong side (purl side). This versatile stitch is often used in various clothing items such as sweaters, scarves, hats, and socks.
To knit the stockinette stitch, one row is worked in knit stitches (knit side), while the next row is worked in purl stitches (purl side). By alternating these two basic stitches, the fabric is created with the smooth knit side facing outwards. This stitch pattern is achieved by working all odd-numbered rows as knit stitches and all even-numbered rows as purl stitches.
The stockinette stitch has many advantages. It has excellent drape and elasticity, making it suitable for a wide range of garments. It is also relatively easy to knit, even for beginners, as it only requires knowledge of the basic knit and purl stitches. Additionally, the stockinette stitch allows for various possibilities in terms of colorwork, texture, and shaping, making it a versatile choice for creating different patterns and designs.
However, one challenge of the stockinette stitch is that it tends to curl at the edges. This is due to the natural tendency of the knit stitches to pull the fabric towards the wrong side. To prevent excessive curling, it is common to include a border of a different stitch pattern, such as the garter stitch, or to add ribbing at the edges of the fabric. Blocking and proper tension can also help minimize the curling effect.
Simple rows knitting patterns

Knitting is a popular craft that allows you to create beautiful and unique garments and accessories. One of the most basic techniques in knitting is working in rows, where you knit or purl stitches in a straight line across your needles. There are many simple rows knitting patterns that you can try, whether you are a beginner or an experienced knitter.
Garter stitch: One of the simplest rows knitting patterns is the garter stitch. This pattern requires you to knit every row, creating a fabric with a bumpy texture. The garter stitch is great for creating scarves, blankets, and dishcloths.
Stockinette stitch: Another popular rows knitting pattern is the stockinette stitch. This pattern alternates between knitting one row and purling the next, creating a smooth and flat fabric. The stockinette stitch is commonly used for sweaters, hats, and socks.
- Seed stitch: The seed stitch is a simple rows knitting pattern that creates a textured fabric with a raised pattern. This pattern alternates between knitting one stitch and purling the next stitch across each row. The seed stitch is often used for scarves, baby blankets, and washcloths.
- Ribbing: Ribbing is a common rows knitting pattern used to create flexible and stretchy edges on garments. This pattern typically consists of alternating knit and purl stitches in a specific pattern, such as knitting two stitches and purling two stitches. Ribbing is commonly used for cuffs, collars, and hems.
- Moss stitch: The moss stitch is a variation of the seed stitch and creates a similar textured fabric. This pattern alternates between knitting two stitches and purling two stitches across each row. The moss stitch is often used for scarves, hats, and baby blankets.
These are just a few examples of simple rows knitting patterns that you can experiment with. Whether you are a beginner or an experienced knitter, working in rows allows you to create a variety of textures and patterns in your projects. Have fun exploring these patterns and creating beautiful knitted items!
Seed Stitch

The seed stitch is a simple and versatile knitting pattern that creates a richly textured fabric. It is often used for borders, cuffs, and edging, as well as for creating interesting surface designs. The seed stitch is characterized by alternating knit and purl stitches in a repetitive pattern. This creates a raised, bumpy surface that resembles scattered seeds, hence the name.
To knit the seed stitch, you will need an odd number of stitches. Start by knitting one stitch, then purling the next stitch. Repeat this pattern across the row until the end. On the next row, purl the first stitch, then knit the next stitch. Repeat this pattern across the row and continue alternating between knitting and purling stitches for each row.
The seed stitch is a great choice for beginners as it only requires knitting and purling, making it a simple and easy pattern to master. It also provides an excellent opportunity to practice tension control and maintaining an even stitch pattern. The seed stitch is also highly reversible, meaning it looks the same on both sides, making it ideal for projects where both sides are visible, such as scarves or blankets.
Due to its textured appearance, the seed stitch is often used to add interest and depth to plain or monotone projects. It can create a beautiful contrast when combined with other stitch patterns, such as ribbing or cables. By changing the color of the yarn or using variegated yarn, the seed stitch can produce stunning visual effects and make the pattern more visually appealing.
Ribbing
Ribbing is a common knitting technique used to create stretchy and elastic fabric. It is often used for cuffs, hems, and neckbands in garments, as well as for decorative borders in accessories. Ribbing is created by alternating knit and purl stitches in a specific pattern.
The most common ribbing pattern is called “1×1 rib” or “k1, p1 rib.” This means that you knit one stitch, then purl one stitch, and repeat this pattern across the row. The next row is worked the same way, knitting the knit stitches and purling the purl stitches. This creates a pattern of vertical ridges that is flexible and stretchy.
Ribbing can also be created with different stitch ratios, such as “2×2 rib” or “k2, p2 rib.” In this pattern, you knit two stitches, then purl two stitches, and repeat this pattern across the row. The next row is worked the same way, knitting the knit stitches and purling the purl stitches. This creates a wider rib with larger ridges.
Ribbing can be used as a design element to add texture and interest to a knitted piece. It can also be used to create a snug fit, as the stretchiness of the ribbing allows it to comfortably hug the body. Ribbing is commonly used in sweaters, socks, hats, and scarves, and can be worked in a variety of yarn weights and needle sizes.
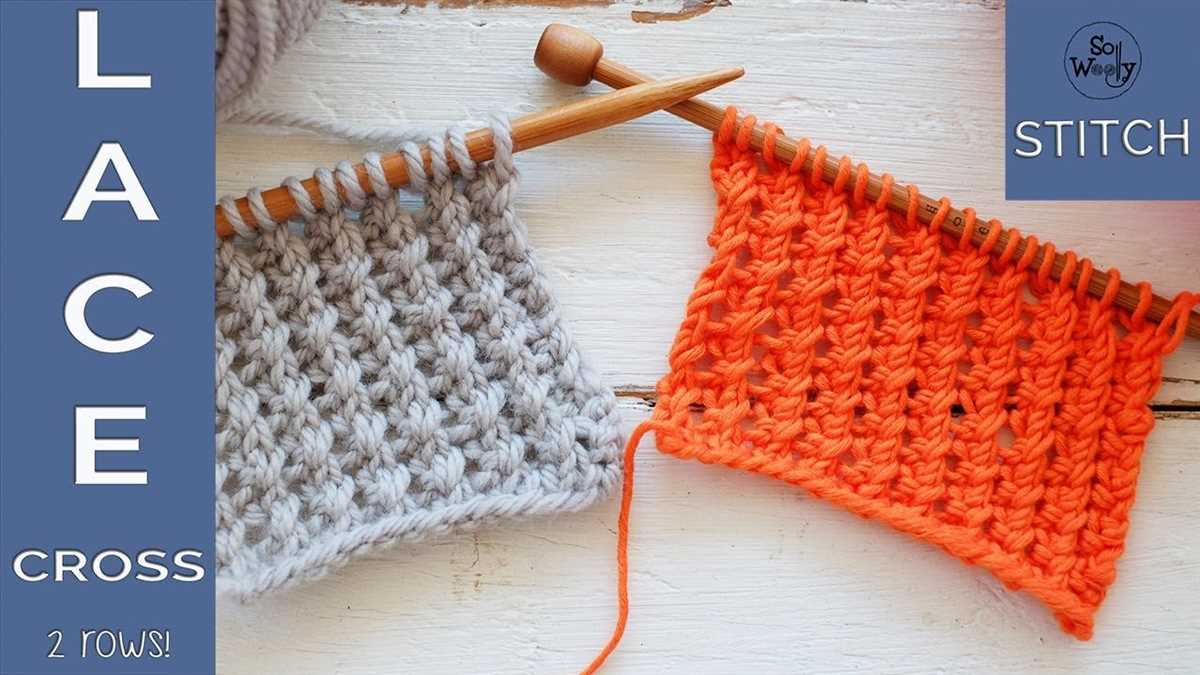
Lace Rows Patterns

If you’re a fan of delicate and intricate knitting patterns, lace rows patterns are perfect for you. Lace knitting is a beautiful technique that creates lacy and openwork designs, adding a touch of elegance to any project.
Lace rows patterns typically involve creating patterns with holes or eyelets that are formed by strategically placing yarn overs and decreases in your knitting. The result is a stunning fabric that is lightweight and breathable, making it ideal for garments and accessories.
One popular type of lace rows pattern is the feather and fan stitch, also known as the old shale pattern. This pattern creates a lovely wavy design that resembles the ruffled feathers of a fan. It’s often used in shawls, scarves, and even blankets to add a touch of elegance and texture.
Another stunning lace rows pattern is the leaf lace stitch. This pattern features intricate leaf motifs that are worked over a set number of rows. It’s often used in cardigans, sweaters, and even socks to create a nature-inspired look. The leaf lace stitch can be modified by adding additional leaves or changing the stitch count to create a customized design.
- The pine cone lace pattern is another intricate lace rows pattern that resembles the texture and shape of a pine cone. It’s often used in knitted accessories like hats and mittens to add a unique and eye-catching detail.
- The openwork lattice stitch is a classic lace rows pattern that creates a beautiful lattice-like design. It’s often used in lightweight garments like summer tops or openwork scarves to create a delicate and feminine look.
- The cable and lace stitch combines the complexity of cables with the delicacy of lace to create a unique and stunning pattern. It’s often used in sweaters or cardigans to add interest and texture to the design.
Whether you’re a beginner or an experienced knitter, lace rows patterns offer endless possibilities for creating stunning and intricate designs. With a wide variety of patterns available, you can choose one that suits your skill level and personal style to create beautiful lace projects that will impress everyone who sees them.
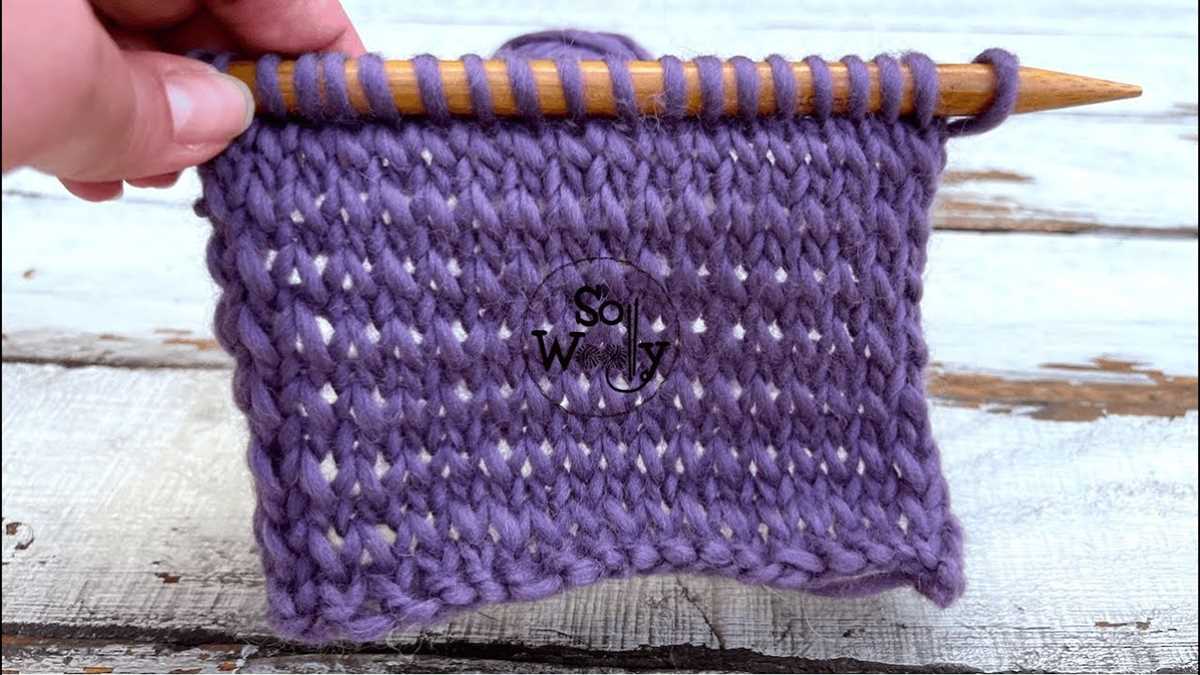
Eyelet Pattern

The eyelet pattern is a popular choice for knitters who want to create a delicate and lacy look in their projects. This pattern features small, decorative holes or “eyelets” that are created by strategically placed yarn overs and decreases. The result is a beautiful and airy fabric that can be used in a variety of projects, such as shawls, scarves, and even sweaters.
To create the eyelet pattern, knitters generally need to have a basic understanding of yarn overs and decreases. Yarn overs are simply created by wrapping the yarn around the needle, while decreases involve knitting or purling stitches together to decrease the total number of stitches on the needle. By combining these simple techniques in different ways, knitters can create a wide range of eyelet patterns with varying levels of complexity.
One popular eyelet pattern is the “feather and fan” stitch, which features a series of increases and decreases that create a wave-like effect. This pattern is often used to create beautiful edging on shawls and blankets. Another popular eyelet pattern is the “lace diamond” stitch, which features a series of yarn overs and decreases that create a diamond shape. This pattern is often used to create intricate lace panels in garments.
Knitters can experiment with different yarn weights and needle sizes to achieve different effects with the eyelet pattern. For a delicate and lightweight fabric, a fine yarn and small needles can be used. For a more substantial and textured fabric, a heavier yarn and larger needles can be used. The choice of yarn and needle size will ultimately depend on the project and the desired outcome.
In conclusion, the eyelet pattern is a versatile and elegant knitting technique that can be used to create a wide range of beautiful and lacy fabrics. With some basic knitting skills and an understanding of yarn overs and decreases, knitters can easily incorporate this pattern into their projects to add a touch of delicate beauty. Whether used in shawls, scarves, or garments, the eyelet pattern is sure to impress.
Chevron Lace Pattern
The chevron lace pattern is a classic knitting design that creates a beautiful zigzag motif. It is commonly used in a variety of knitting projects, including scarves, shawls, and blankets. The pattern is created by alternating decreases and increases to create the angled lines that form the chevron shape.
Materials:
- Yarn of your choice
- Appropriate knitting needles
- Tapestry needle
To create the chevron lace pattern, you will need to have a basic understanding of knitting techniques, including yarn overs, knit two together (k2tog), and slip slip knit (ssk). The pattern typically starts with a multiple of stitches to create a symmetrical design.
Here is a simple chevron lace pattern:
| Row | Instructions |
|---|---|
| 1 | Knit all stitches |
| 2 | Purl all stitches |
| 3 | K2tog, *yo, k1, yo, ssk, k2tog, repeat from * to last 3 stitches, yo, k1, yo, ssk |
| 4 | Purl all stitches |
| 5 | Knit all stitches |
| 6 | Purl all stitches |
Repeat these six rows until your desired length is reached. The chevron lace pattern can be easily customized by changing the number of repeats or adding additional pattern rows. Once you have mastered this basic pattern, you can experiment with different yarns and needle sizes to create unique variations of the chevron lace design.
Cable Rows Patterns
Cable rows are a popular knitting technique that adds texture and visual interest to your projects. By crossing stitches over each other, you can create intricate cable patterns that look complex but are actually quite simple to knit. Cable rows patterns can be used in a variety of knitting projects, such as sweaters, scarves, and hats, to add a unique touch and elevate your knitting skills.
One common cable rows pattern is the basic 4-stitch cable, which involves crossing two stitches over the middle two stitches. This creates a twist in the fabric that adds depth and dimension to your knitting. To knit this pattern, you’ll need to know how to work a cable needle, which is a short, double-pointed needle used to hold stitches while you cross them.
- Row 1: Knit 2 stitches, place next 2 stitches onto the cable needle and hold in front, knit the next 2 stitches from the left needle, then knit the 2 stitches from the cable needle.
- Row 2: Purl all stitches.
- Repeat these two rows until you’ve reached your desired length.
If you’re feeling more adventurous, you can try knitting more complex cable rows patterns, such as the honeycomb cable or the horseshoe cable. These patterns involve crossing multiple stitches over each other and require a bit more attention and skill. However, the end result is a stunning cable design that will impress everyone who sees your finished project.
When working with cable rows patterns, it’s important to keep track of your rows and stitches, especially when knitting larger projects. Using stitch markers and row counters can help you stay organized and ensure that your cable pattern stays on track. Additionally, using a cable needle with a slightly different size or material than your main knitting needles can help the stitches slide more easily, making the cable rows easier to manipulate.
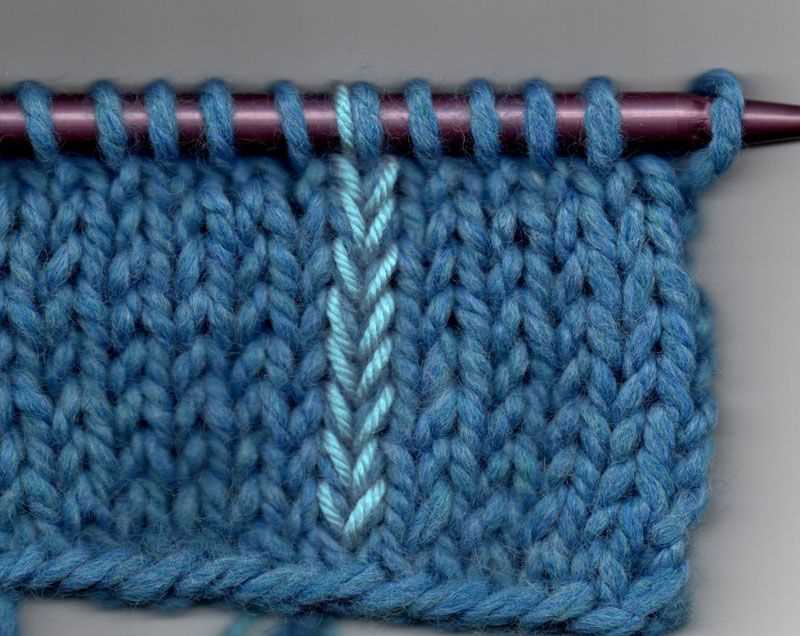
Basic Cable Stitch

The basic cable stitch is a classic knitting pattern that creates a beautiful interwoven design. It is a technique that adds dimension and texture to your knitting project, making it perfect for scarves, hats, and even sweaters. This stitch is achieved by crossing stitches over each other, creating the illusion of intertwined cables.
To create the basic cable stitch, you will need a cable needle or a double-pointed needle. Here is a step-by-step guide on how to knit the basic cable stitch:
- Step 1: Knit the desired number of stitches before starting the cable stitch.
- Step 2: Slip the next set of stitches onto the cable needle, holding it either in front or in the back of your work depending on the desired direction of the cable.
- Step 3: Knit the same number of stitches from the left-hand needle.
- Step 4: Knit the stitches from the cable needle, crossing them over the stitches you just knit.
- Step 5: Continue knitting the remaining stitches as usual.
By repeating these steps, you can create a beautiful cable stitch pattern that adds sophistication and elegance to any knitting project. You can experiment with different cable sizes and directions to achieve unique and intricate designs.
Once you have mastered the basic cable stitch, you can explore more complex cable patterns that incorporate twists, braids, and multiple crosses. The possibilities are endless, and the results are always stunning. So grab your knitting needles and give the basic cable stitch a try!
The Twisted Cable Stitch: A Classic and Beautiful Pattern
The twisted cable stitch is a classic knitting pattern that adds depth and texture to any project. It is created by crossing stitches over each other, resulting in a twisting, rope-like effect. This stitch is often used in cable knitting to create intricate designs and motifs.
To create the twisted cable stitch, you will need to work with a cable needle. This needle is used to hold stitches while you cross them over each other. By following a specific pattern, you can create stunning cables that give your project a visually appealing and professional finish.
The twisted cable stitch can be used in a variety of knitting projects, from scarves and hats to sweaters and blankets. It adds an element of complexity and elegance to any piece, making it a popular choice among knitters.
When working with the twisted cable stitch, it’s important to pay attention to the pattern and keep track of your rows. Mistakes can be difficult to fix once the cables are crossed, so it’s best to take your time and focus on each stitch.
In conclusion, the twisted cable stitch is a versatile and visually interesting pattern that can elevate your knitting projects to a new level. Whether you’re a beginner or an experienced knitter, incorporating this stitch into your repertoire will add depth and texture to your creations. So grab your cable needle and start experimenting with this classic knitting technique!